IT Automation
IT Process Automation, also known as Run Book Automation (RBA), is the process of orchestrating and integrating tools, people, processes, and more through automated workflow. It is the key to faster deployment thus reducing downtime from manual processes and human error. In a lot of cases, automation increases efficiency and decreases costs.
- Why IT automation is becoming a business necessity
- Site24x7 IT Automation Templates
- How it works
- Add an automation template
- IT automation logs
- Enabling and disabling IT Automation
- Security
- Licensing
Why IT Automation is becoming a Business Necessity?
Most IT departments spend around 50% of their time on repetitive manual maintenance tasks that occur due to unexpected configuration changes. That being the case, there is very less time spent on quick deployment of applications and moving the business ahead. This is where automation steps in.
Five major benefits of Automation:
- Increase Productivity
You can save time and money by eliminating the lag time between jobs and minimizing operator intervention. In some cases, you can reduce working hours from your process that lets you perform more work and significantly improve productivity. - High Availability
Today, with increased cloud computing, it is nearly unacceptable to have a system outage. With automation in place, IT operations can provide quick and timely rescue to performance degradation issues, ensuring high availability. - Reliability
Critical functions including releasing jobs, performing backups, ensuring communications and more will now be reliably executed by the automation tool, relieving the operations personnel from hours of tedious, boring and manual tasks. - Improve Performance
Every organization would aim at having their enterprise perform without any interruption. Although advancements help in doing this, there is always an equal dose of work demand, eventually exceeding the level of the company's capability. With automation, the same capacity can handle a greater amount of work. - Reduce Costs
How much would a system outage, a human error or redoing a complete operation affect your business? When compared to that, spending for an effective IT automation tool will actually help create a highly efficient and cost effective environment.
Site24x7 IT Automation Templates
Site24x7 offers a set of exclusive IT automation tools to auto-resolve performance degradation issues. It helps to proactively react to an event/incident rather than waiting for manual intervention. These tools help automate repetitive tasks and automatically remediate threshold breaches. The alarms engine continually evaluates the system events for which thresholds are set, and executes the mapped automation when there is a breach.
For example, a simple task like disk cleanup can be done automatically using one of the automation tools, server commands. Instead of manually moving logs from one disk partition to another when the disk is full, this action can be automated by using the mv command when the set threshold is breached.
How it Works?
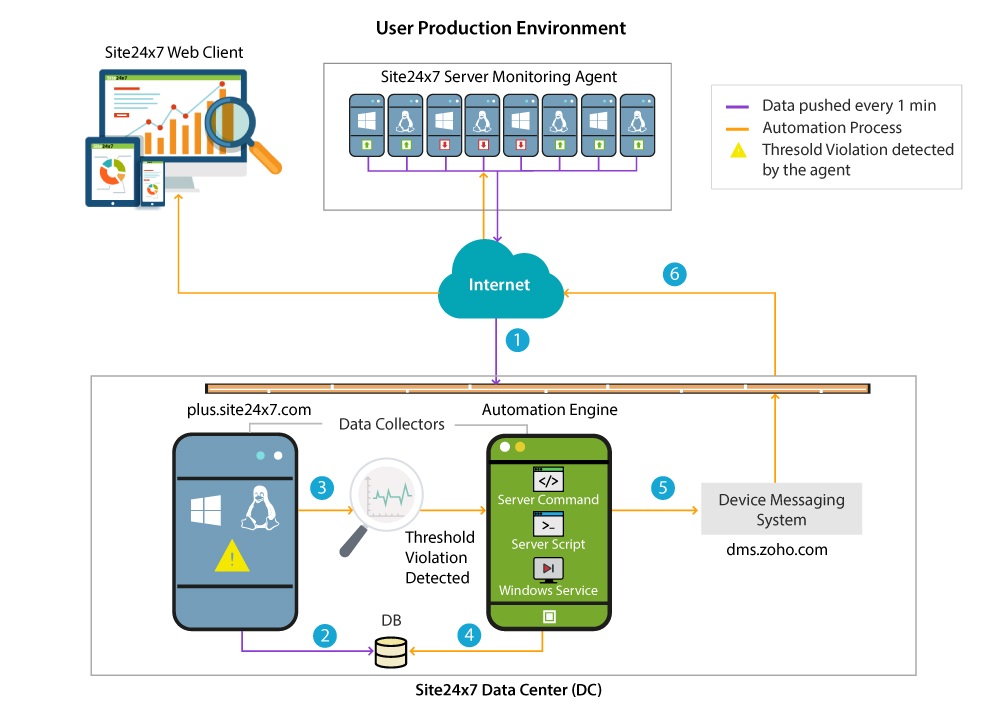
Automations except Invoke URL, Mark as Maintenance, Azure VMs, and various supported AWS service actions require a server monitoring agent installed in their machines to execute the automation configured. The automations will be handled and executed by the Site24x7 IT Automation Engine, a part of our data center.
The Site24x7 Server Monitoring agent installed in the user machine will communicate based on the user configured check frequency with our data center (DC). A user can setup threshold breach setting as part of their configuration settings. Following this, there will be a confirmation done by the DC in the database (DB) on the strategy options configured by the user. Based on this setting, if there is a threshold violation or monitor status change, the DC will send an alert to the user.
Once confirmed, the Site24x7 IT Automation Engine will identify the automations configured by the user. Simultaneously, alerts will be sent to the user informing about the outage. The Site24x7 IT Automation Engine will then communicate via device messaging system (DMS) and inform the server monitoring agent to execute the configured automation(s) and take the required corrective action(s).

In case of Invoke URL automation, an ‘user defined HTTP call back action’, popularly also known as a Webhook, will be initiated. While monitoring your website or web application from your configured locations or On-Premise Poller, Site24x7 will perform data collection based on the user configured check frequency. This data is pushed instantly to Site24x7’s DC. Based on the threshold breach setting, if the DC detects a threshold violation or monitor status change, it will trigger the Site24x7 IT Automation Engine, which in-turn will invoke the call back URL specified by you. Once the automation is triggered, messages like status of the monitors, RCA reports, or even outage comments will be posted to the hook URL.
In the case of Amazon Web Service (AWS) related automations, Site24x7 directly sends out authenticated requests to the resource using the AWS SDK. Just make sure the necessary write level permissions are present in the IAM policy assigned to the Site24x7 IAM user/role.
The automation(s) will be executed only the first time the threshold breach is detected.
Add an Automation Template
- Server Script
- Server Command
- Windows Service
- Hyper-V
- IIS
- Server Reboot
- Thread Dump/Heap Dump
- Invoke URL/REST API
- Mark as Maintenance
- Start or stop Azure VMs
- List of Amazon Web Service Actions
- Start, stop, or reboot VMware VMs
- Network automation via configuration templates (Configlets)
Once an automation is added, schedule these automations to be executed one after the other.
IT Automation Logs
You can view a detailed report of all your automations executed by date. Filter them out based on the Automation Type or Status for a better perspective.
Enabling and disabling IT Automation
Site24x7 provides a suite of IT Automation tools that aid in the automation of repetitive processes as well as the automatic remediation of threshold breaches. By enabling IT Automation, you can proactively react to an event or a breach without manual intervention.
By default, IT Automation will be disabled during installation if no argument has been set manually. You can opt to enable or disable IT Automation using the following steps.
If you have already installed a server monitor, you can manually check if IT Automation has been enabled or disabled.
Enabling and disabling IT Automation in Linux
While installing using commands:
- Log in to your Site24x7 account.
- Navigate to the Server tab on the left navigation pane.
- Click the + icon near the Servers tab under the Server Monitor drop-down.
- In the Add Server Monitor page, click the Linux icon.
- To enable IT Automation, execute the following command in the terminal:
wget
https://staticdownloads.site24x7.com/server/Site24x7InstallScript.sh
bash Site24x7InstallScript.sh -i -key=<Device Key> -automation=true
- To disable IT Automation, execute the following command in the terminal:
wget
https://staticdownloads.site24x7.com/server/Site24x7InstallScript.sh
bash Site24x7InstallScript.sh -i -key=<Device Key> -automation=false
If you want to change the configuration of the IT Automation module in an already-installed agent, you have to reinstall it. You can opt to enable or disable IT Automation using the respective commands.
While reinstalling using commands:
- Download the Site24x7_Linux_64bit.install file.
(https://staticdownloads.site24x7.com/server/Site24x7_Linux_64bit.install) - Go to the download path in the terminal.
- To enable IT Automation, execute the following command in the terminal:
bash Site24x7_Linux_64bit.install -ri -automation=true
- To disable IT Automation, execute the following command in the terminal:
bash Site24x7_Linux_64bit.install -ri -automation=false
Enabling and disabling IT Automation in Windows
If you use Windows, you can configure this setting during installation using InstallShield or commands.
While installing using InstallShield:
- Log in to your Site24x7 account.
- Navigate to the Server tab on the left navigation pane.
- Click the + icon near the Servers tab under the Server Monitor drop-down.
- In the Add Server Monitor page, click the Windows icon.
- Click Download Site24x7 Windows Server Agent.
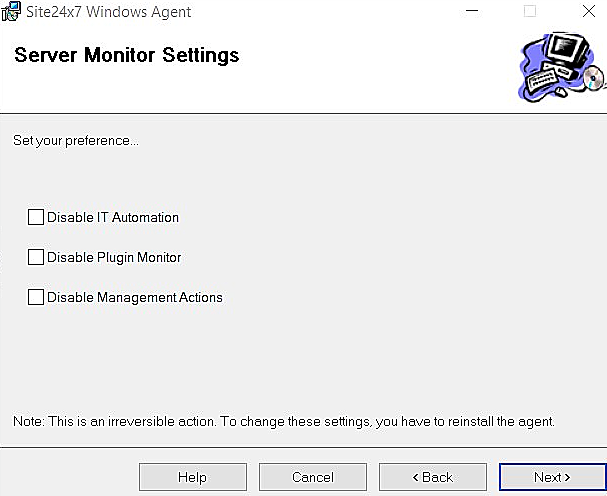
- Double-click the MSI file on the download panel and click Next.
- By default, IT Automation will be disabled. You can uncheck the box next to IT Automation to enable automation.
- Click Next and complete the installation process.

While installing using commands:
- Log in to your Site24x7 account.
- Navigate to the Server tab on the left navigation pane.
- Click the + icon near the Servers tab under the Server Monitor drop-down.
- In the Add Server Monitor page, click the Windows icon.
- Click Download Site24x7 Windows Server Agent.
- Go to the download path in the Command Prompt.
- To enable IT Automation, execute the following command:
msiexec.exe /i Site24x7WindowsAgent.msi EDITA1=<Device Key> ENABLESILENT=YES REBOOT=ReallySuppress AUTOMATION=TRUE /qn
- To disable IT Automation, execute the following command:
msiexec.exe /i Site24x7WindowsAgent.msi EDITA1=<Device Key> ENABLESILENT=YES REBOOT=ReallySuppress AUTOMATION=FALSE /qn
While reinstalling using commands:
- Download the Site24x7WindowsAgentInstaller.exe file.
(https://staticdownloads.site24x7.com/server/Site24x7WindowsAgentInstaller.exe) - Go to the download path in the Command Prompt.
- To enable IT Automation, execute the following command:
Site24x7WindowsAgentInstaller.exe -ri --plugins=TRUE --automation=TRUE
- To disable IT Automation, execute the following command:
Site24x7WindowsAgentInstaller.exe -ri --plugins=TRUE --automation=FALSE
This is how you can enable or disable IT Automation for a server agent.
Security
Only an Admin or a Super Admin can add a new or update an existing IT Automation Template, thus allowing you to decide who can run what automation.
- For Server Script automation,
- The files uploaded by a user is sent to the Site24x7 Data Center and stored in the Zoho File Systems. During execution, the agent will download this file using a secured HTTPS connection.
- If only the file path is mentioned, the meta data is accessed and the required automation is executed.
- For Server Command automation, the commands given by the user will be stored in the database (DB) present in the Site24x7 Data Center. When a threshold violation occurs, this data would be sent to the agent for executing the automation.
- For all the other automations including IIS, Hyper-V, Server Reboot, etc., only the meta data is accessed for executing the given actions.
Users can choose to disable the IT Automation feature while installing the agent, so that no automation action is executed by the agent. By default, this option is enabled in the agent. Read more about agent security.
Licensing
You can add a maximum of 100 automations per Site24x7 account.
Don't find the automation tool you need? Click on Suggest a New Automation and post your requirement in our Community Forum
