Microsoft 365 Monitoring
Add a Microsoft 365 monitor and monitor performance metrics including the service status of Exchange, mail traffic, Skype, SharePoint and more.
Microsoft 365 monitoring is agentless and users need not share their credentials directly with Site24x7. Once login is completed in the Microsoft portal, an app called Site24x7 is registered in the user's Microsoft 365 account, with Read-only permission. The access tokens (generated from the Windows Graph API requests) are used to fetch data from the user's Microsoft 365 account, that is presented in the Site24x7 web client.
- Prerequisites
- Add a Microsoft 365 monitor: Using Site24x7 App | Custom App
- Data collection for Microsoft 365 monitor
- Licensing
- Troubleshooting Tips
Prerequisites
- The user should have a Global Admin role in their Microsoft 365 account.
- The user account provided should be a Licensed account.
Add a Microsoft 365 Monitor
- Log in to Site24x7 and go to Server > Microsoft 365 (+).
- Enter a Display Name for identification purposes.
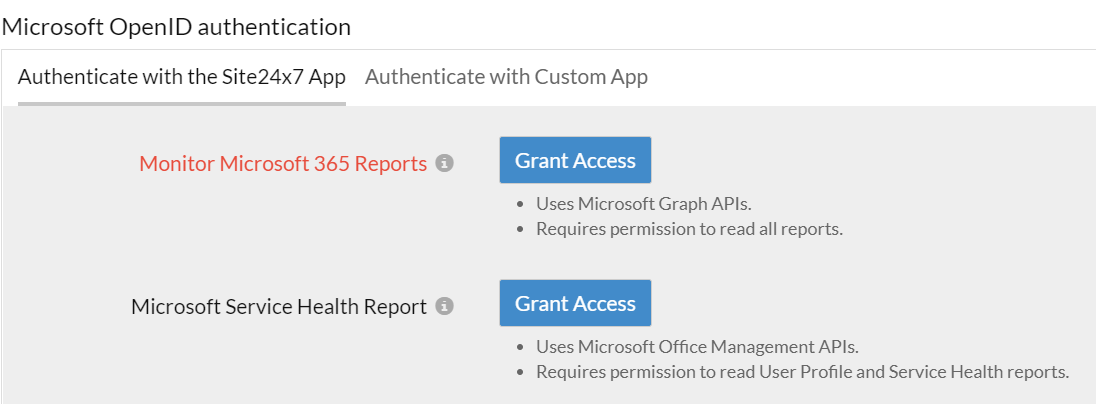
- The authentication to Site24x7 can be done in two ways:
- Add new or use existing Configuration Profiles and associate them to your monitor.
- Save your changes.
Microsoft OpenID Authentication using the Site24x7 App
- Click on Grant Access to provide an authentication to read the Service Health and other Microsoft 365 reports.
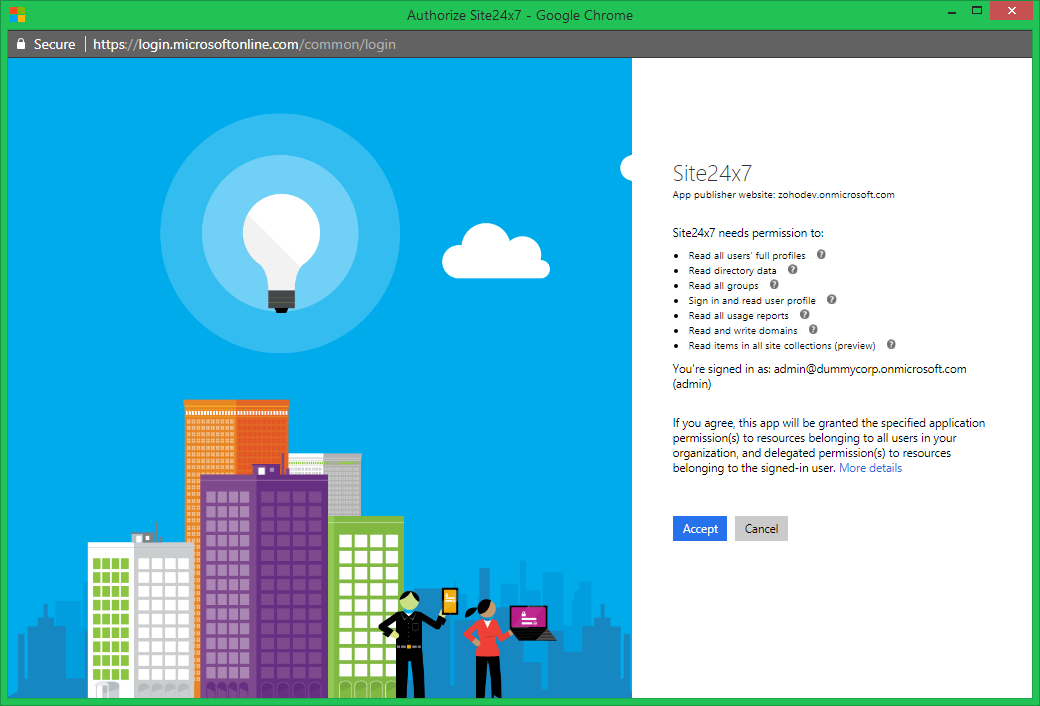
NoteWe only use the access tokens generated from the API requests (made to Microsoft 365) to read the reports. Site24x7 does not store your Microsoft 365 account credentials.

- Log in to your Microsoft account to allow Site24x7 to read your reports.

Note- We use Microsoft Office Management APIs to read the Service Health reports and Microsoft Graph APIs to read all the other reports of Microsoft 365.
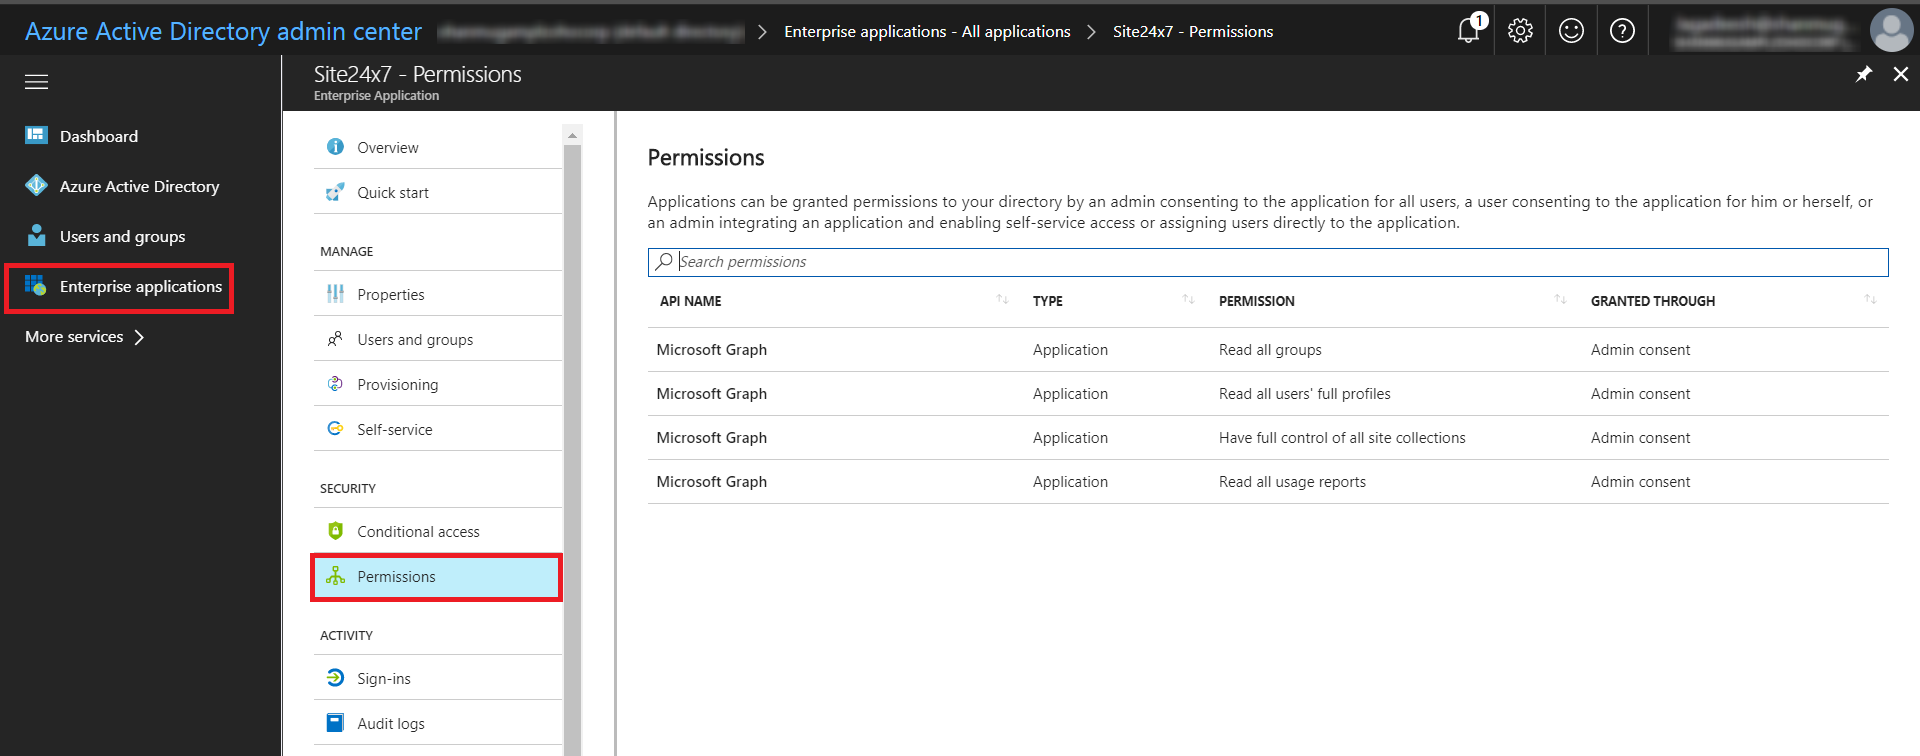
- To view the permissions granted to Site24x7, log in to Azure Active Directory Admin Center > Enterprise Applications > All Applications > Site24x7 > Permissions

Check out some common FAQ's related to the authentication process.
Once the changes are saved and the authentication is successful, go to Server > Microsoft 365 to view the performance metrics. Set up a threshold profile and be notified when there is a threshold violation.
Microsoft OpenID Authentication using Custom App
The custom app creation involves three major parts:
Part 1: Creating an Azure Active Directory application
Part 2: Providing the necessary permissions to the custom app
Part 3: Completing the configuration in the Site24x7 web client
Part 1: Creating an Azure Active Directory Application
- Log in to the Microsoft Azure portal and navigate to the Azure Active Directory section.
- Click on App Registrations > + New registration.
- In the Register an application page, provide the Name of the application, select the Supported account types, and specify the Redirect URI.
- Name: Provide a unique name for identification purposes. Example: Site24x7 Microsoft 365 App
- Supported account types: Select Accounts in any organizational directory.
- Redirect URI: Select Web from the drop-down and mention any valid URL (for example: https://localhost:8080). Click Register.
Once the application is registered in the Azure portal, you will be taken to a new blade with information about the application. Copy the Application (client) ID and save it for later use.
Part 2: Providing the Necessary Permissions to the Custom App
- Go to API Permissions under Manage and grant the following Application permissions to Microsoft Graph API:
- Directory.Read.All
- Domain.Read.All
- Group.Read.All
- Reports.Read.All
- Sites.Read.All
- User.Read
- User.Read.All
- ServiceHealth.Read.All
- ServiceMessage.Read.All
- Then, navigate to Certificates and secrets under Manage and click on + New client secret.
- In the Add a client secret window, provide a Description, select Expires as Never, and click Add.
- Copy the value that appears and save it for later use.
Note
This value would disappear after a while. So, copy and paste the value as soon as you save it.
Part 3: Completing the Configuration in the Site24x7 Web Client
- Open the Site24x7 web client and go to the Authenticate with Custom App tab in the Add Microsoft 365 Monitor (Server > Microsoft 365 (+)) page.
- Paste the Application ID (obtained from Part 1: Creating an Azure Active Directory Application) in the Application ID field; the Directory ID (obtained from Part 2: Providing the Necessary Permissions to the Custom App) in the Tenant ID field; and the Value (obtained from Part 2: Providing the Necessary Permissions to the Custom App) in the Client Secret field.
Data Collection for Microsoft 365 monitor
Polling for Microsoft 365 is done at different time intervals, based on the APIs. The Report APIs poll once a day to avoid a high number of API hits, persisting same data; and minimize API licensing consumption in the Azure portal.
The other APIs, including the Service Health APIs and Licensing APIs, poll every five minutes and present the metrics in the Site24x7 web client.
Licensing
This is an advanced monitor available in all plans (except the Enterprise plus Web plan). For every Office 365 monitor, you can monitor up to 50 sites, 50 services, 100 domains, and 100 users.
Troubleshooting Tips
- No data for Exchange mailbox metrics in Office 365
- FAQ's related to monitoring your Microsoft 365 services using Microsoft Graph APIs and Service Communication APIs
- What should I do if stats are missing for my Microsoft 365 monitor?
Related Articles
- Performance metrics for Microsoft 365 | Add a threshold profile
- Server monitoring architecture
- Microsoft applications monitoring
- Other OS platforms supported: Linux | FreeBSD | OS X
