Network Configuration Manager Device Templates
What are Device Templates?
Device templates for Site24x7's Network Configuration Manager (NCM) define the commands to connect, back up, restore, or perform other configuration-related operations on a device. To perform these operations, the On-Premise Poller connects to the device using protocols like SSH, SSH - SCP, SSH - TFTP, TELNET, TELNET - TFTP, and SNMP - TFTP.
Device templates provide device-specific commands for backing up device configurations, discovering devices in the NCM, syncing startup and running configurations, and obtaining hardware details.
Selecting the correct device template will ensure smooth functioning for various operations. Configuration-related operations like backup and restore will not function correctly if an incorrect template is selected. If the selected device template is not working correctly, you must execute and verify the commands provided on the device template details page for that device.
The SSH credentials must have appropriate read-write permissions to execute all commands specified on device templates successfully. Site24x7 encrypts and stores all credentials to maintain security.
Where can I use NCM Device Templates?
Use case 1
Let's use a device template for Cisco as an example. The Cisco IOS Router device template performs various operations as discussed below. Each vendor supports a different set of protocols for backing up or uploading configurations and performing other actions. The commands for an operation differ depending on the protocol and device type.
Figure 1 shows the operations performed using SSH - TFTP/TELNET - TFTP, including the Backup Running Configuration, the Backup Startup Configuration, the Upload Running Configuration, and the Upload Startup Configuration.
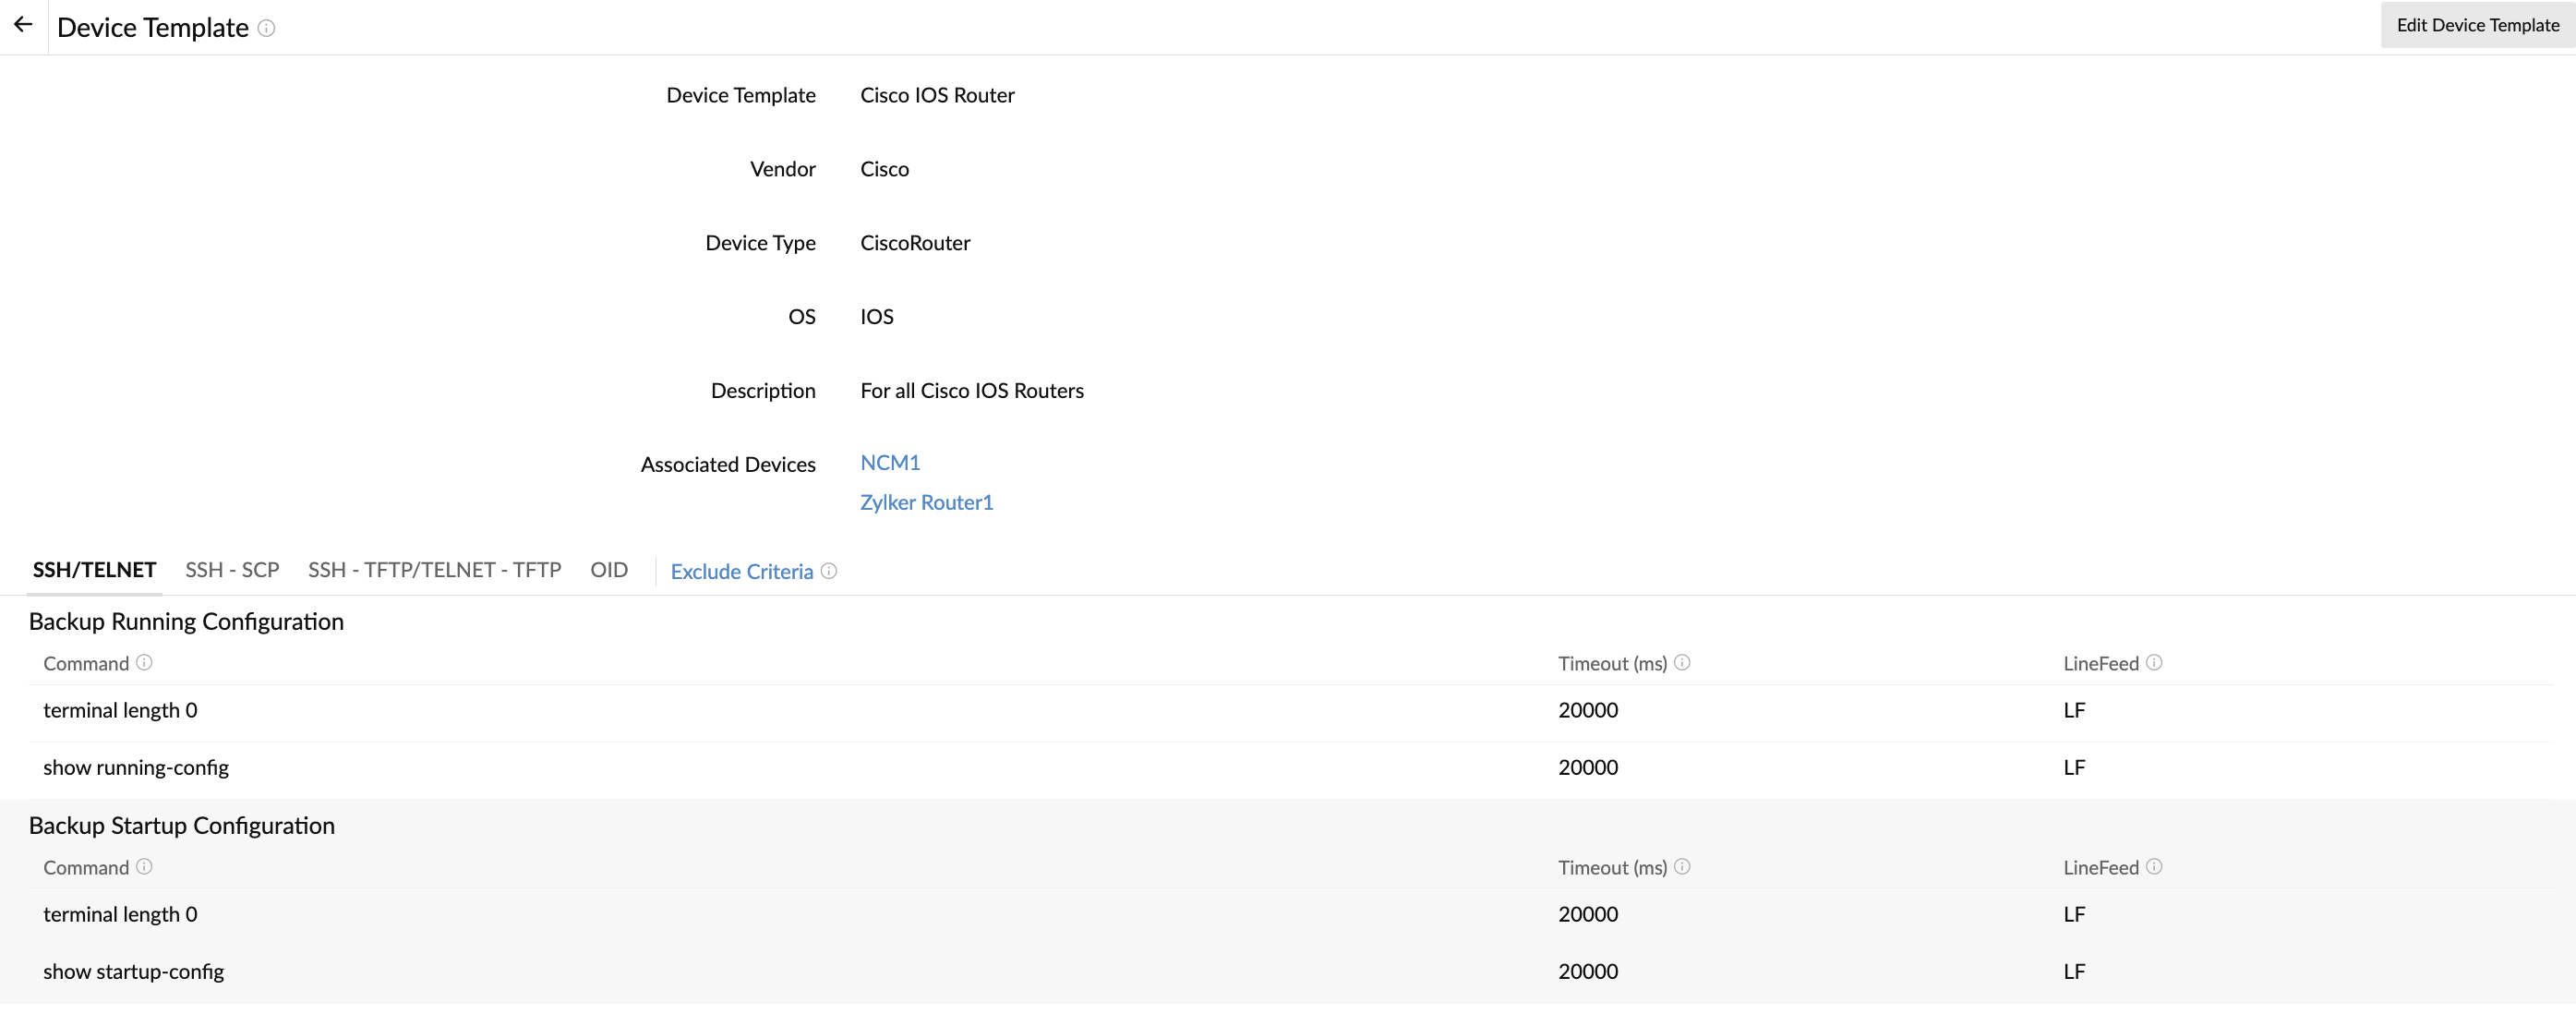
Figure 1. Commands for operations using SSH - TFTP/TELNET - TFTP
You can view the commands that will be executed for each operation under different protocols for that device. Let's say the configuration backup fails despite you providing the right credentials. In this case, you would only need to verify if the commands displayed on this page for the selected protocol have been executed correctly on the device. If they have not, you would select the appropriate device template.
Use case 2
- Let's take a look at the Brocade Switch device template, which supports the following protocols: SSH and SSH - SCP. Other protocols are not displayed as they are not supported.
- Click SSH/TELNET (Fig. 2). This page displays the commands for the Backup Running Configuration. However, there's no option to back up startup configurations here.

Figure 2. View the Brocade Switch SSH/TELNET commands - Click SSH - SCP (Fig. 3). This page displays the commands for Backup Running Configuration and Upload Running Configuration
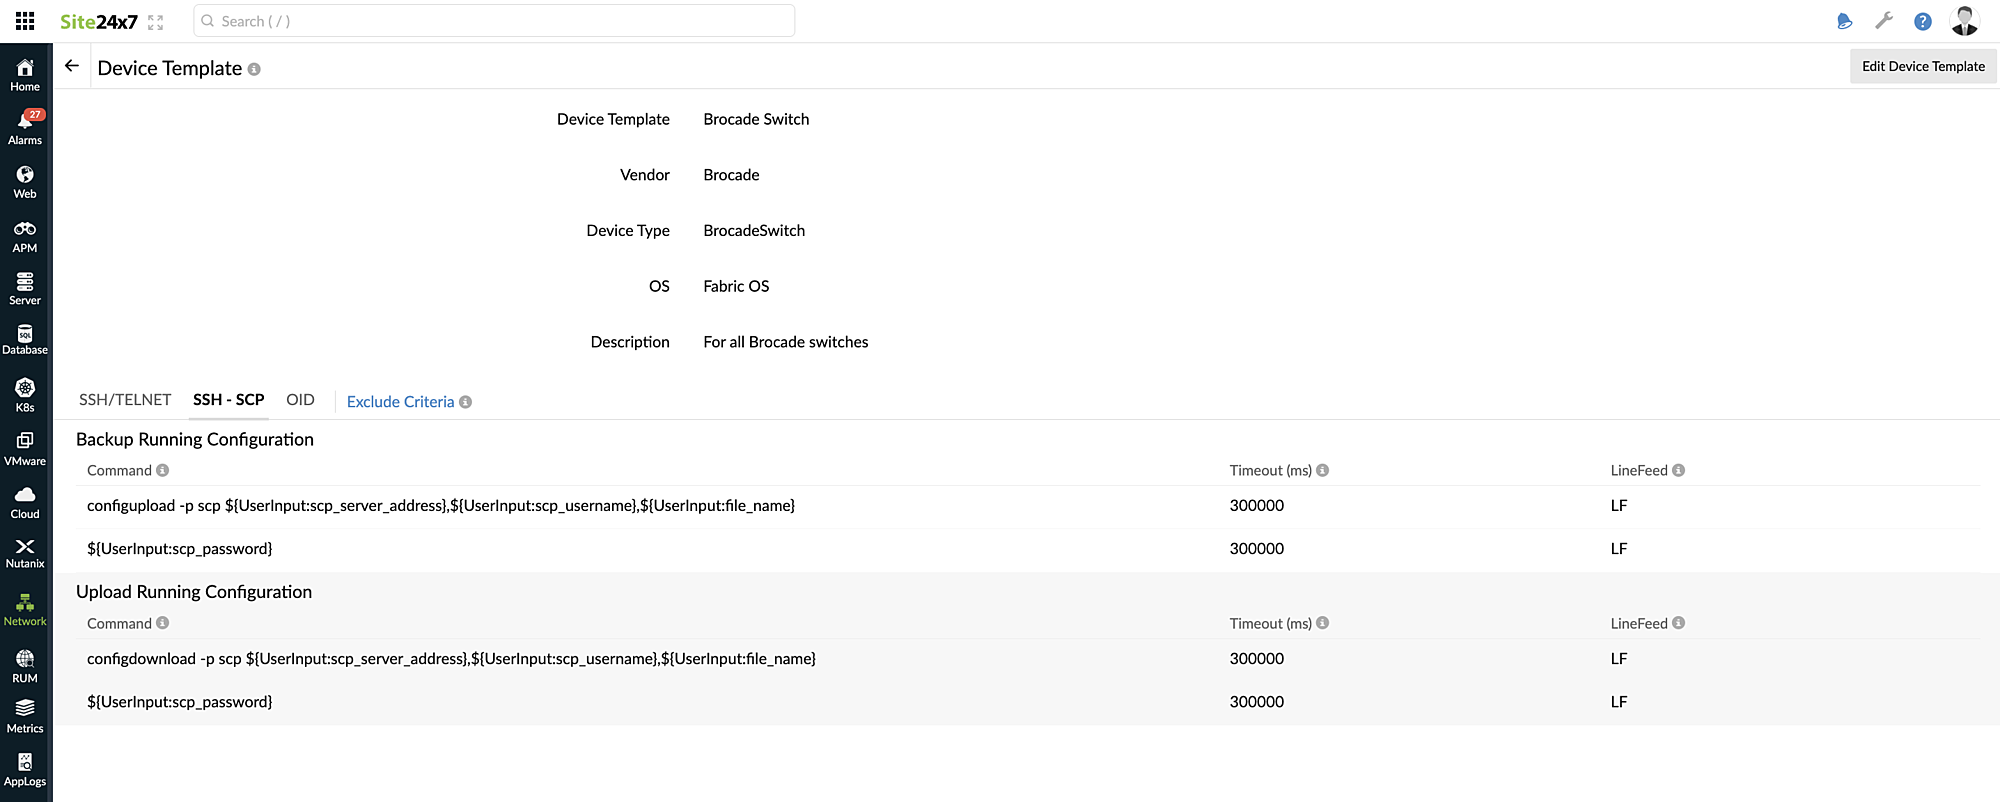
Figure 3. Brocade Switch SSH - SCP commands
Viewing NCM Device Templates
- Log in to your Site24x7 account.
- Navigate to Network > NCM > Device Templates.
- Click each template name to view the supported protocols and the commands used for the operations (Fig. 4).

Figure 4. Viewing Device Templates
Adding or editing NCM Device Templates
Site24x7's NCM supports creating custom device templates to manage the configurations of any device in your network. With Site24x7's NCM, you can add, edit, and clone device templates as needed.
- Navigate to Network > NCM > Device Templates.
- To add a new device template, click the Add Device Template button as shown in Figure 4 (marked as 1).
- Enter the details for the Device Template, Vendor, Device Type, OS, and Description fields (Fig. 5).
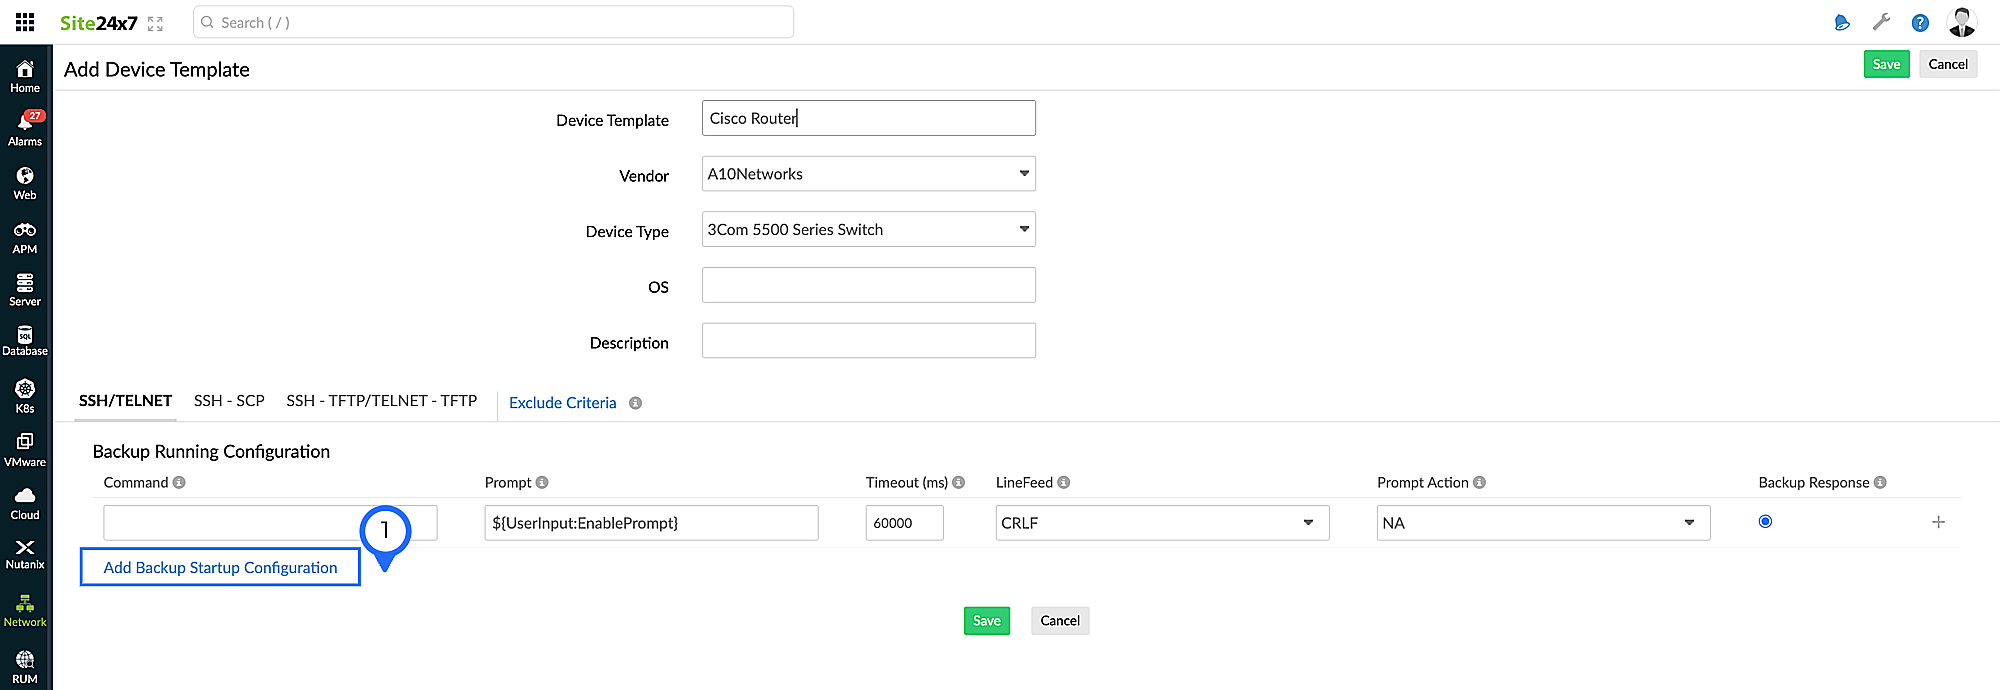
Figure 5. Adding NCM Device Templates - Provide the commands to be used for the protocols. By default, SSH/TELNET is selected. You may select SSH - SCP and SSH - TFTP/TELNET - TFTP and provide commands if required, though it is not mandatory.
- You can also provide commands for Backup Startup Configuration by clicking Add Backup Startup Configuration(marked as 1 in Fig. 5 above). Enter the values for:
- Command: This is the command line displayed on the terminal for which the user has to provide input. You can also provide variables to fetch data here.
- Prompt: This is the prompt displayed at the end of the command, after which the user response will be entered.
- Timeout (ms): This is the amount of time the NCM must wait for a response.
- LineFeed: Select LF, CR, or CRLF based on your device, where LF is for line feed, CR is for carriage return, and CRLF is for carriage return line feed.
- Prompt Action: This is the action that will be executed after the prompt is displayed on the terminal. Provide the appropriate value after the prompt ")?" as shown in the "Command field variables" section below.
- Click the X icon to delete the row (marked as 1 in Fig. 6).
- Click the plus icon + to add a row (marked as 2 in Fig. 6).
- Click the trash icon
 to delete the section (marked as 3 in Fig. 6).
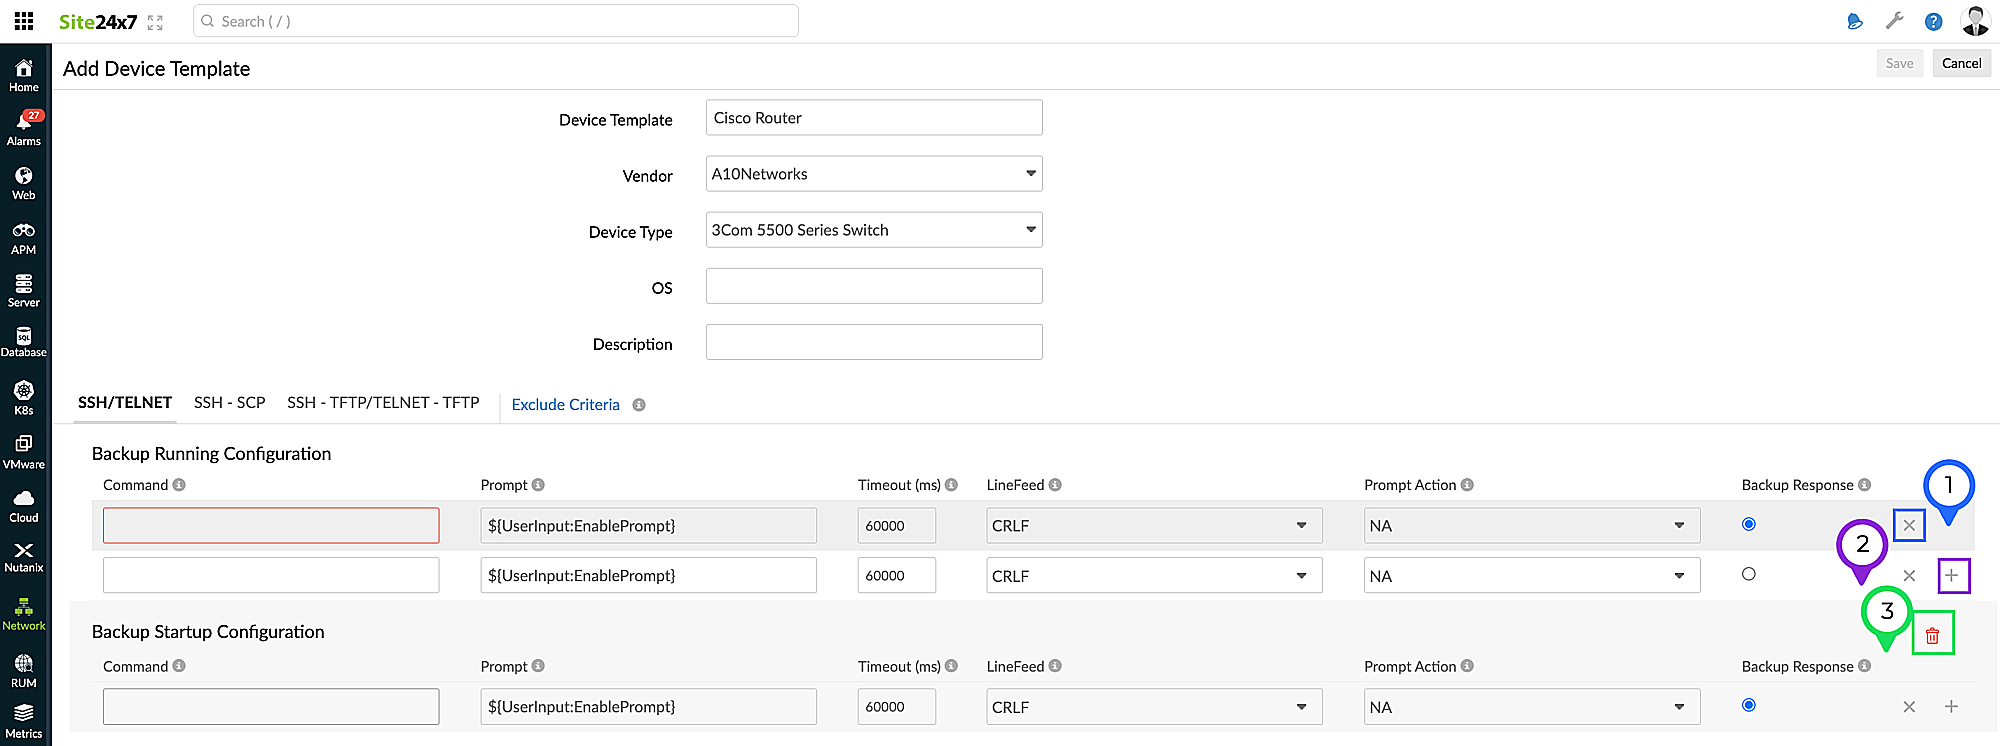
Figure 6. Actions while adding new NCM Device Templates
- Enter the details for the Device Template, Vendor, Device Type, OS, and Description fields (Fig. 5).
- To edit an existing device template, click the pencil icon
 beside the appropriate device template as shown in Figure 4 (marked as 2).
- On the Edit Device Template page, you can edit the values for Command, Prompt, Timeout (ms), LineFeed, Prompt Action, and Backup Response (if available).
- You can add or delete commands as needed. If you wish to remove any protocol (except SSH/TELNET), remove all the commands by clicking the X icon for all the rows, as mentioned in step 2d.
- Click Exclude Criteria to exclude configuration content from comparison.
- To clone and customize a Device Template, click the copy icon beside the respective Device Template as shown in Figure 4 above (marked as 3). With this option, all the commands for all the available protocols for the template will be added to the new template.
Command field variables
In the example given in Figure 7, after the question Address or name of remote host []?, the IP address of the TFTP server must be provided. The TFTP server address differs based on the On-Premise Poller from which the device is monitored. So, the variable needs to be fetched with specific commands. Provided below is a list of variables that are supported in NCM Device Templates:
|
Serial number |
Variable |
Values |
| 1 |
${UserInput:tftp_server_address}
|
On-Premise Poller server IP. For example, 10.10.10.5 |
| 2 |
${UserInput:EnablePrompt}
|
The Enable Prompt configured in the SSH/TELNET credential |
| 3 |
${UserInput:file_name}
|
This value will be created based on the device ID to ensure a unique file name |
| 4 |
${UserInput:HostIpAddress}
|
The On-Premise Poller server IP. For example, 10.10.190.5 |
| 5 |
${UserInput:LoggingLevel}
|
The notification selected while enabling change detection will be used |
| 6 |
${UserInput:scp_server_address}
|
On-Premise Poller server IP. For example, 10.10.190.5 |
| 7 |
${UserInput:scp_username}
|
On-Premise Poller SCP Server UserName. For example, admin |
| 8 |
${UserInput:scp_password}
|
On-Premise Poller SCP Server password. For example, admin |
To provide the right IP address, the variable ${UserInput:tftp_server_address} can be used in the Command field of the device templates.
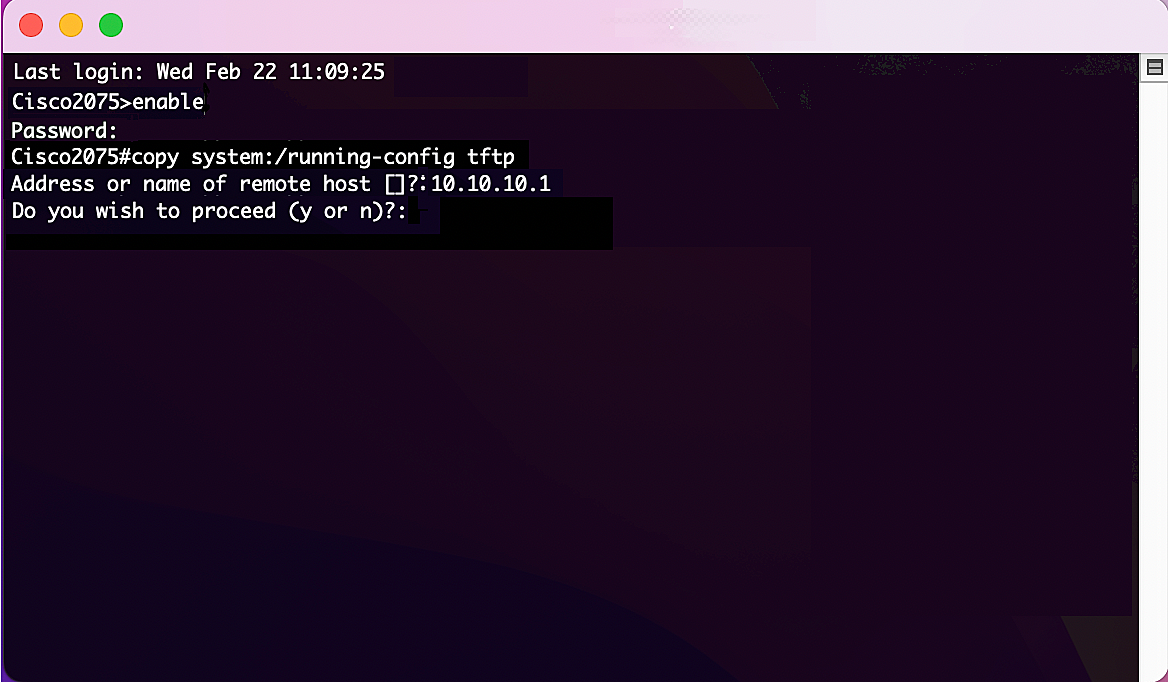
Figure 7. Setting command variables
Excluding configuration content from NCM Device Templates comparison
When comparing two device configurations or configuration versions in Site24x7's NCM, you can see all the differences between them. These differences include empty lines, inconsequential lines (like the created date), expected differences (like the hostname), or even the certification section of the configuration version.
Sometimes, these differences might cause unexpected changes to a device's status. Figure 8 shows an example of a difference between the startup and running configurations that could change the status of the device to Down, Trouble, or Critical, as configured in the threshold profile.
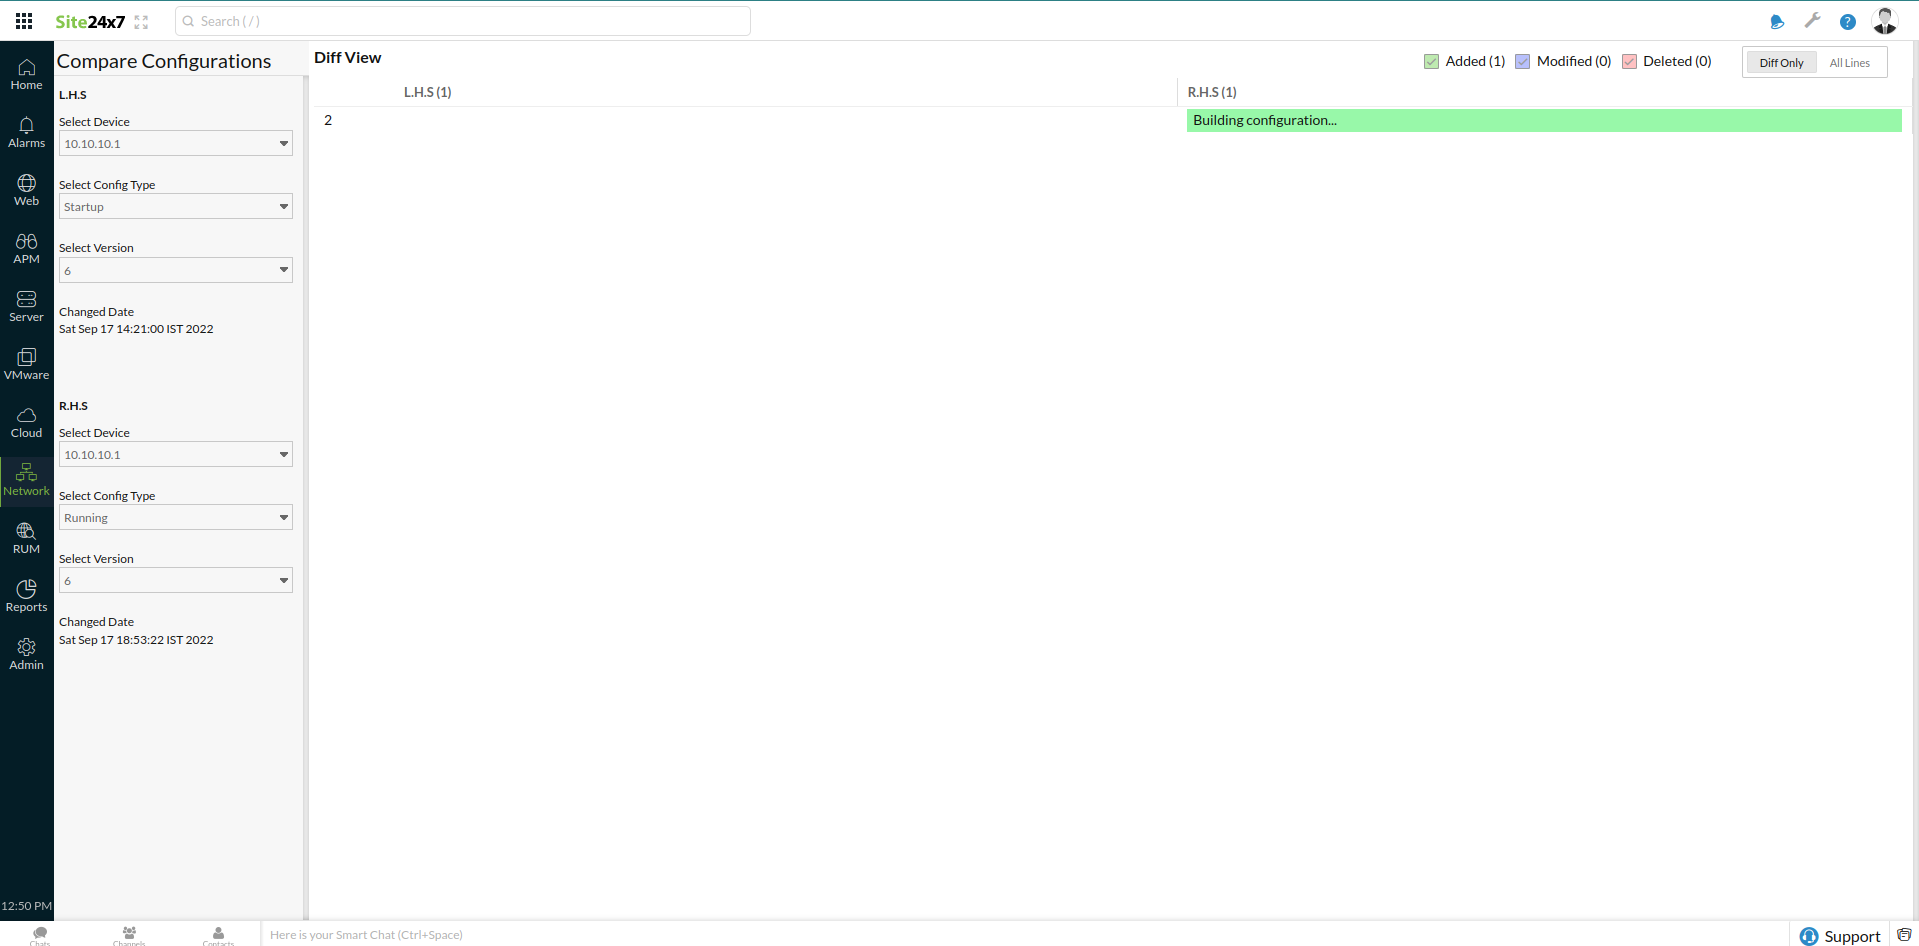
Figure 8. Pinpointing differences when comparing device configurations.
To avoid unexpected status changes and to exclude such configuration content from comparison so it does not show up as a difference, Site24x7's NCM uses regular expressions to ignore this content during comparison. Learn how you can add a new criteria or modify an existing one to exclude specific content during configuration comparison.
Related Articles
- Site24x7's Network Configuration Manager (NCM)
- Network Configuration Manager (NCM) Credentials
- NCM Configuration Summary
