
Database monitoring on Azure SQL servers
Track the Microsoft SQL Server databases running in your Azure managed instances, in Azure SQL databases, or on SQL servers hosted on Azure Virtual Machines (VMs) by monitoring slow queries, top sessions, locks, waits, and expensive queries in real time.
Site24x7's integration for monitoring SQL servers enables you to establish thresholds for various attributes and get notifications when the values surpass those set limits. Utilize Site24x7's distinctive, informative dashboard to access a centralized perspective of your Azure SQL Database environment's health and guarantee the efficient functioning of your Azure SQL Database setup.
Setup
Prerequisites
-
Ensure AppLogs is enabled. To enable it, navigate to Admin > AppLogs > Settings and toggle Collect application logs from servers using AppLogs to Yes.
-
Your Site24x7 Windows agent version should be 20.6.0 or above.
-
Your .NET version should be 3.0 or above.
-
Your SQL Server version should be 2008 or above.
Permissions
-
Ensure that the Site24x7 server monitoring agent is given read-only access to the database server to collect statistics and queries.
-
The Site24x7 agent needs a few privileges to collect the metrics. You need to provide the SQL Server user with the following limited privileges:
For Azure SQL Managed Instance
Create a read-only login to connect to your server and grant the required permissions:
CREATE LOGIN <USERNAME> WITH PASSWORD = '<PASSWORD>';
CREATE USER <USERNAME> FOR LOGIN <USERNAME>;
GRANT CONNECT ANY DATABASE to <USERNAME>;
GRANT VIEW SERVER STATE to <USERNAME>;
GRANT VIEW ANY DEFINITION to <USERNAME>;
To enable data collection for failed jobs
For SQL Server Authentication mode, execute the following Transact-SQL (T-SQL) command with admin privileges. It will add the db_datareader role to the given user.
use msdb;
EXEC sp_addrolemember N'db_datareader', N'user'
Example
CREATE LOGIN site24x7 WITH PASSWORD = 'localhost@123';
CREATE USER site24x7 FOR LOGIN site24x7;
GRANT VIEW SERVER STATE to site24x7;
GRANT CONNECT ANY DATABASE to site24x7;
GRANT VIEW ANY DEFINITION to site24x7;
For Azure SQL Database
Create a read-only login to connect to your server and grant the required permissions:
CREATE LOGIN <USERNAME> WITH PASSWORD = '<PASSWORD>';
CREATE USER <USERNAME> FOR LOGIN <USERNAME>;
ALTER SERVER ROLE ##MS_ServerStateReader## ADD MEMBER <USERNAME>;
ALTER SERVER ROLE ##MS_DefinitionReader## ADD MEMBER <USERNAME>;
To enable data collection for failed jobs
For SQL Server Authentication mode, execute the following T-SQL command with admin privileges. It will add the db_datareader role to the given user.
use msdb;
EXEC sp_addrolemember N'db_datareader', N'user'
Example
CREATE LOGIN site24x7 WITH PASSWORD = 'localhost@123';
CREATE USER site24x7 FOR LOGIN site24x7;
ALTER SERVER ROLE ##MS_ServerStateReader## ADD MEMBER site24x7;
ALTER SERVER ROLE ##MS_DefinitionReader## ADD MEMBER site24x7;
use msdb;
EXEC sp_addrolemember N'db_datareader', N'site24x7'
For SQL servers hosted on an Azure VM
For SQL servers hosted on an Azure VM, follow the steps in this document to install the database monitoring agent directly on the Azure VM.
Adding an Azure SQL server monitor
Follow the steps below to add an Azure SQL server monitor:
-
Download the Site24x7 Windows Server agent file shared with you.
-
Execute the Site24x7 app monitoring configuration script shared with you via email.
-
Select Cloud SQL as the SQL Server type and enter your selection.
-
Provide the credentials (the Host or server name, Port, User Name, and Password).
-
For Azure SQL Managed Instance
-
If you are monitoring Azure SQL Managed Instance, navigate to your Azure portal.
-
From the list of databases, select the Azure SQL managed instance that you wish to monitor, copy the hostname, and paste it in the terminal.
-
Similarly, provide your port, username, and password in the required fields.
-
For Azure SQL Database
-
If you are monitoring Azure SQL Database, navigate to your Azure portal.
-
From the listed databases, select the SQL server that is associated with the Azure SQL Database service. Copy the server name and paste it in the Host field in the terminal.
-
Similarly, provide your port, username, and password in the required fields.
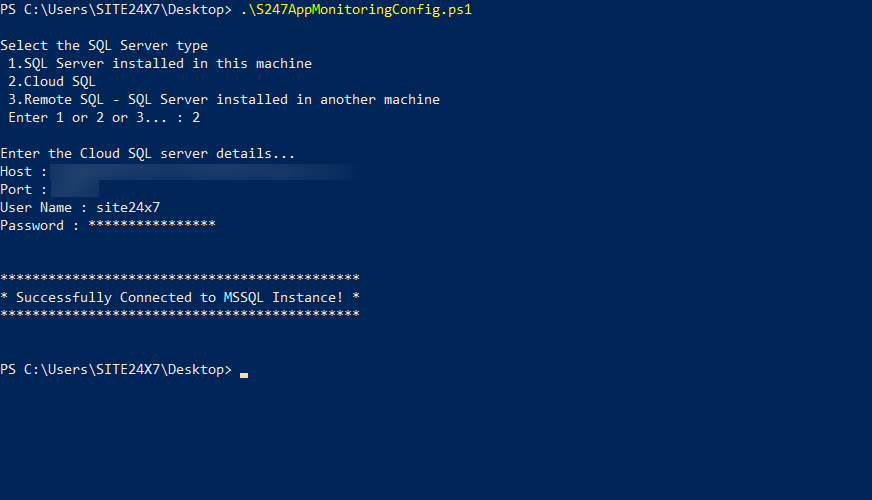
Thus, you have successfully added your Azure SQL server for monitoring.
You can find the added monitor in the Site24x7 web console. The name of the monitor is a combination of the Azure-hosted VM and the provided hostname.
Adding Azure SQL Database monitors
All the Azure SQL databases associated with the selected SQL server can be added for full-fledged monitoring.
-
Log in to Site24x7.
-
Navigate to Database > Microsoft SQL Server and select the Azure SQL Server from the listed databases. This opens the Performance monitor page of the selected Azure SQL server.
-
Click the Database tab.
-
Under the Database Details widget, all the databases hosted on the selected Azure SQL server will be listed. Enable full-fledged monitoring by toggling the button near the SQL database that you wish to add for monitoring.
-
Click the Enable Now button to add the database monitor.
This will add your Azure SQL databases hosted on the selected SQL server for advanced monitoring.
Viewing the added database monitors
All the added Azure SQL databases can be viewed by scrolling to the Microsoft SQL Server Databases widget below. Click the database name to take you to the individual Azure SQL Database monitor page to view the detailed insights.
Performance metrics
Find the extensive list of essential metrics that can be tracked using our advanced database monitor.
IT automation
Site24x7 provides exclusive IT automation templates that enable you to automate remedial actions for when there is an outage or threshold breach.
Security
The Site24x7 server monitoring agent never stores your data on the Site24x7 app servers. The username and password are encrypted in the agent for security reasons.
Licensing
Each Azure SQL database consumes one advanced monitor.
FAQ
1. Does Site24x7 need write permission to access databases?
No. Site24x7 does not require write permission.
2. What performance data is collected by Site24x7 for monitoring Azure SQL databases?
Site24x7 collects data for the performance metrics listed in this document for monitoring Azure SQL databases.
3. How do you collect performance metrics for SQL Server monitoring?
Site24x7 collects performance metrics by connecting to the Azure SQL database with the user credentials given by the user, who has limited read-only access.
4. How do you connect with the Azure SQL database?
Site24x7 connects with the Azure SQL database with the user credentials given in the terminal console and collects data.
5. Do you keep the SQL Server connection open?
No, Site24x7 creates a connection to the Azure SQL database for collecting performance metrics. Once the data collection is complete, the created connection will be closed.
6. Do you store the SQL Server user password directly?
No, Site24x7 encrypts the password given. The username and password are encrypted in the agent for security reasons. They will not be saved or stored on the Site24x7 app servers.