Enable Access to your accounts using a CloudFormation stack and Control Tower lifecycle events
For comprehensive AWS infrastructure monitoring, Site24x7 needs to automatically discover all instances of various supported services currently running in your account. For this, you need to authenticate and authorize Site24x7 to access your resource. You can achieve this by manually creating IAM user roles or cross-account IAM roles. You can also automatically create an IAM role using a AWS CloudFormation template.
The AWS Control Tower provisions your AWS accounts to meet your organization's security and compliance requirements. Site24x7 uses AWS Control Tower lifecycle events to automatically discover all the accounts in your organization, including new accounts. As a result, you can quickly and easily integrate your AWS accounts with Site24x7.
Only Control Tower enrolled accounts can be integrated with Site24x7 using the Control Tower integration method. If you wish to monitor AWS accounts that are not enrolled in Control Tower along with the enrolled accounts, you must use the Delegated Admin method to integrate those accounts with Site24x7.
Use cases
- Consider that you have multiple AWS accounts, which you wish to integrate with Site24x7. Integrating each AWS account can be cumbersome and time-consuming. The AWS Control Tower helps you to set up and manage multiple AWS accounts. You can integrate your AWS accounts with Site24x7 using Control Tower and effectively monitor and manage them in a secure and compliant manner. Using this approach, you can integrate multiple AWS accounts with Site24x7 at the same time.
- The Site24x7-AWS Control Tower integration helps to save time and increase efficiency when managing multiple accounts. For instance, if you create a new account in AWS using Control Tower, the same account gets automatically integrated with Site24x7 without any manual intervention.
Prerequisites
Make sure you have the following before you begin:
- An AWS Management account.
- Accounts Managed using AWS Control Tower.
Permissions
Ensure that you have the following permissions for the CloudFormation stack to create resources that are required for discovery.
Replace <account_id> with the AWS account ID where the CloudFormation template is running.
{
    "Version": "2012-10-17",
    "Statement": [
        {
            "Sid": "VisualEditor0",
            "Effect": "Allow",
            "Action": [
                "lambda:CreateFunction",
                "kms:Decrypt",
                "kms:PutKeyPolicy",
                "secretsmanager:CreateSecret",
                "events:PutRule",
                "secretsmanager:DeleteSecret",
                "iam:CreateRole",
                "iam:AttachRolePolicy",
                "iam:PutRolePolicy",
                "iam:PassRole",
                "kms:TagResource",
                "iam:DetachRolePolicy",
                "kms:Encrypt",
                "kms:ScheduleKeyDeletion",
                "iam:DeleteRolePolicy",
                "secretsmanager:RotateSecret",
                "kms:DescribeKey",
                "events:RemoveTargets",
                "lambda:DeleteFunction",
                "kms:EnableKeyRotation",
                "iam:GetRole",
                "events:DescribeRule",
                "lambda:InvokeFunction",
                "lambda:GetFunction",
                "lambda:UpdateFunctionConfiguration",
                "iam:DeleteRole",
                "secretsmanager:CancelRotateSecret",
                "kms:UpdateAlias",
                "events:DeleteRule",
                "events:PutTargets",
                "lambda:UpdateFunctionCode",
                "lambda:AddPermission",
                "iam:CreateServiceLinkedRole",
                "kms:GenerateDataKey",
                "kms:CreateAlias",
                "kms:DeleteAlias",
                "lambda:RemovePermission"
            ],
            "Resource": [
                "arn:aws:kms:*:<account_id>:key/*",
                "arn:aws:kms:*:<account_id>:alias/site24x7/user/S247*",
                "arn:aws:secretsmanager:*:<account_id>:secret:/site24x7/api-credentialsS247*",
                "arn:aws:events:*:<account_id>:rule/Site24x7AWS*",
                "arn:aws:lambda:*:<account_id>:function:Site24x7StackSetHandler*",
                "arn:aws:lambda:*:<account_id>:function:Site24x7SecretsHandler*",
                "arn:aws:iam::<account_id>:role/Site24x7AWS*"
            ]
        },
        {
            "Sid": "VisualEditor1",
            "Effect": "Allow",
            "Action": "kms:CreateKey",
            "Resource": "*"
        }
    ]
}
Lambda permissions
Lambda functions are used for communicating with Site24x7, rotating Site24x7 secrets, and for creating stack set instances. The delete permission is used for CloudFormation delete stack operation. The following lambda permissions are used for creating and invoking lambda monitor in the CloudFormation stack:
- lambda:CreateFunction
- lambda:DeleteFunction
- lambda:InvokeFunction
- lambda:GetFunction
- lambda:AddPermission
- lambda:RemovePermission
Secret Manager permissions
Secret Manager is used for storing Site24x7 secrets inside the AWS accounts. These secrets are for communicating with Site24x7 via the Lambda function. The following secret manager permissions are used for creating, rotating and deleting secrets in the CloudFormation stack:
- secretsmanager:CreateSecret
- secretsmanager:DeleteSecret
- secretsmanager:RotateSecret
- secretsmanager:CancelRotateSecret
IAM permissions
The following IAM permissions are used for role creation for Site24x7 integration account and also for giving access to services like Lambda for its function execution:
- iam:CreateRole
- iam:AttachRolePolicy
- iam:PutRolePolicy
- iam:PassRole
- iam:DetachRolePolicy
- iam:DeleteRolePolicy
- iam:GetRole
- iam:DeleteRole
- iam:CreatePolicy
- iam:CreateServiceLinkedRole
KMS permissions
The following permissions are used for the creation and deletion of the KMS key by the CloudFormation service. This key will be used by Secret Manager for encryption and decryption purposes.
- kms:Decrypt
- kms:PutKeyPolicy
- kms:TagResource
- kms:Encrypt
- kms:ScheduleKeyDeletion
- kms:DescribeKey
- kms:CreateKey
- kms:EnableKeyRotation
- kms:UpdateAlias
- kms:GenerateDataKey
- kms:CreateAlias
- kms:DeleteAlias
Eventbridge permissions
The following permissions are used for creating a rule for the Control Tower Create Account event, to trigger the Site24x7 Lambda function to send those details to Site24x7 for new account creation.
- events:PutRule
- events:RemoveTargets
- events:DescribeRule
- events:DeleteRule
- events:PutTargets
Benefits of using AWS Control Tower for integration
You can leverage the following benefits while integrating your AWS account using AWS Control Tower:
- Automatic Amazon Resource Name (ARN) role creation for multiple accounts.
- Effortlessly add multiple AWS accounts from an organization to Site24x7.
- Manage all integrated AWS accounts from a single location.
- Automatically add or remove accounts.
Integrate your AWS account with Site24x7 using AWS Control Tower
To integrate all your AWS accounts with Site24x7 using a Control Tower, follow the steps below:
- Log in to the Site24x7 web console.
- Navigate to AWS > Integrate AWS Account.
- Select the AWS Account Type. The available options are Global, Gov Cloud (US), and China.
- Select Multiple Accounts as the integration method.
- Select Register with Control Tower.
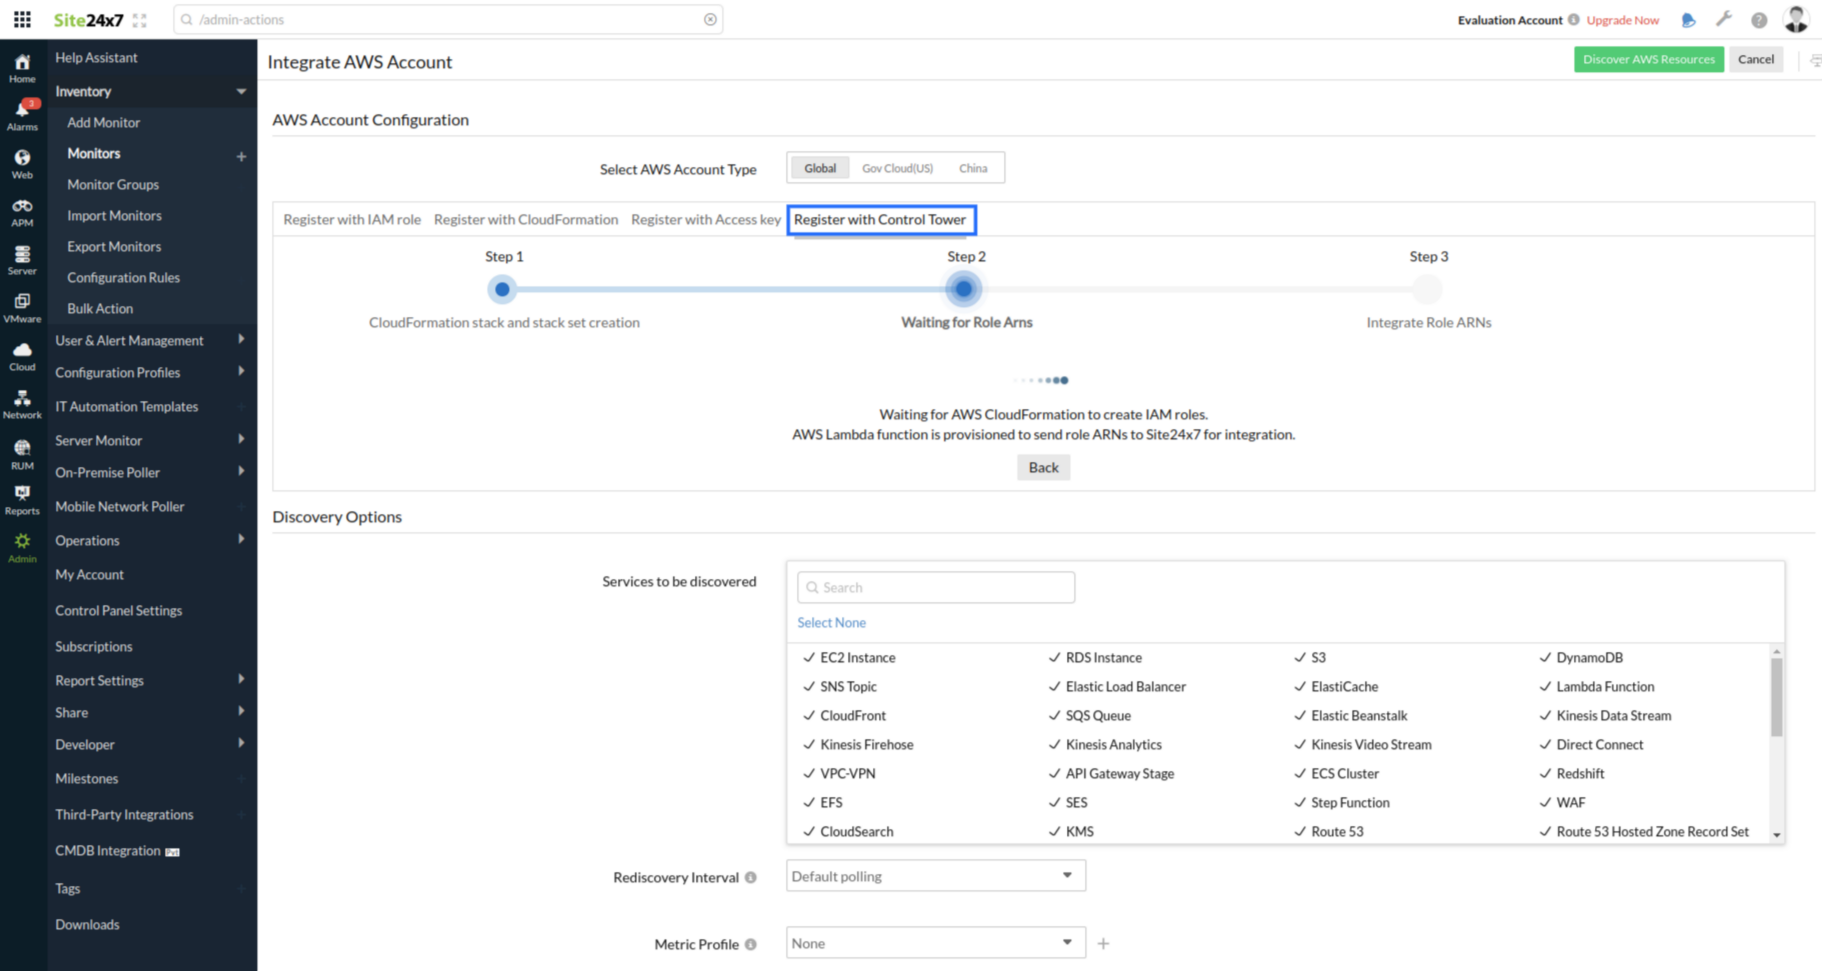
- Select the AWS region in which the CloudFormation stack needs to be created.
- Select the preferred Permissions to be attached with IAM role. Site24x7 provides two options for IAM role permissions:
- AWS Managed ReadOnlyAccess Policy: The IAM role will be created with the ReadOnlyAccess policy, which is managed by AWS for all services.
- Site24x7 Custom Policy: The IAM role will be created with the in-line policy formulated with read-only permissions required for Site24x7-supported services.
- Click Create CloudFormation Template. The CloudFormation stack in your account will automatically create all the necessary components in your account.
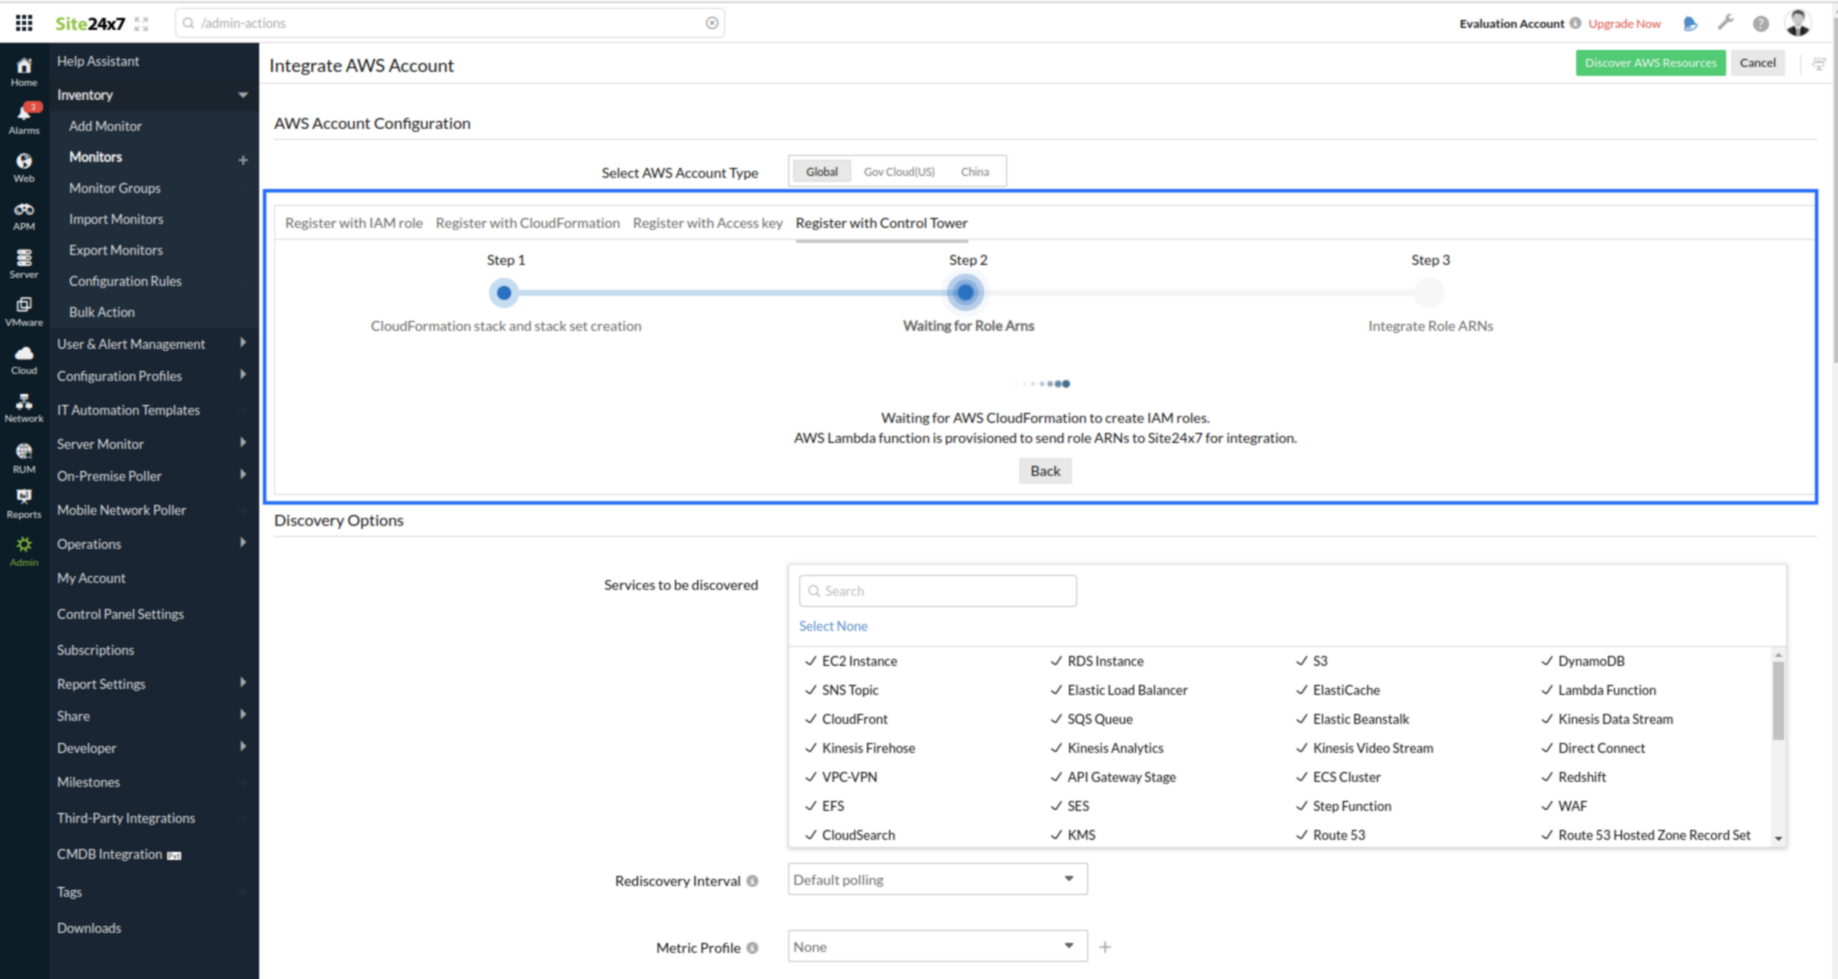
- After creating the IAM role, the CloudFormation stack and stack sets send the role ARNs to Site24x7 via the Lambda function.
- Enter the Display Name.
- Enter the RegEx (Regular Expression) to be filtered in the Accounts Filter field or select the accounts to be integrated from the Select Accounts list.
NoteIf you wish to edit the RegEx after registering with Control Tower, navigate to the Edit Integrated AWS Account page of the Control Tower and update the RegEx.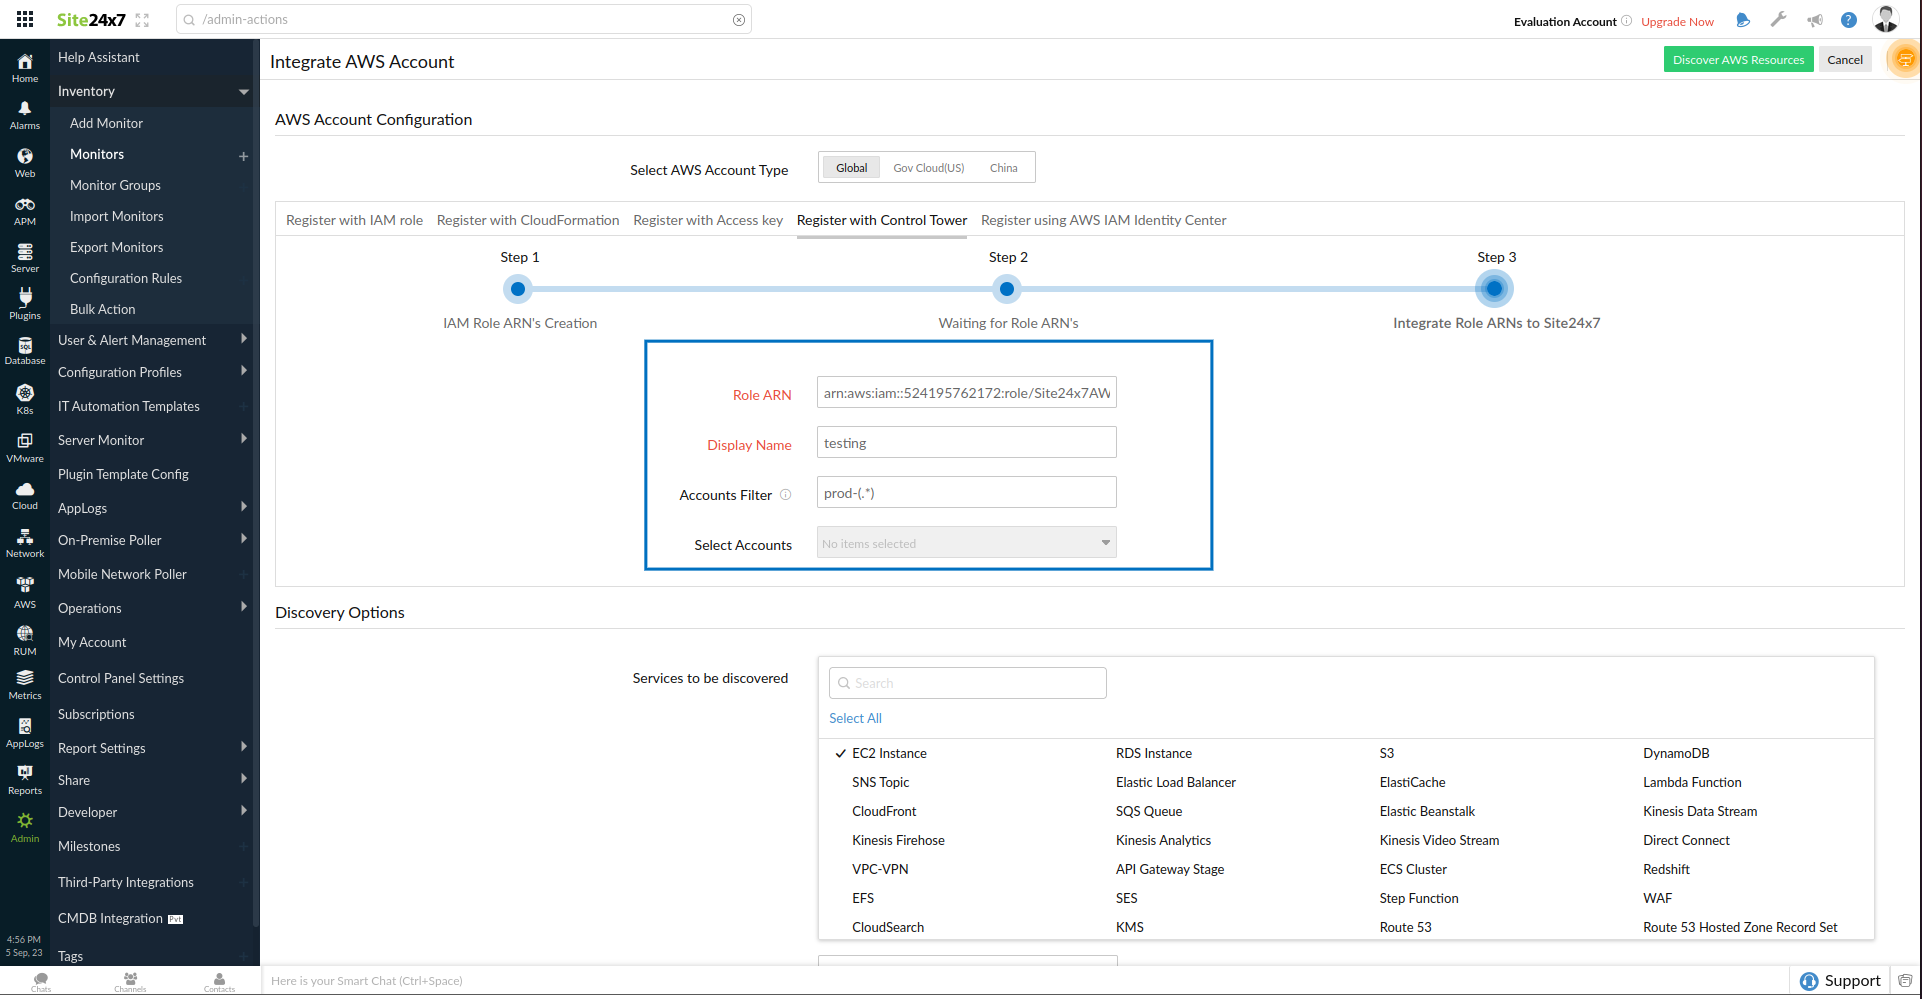
- Once the role ARNs details are fetched, you can configure settings (such as the default threshold profiles for each supported AWS service), mute resource termination alerts, and customize the Guidance Report using the Advanced Configuration option.
- Choose the services you wish to integrate with Site24x7 from the Services to be discovered list in the Discovery Options section. You can view all the integrated accounts inside the management account integrated with Site24x7.
- Click Discover AWS Resources to add the accounts.
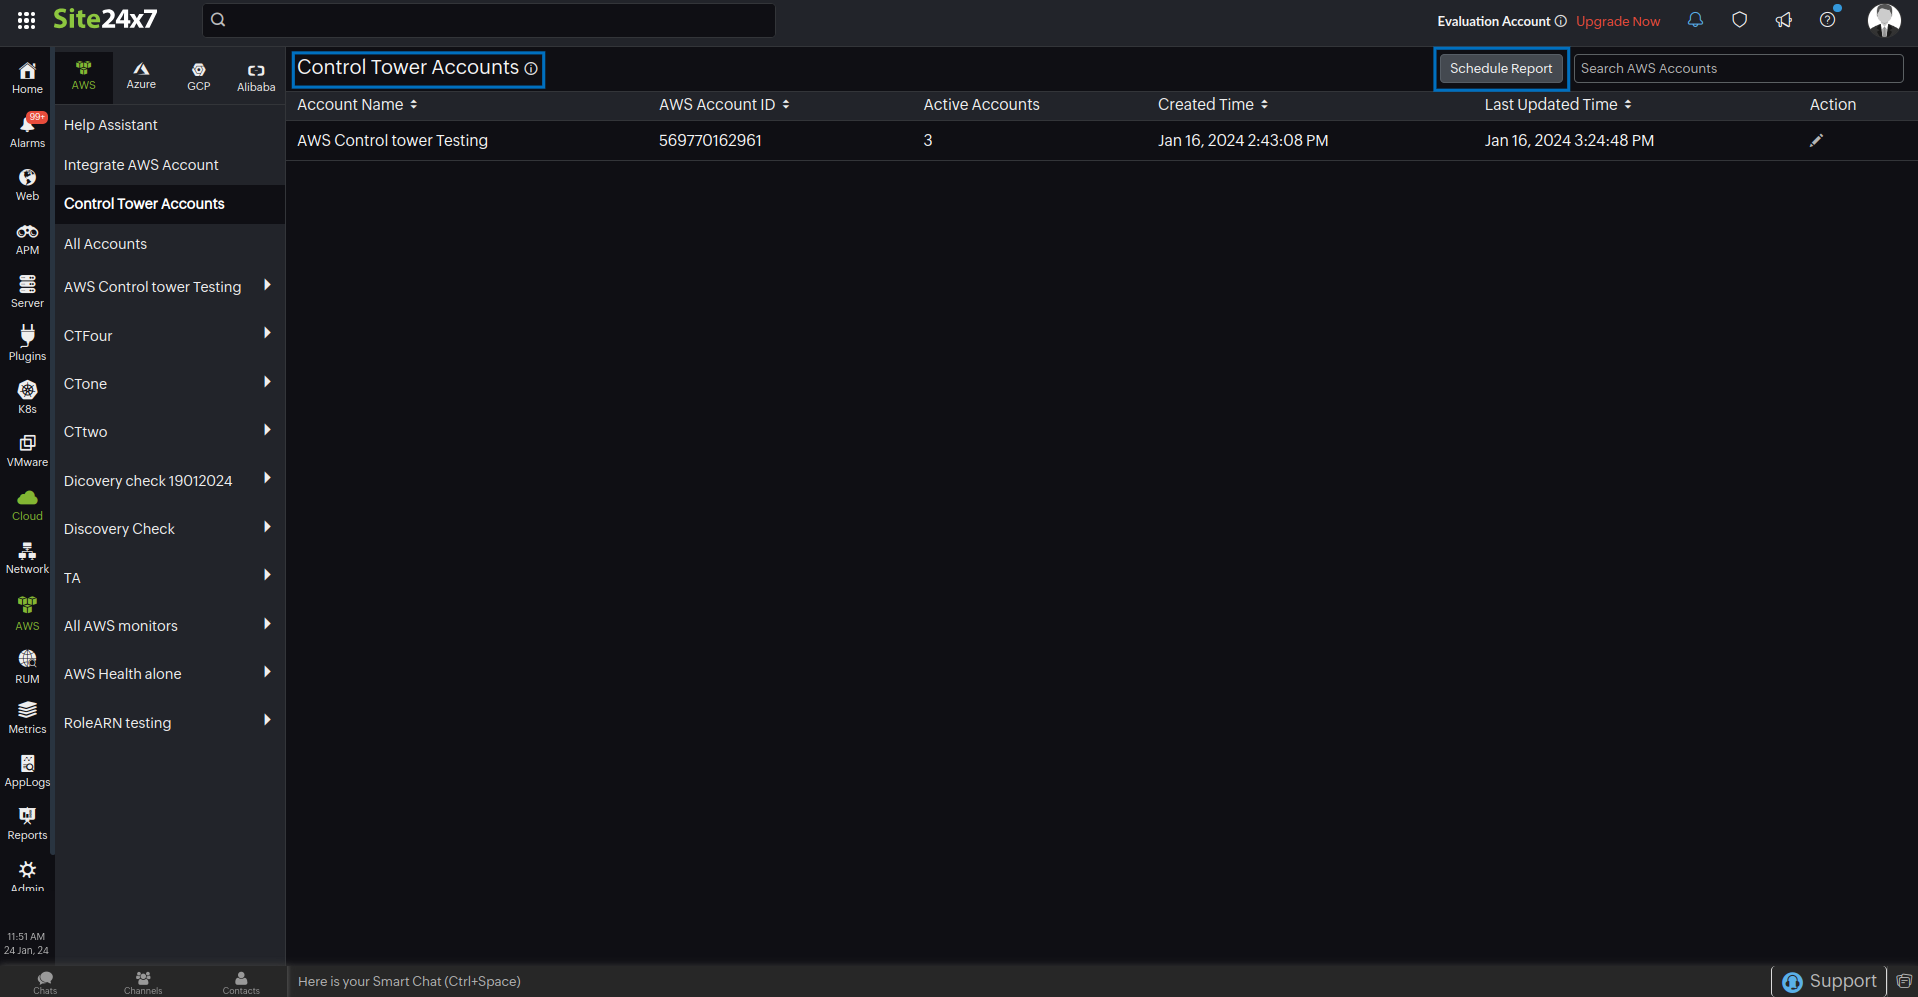
Once your AWS account is integrated with Site24x7 using AWS Control Tower, you can view all the Control Tower accounts in the Cloud > AWS > Control Tower Accounts > Control Tower Accounts page. Click Schedule Report to generate the Control Tower Accounts Report, which contains the Control Tower account details in CSV format.
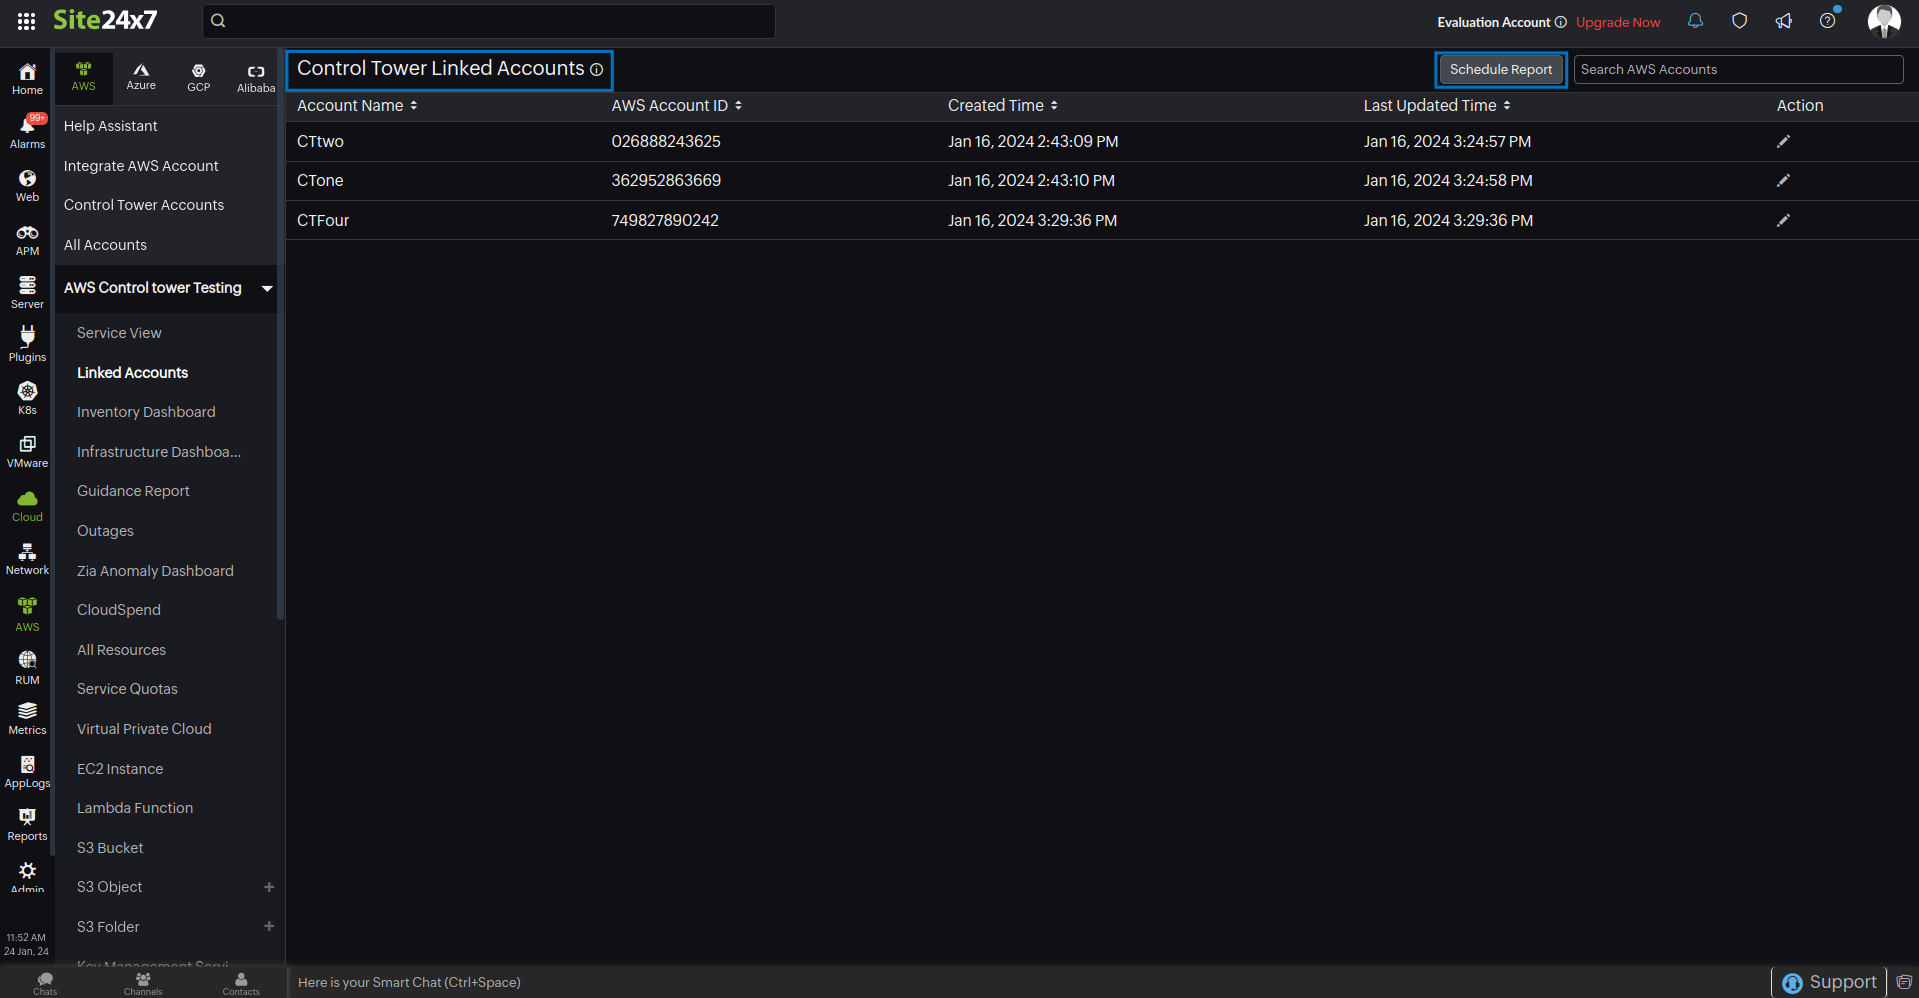
All the accounts linked to the Control Tower parent account will be listed in the Cloud > AWS > Control Tower Accounts > Control Tower Linked Accounts page. Click Schedule Report to generate the Control Tower Linked Accounts Report, which contains the Control Tower linked account details in CSV format.
- If you delete a Control Tower parent account, all the Control Tower linked accounts will also be deleted.
- If you modify the existing configuration of an AWS Control Tower parent account, then the existing changes in the Control Tower linked accounts will be overwritten as well.
- If you modify the configuration of any individual Control Tower linked account, then the changes will be reflected only for the linked account and will not affect the Control Tower parent account or any other linked accounts.
- If the Automatically Remove Closed Account option is enabled in the Integrate AWS Account > Advance Configuration section, all the closed AWS accounts will be permanently removed from Site24x7.
Add AWS accounts to an existing Control Tower integration
If some AWS accounts in your organization were not added when you first integrated the organization with Site24x7 using Control Tower, you can add them later without deleting and recreating the integration.
Site24x7 can discover AWS accounts that are not yet part of the integration and add them to your existing Control Tower setup.
When to use this
You can use account resync when an AWS account was:
- Not selected during the initial integration.
- Part of an organizational unit that was not included during the initial setup.
- Not provisioned successfully when the integration was created.
- Newly added to the AWS organization but not picked up automatically.
Prerequisites
Before you begin, make sure that:
- You have an existing Control Tower integration in Site24x7.
- You have Admin or Super Admin access in Site24x7.
- You have access to the AWS console for the management account used during the initial Control Tower integration, with permission to create a CloudFormation stack.
- The accounts you want to add are active member accounts of the same AWS organization.
Add missed AWS accounts
- Log in to Site24x7 and go to Cloud > AWS > Control Tower Accounts. Click the edit icon next to the integrated account.
- You can also open the account from Admin > Inventory > Monitors.
- On the Edit Integrated AWS Account page, select Multiple Accounts as the integration method.
- Select the Register with Control Tower tab.
Note
Make sure you select Register with Control Tower when resyncing accounts for an existing Control Tower integration. The Register with Delegated Admin tab is used to migrate a Control Tower integration to the Delegated Admin method and is not used to add accounts to the existing Control Tower integration.
- In Step 1: IAM Role ARN's Creation, select the AWS region in which the CloudFormation stack needs to be created.
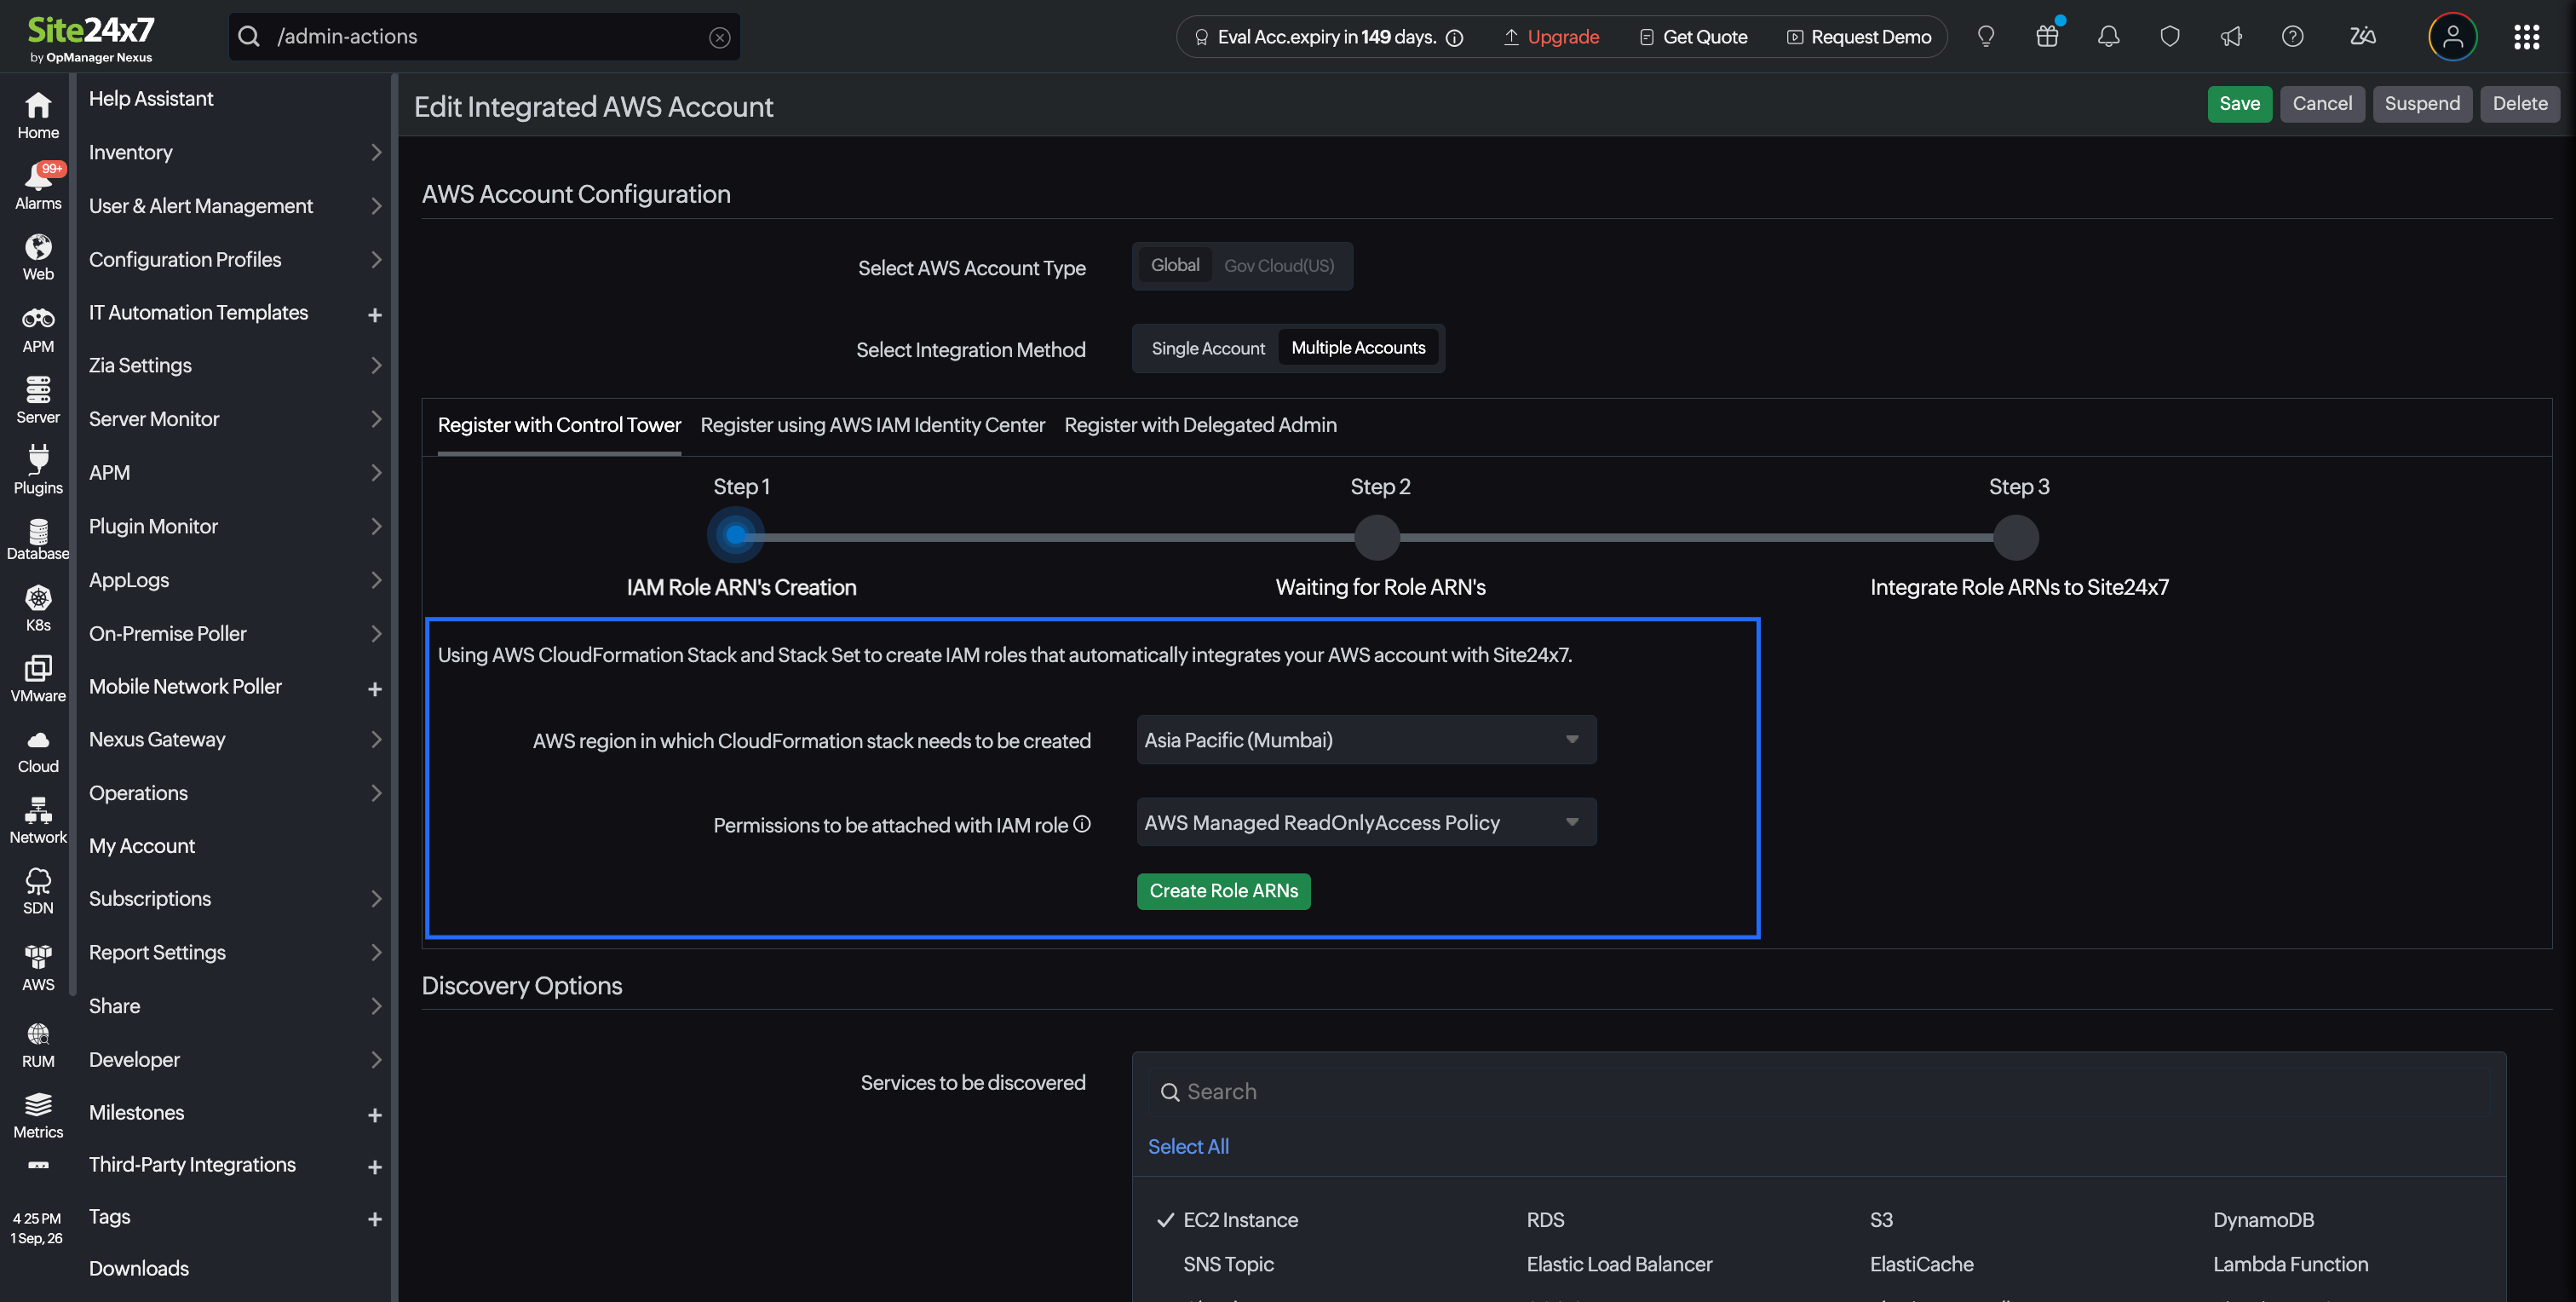
- Select the same permission model that you used during the initial integration for the Permissions to be attached with IAM role field. Site24x7 provides two options for IAM role permissions:
- AWS Managed ReadOnlyAccess Policy: The IAM role will be created with the ReadOnlyAccess policy, which is managed by AWS for all services.
- Site24x7 Custom Policy: The IAM role will be created with the in-line policy formulated with the read-only permissions required for Site24x7-supported services.
- Click Create Role ARNs. The CloudFormation stack in your account will automatically create all the necessary components in your account.
- A CloudFormation Quick create stack page in the AWS console opens in a new tab with the required values prefilled.
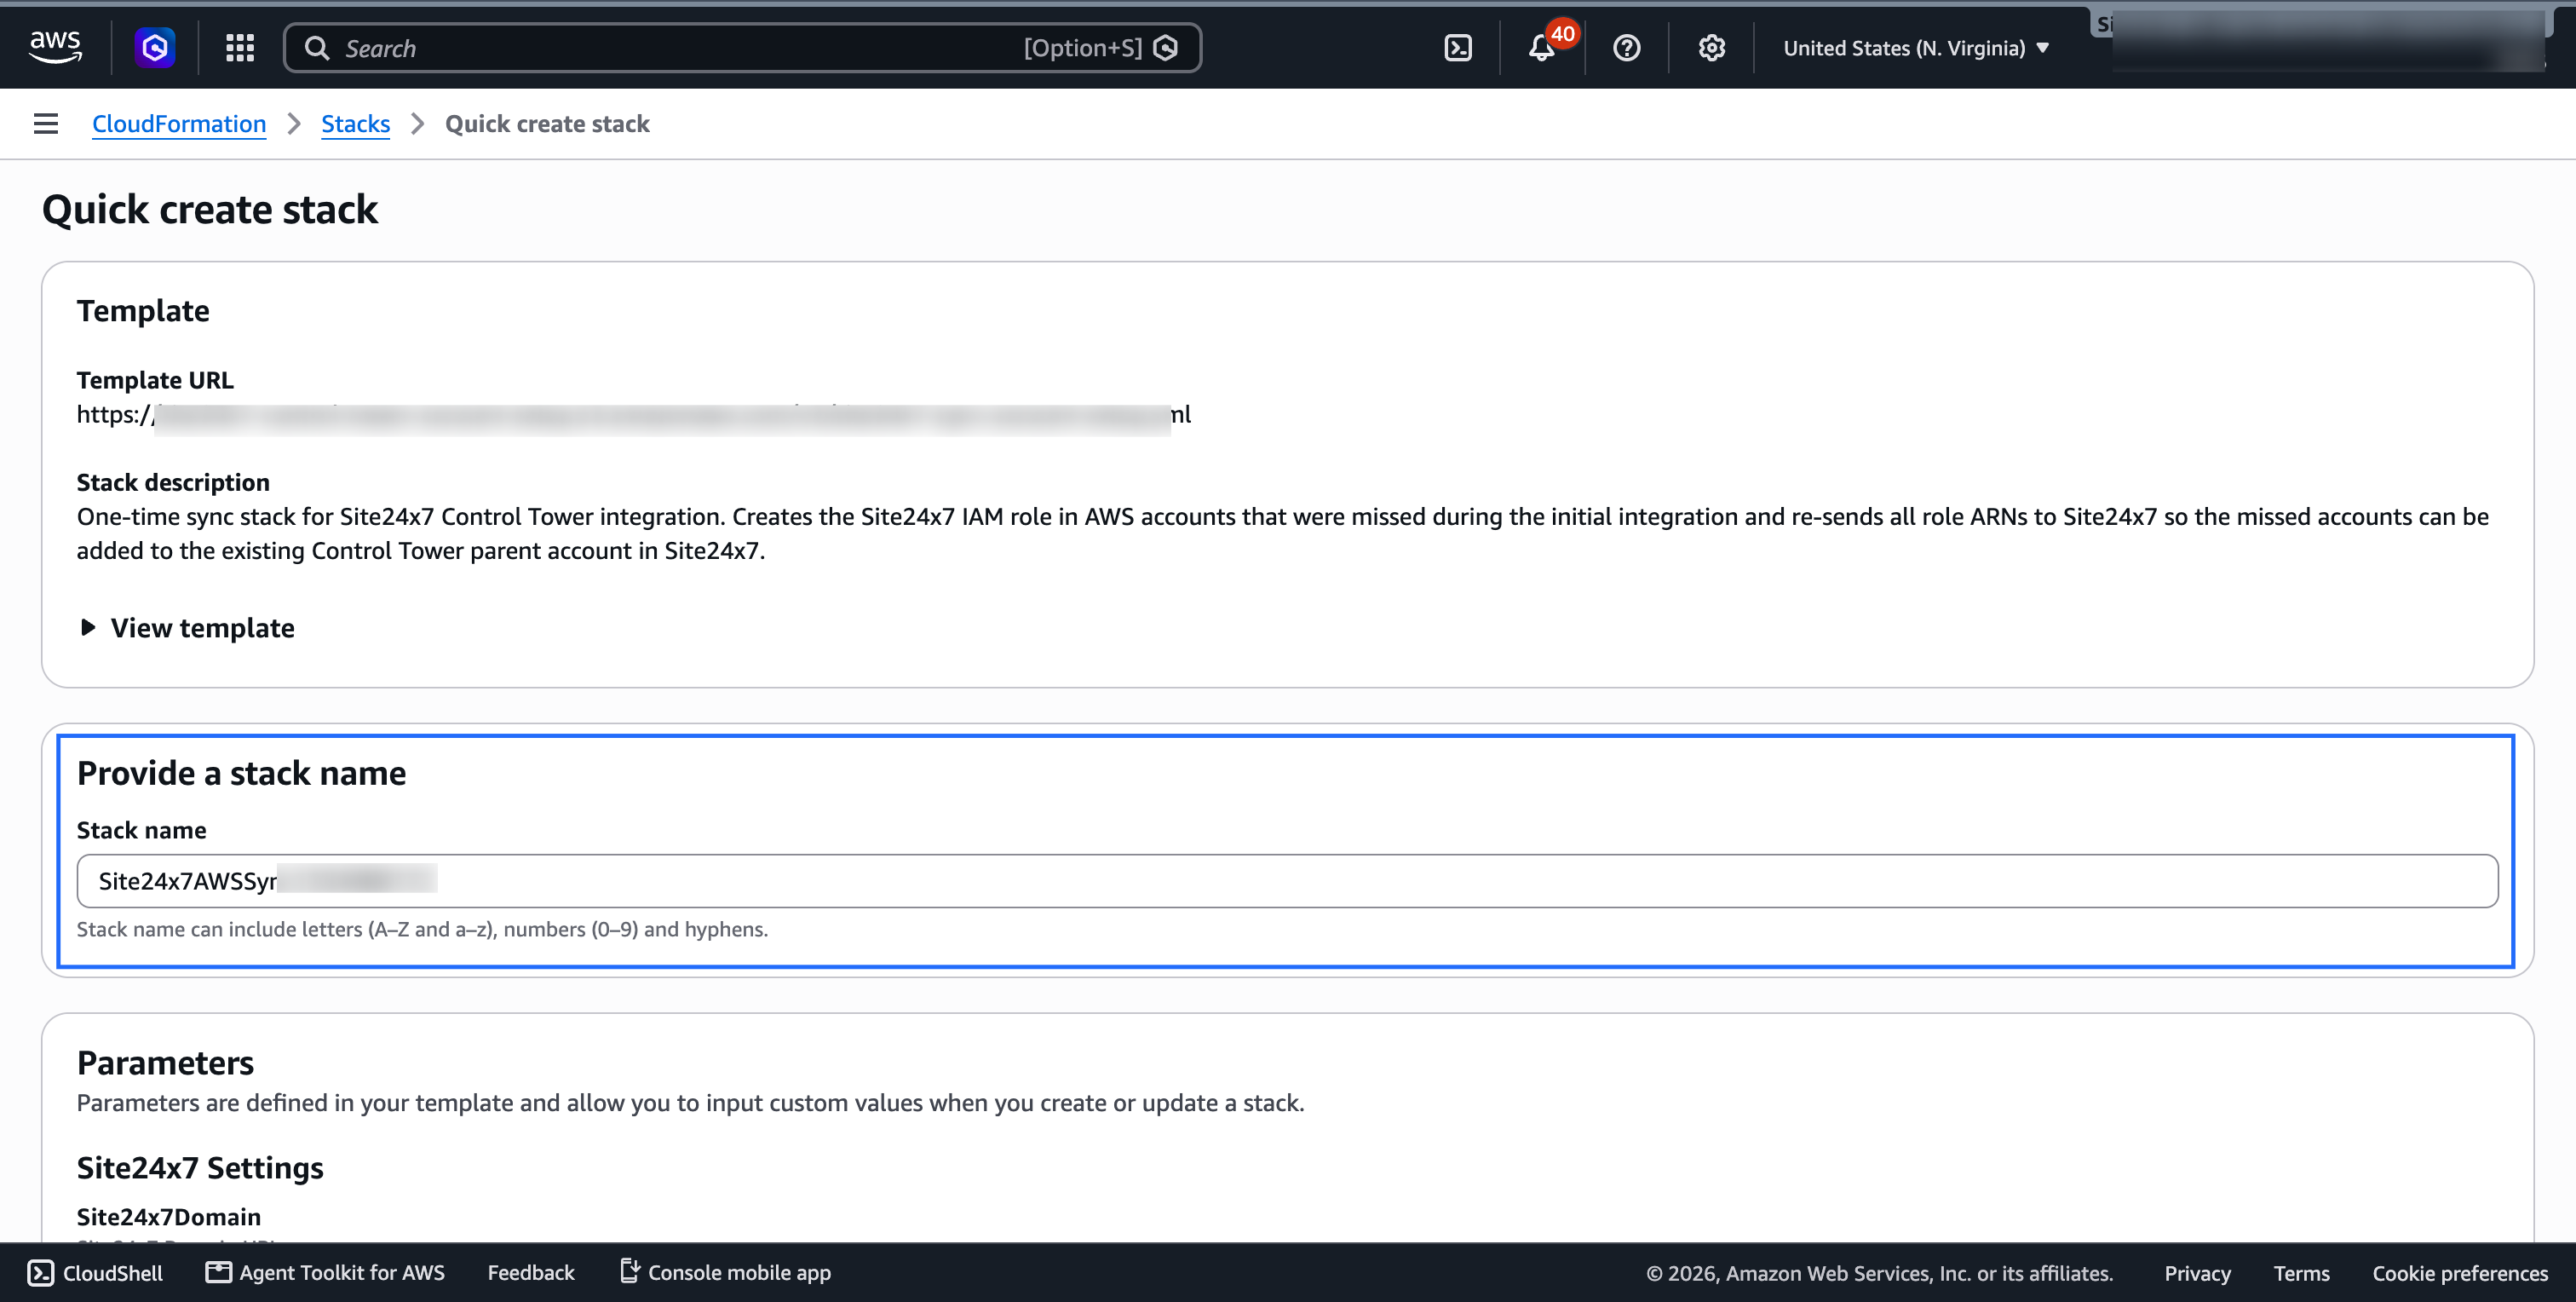
- Review the details, acknowledge the IAM resource creation requirement, and click Create stack.
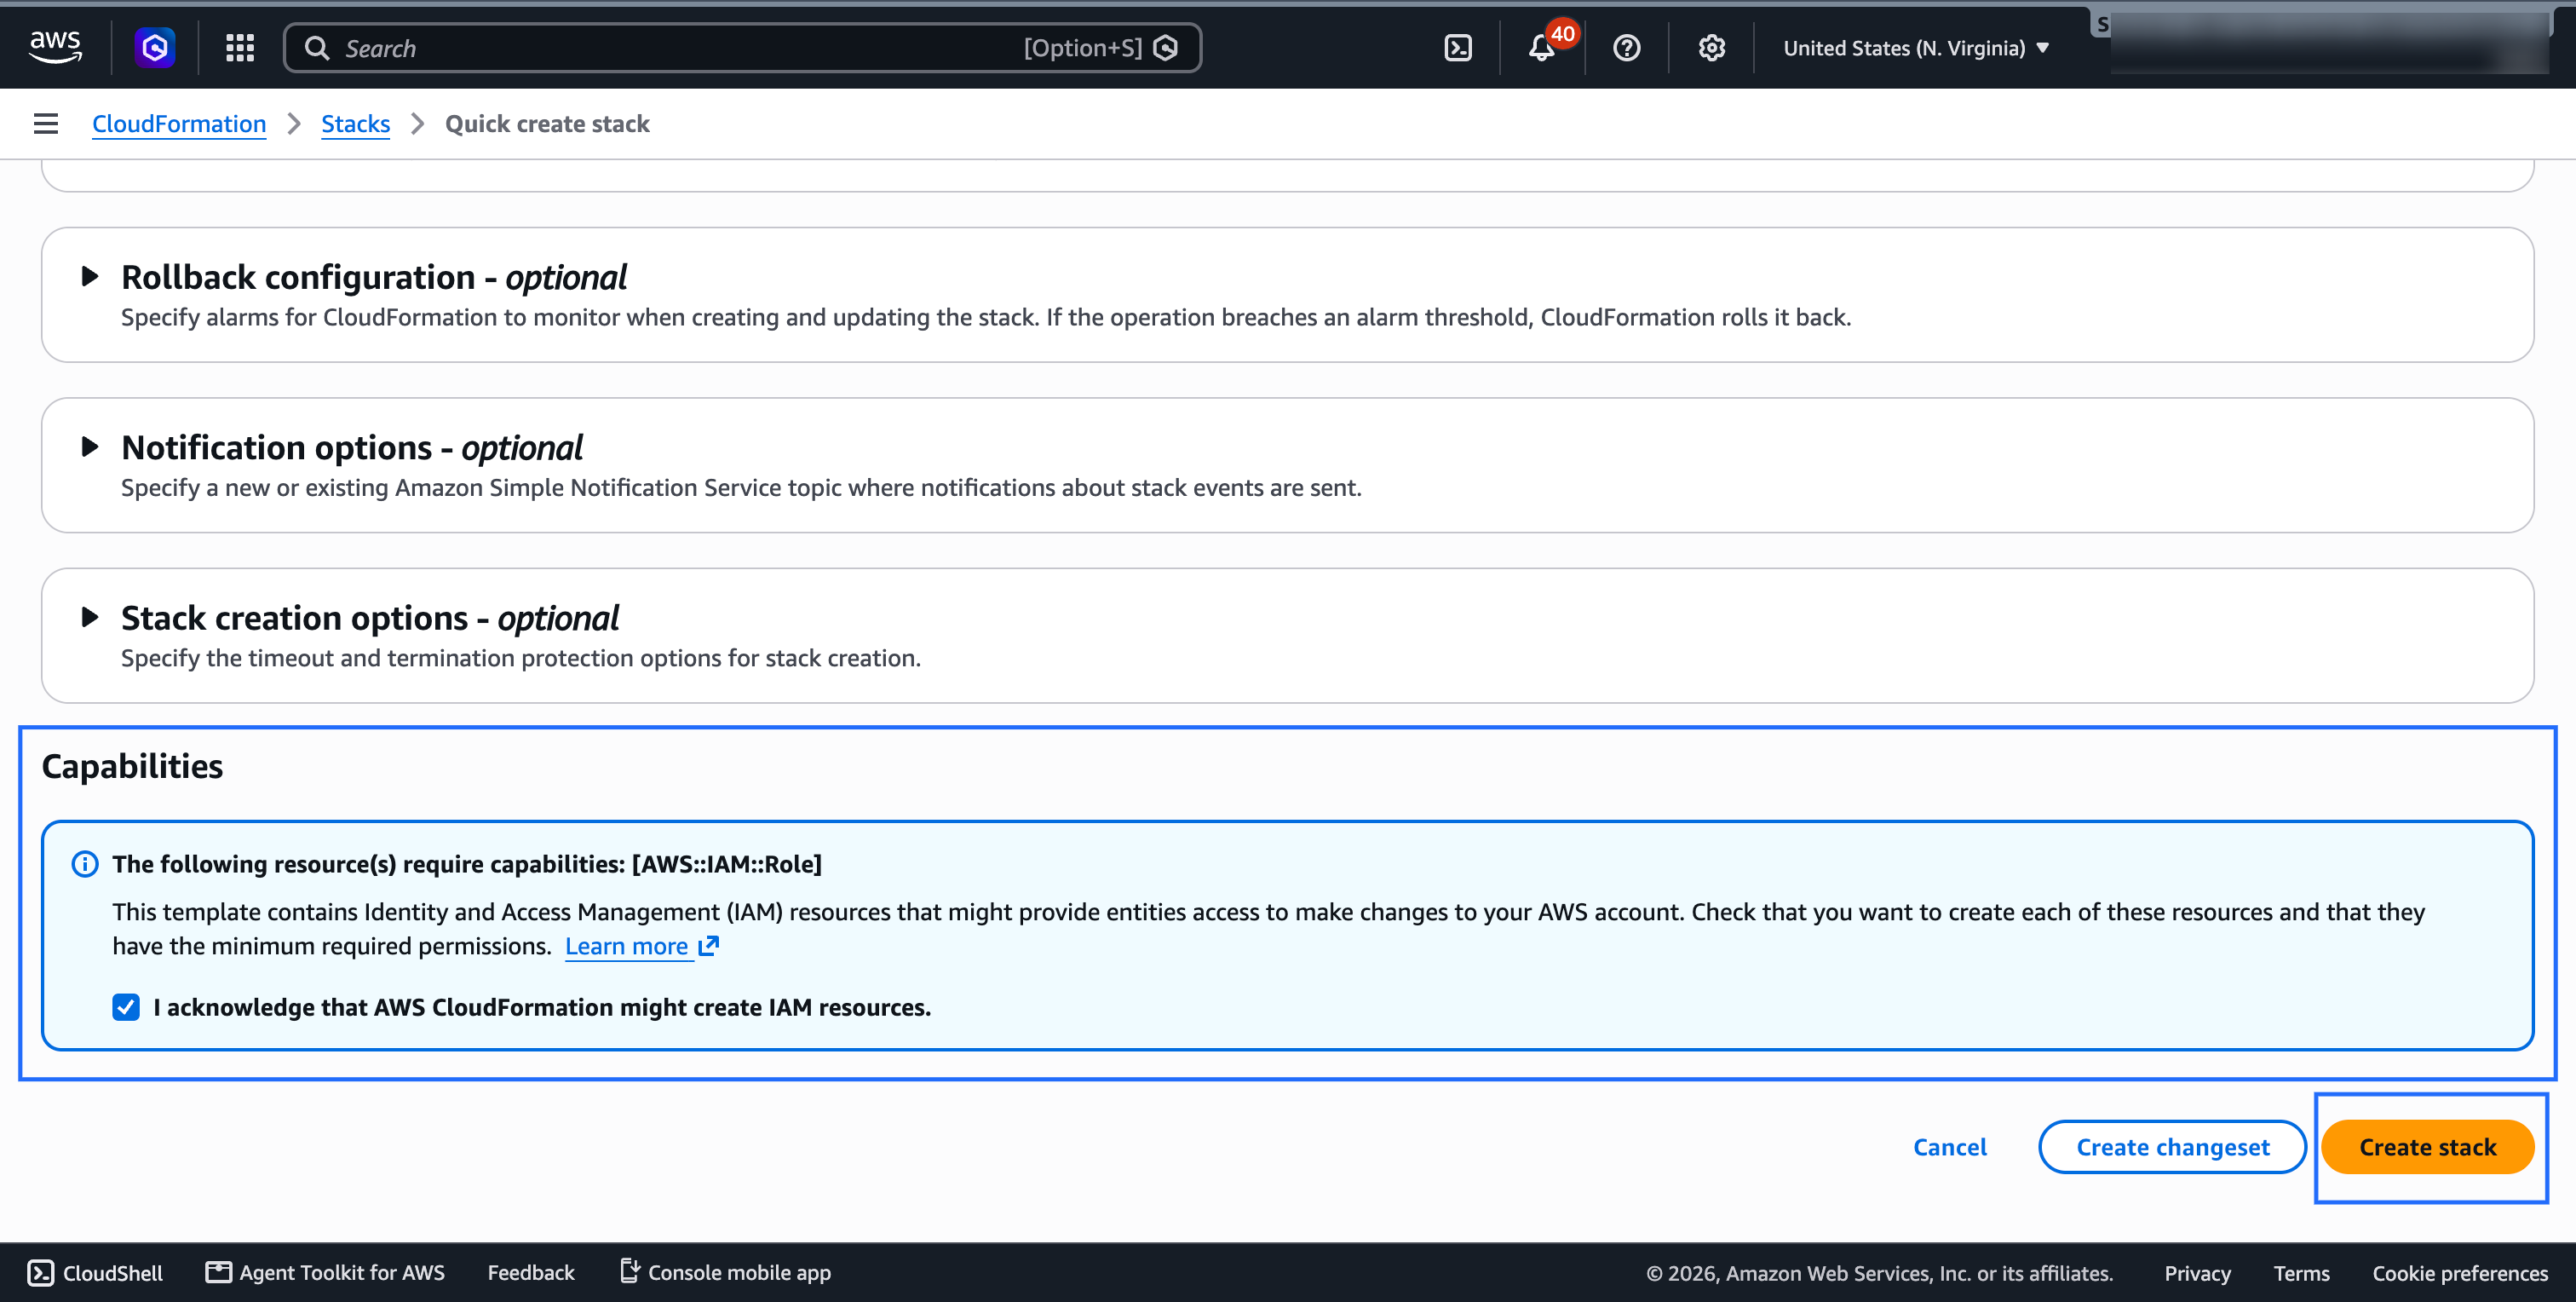
- The stack, named Site24x7AWSSync..., creates the Site24x7 IAM role only in accounts that do not already have the role and reports the accounts in your organization back to Site24x7. Accounts that are already integrated are not modified.
- In the Site24x7 console, Step 2: Waiting for Role ARN's displays the progress while AWS CloudFormation creates the required IAM roles. This usually completes within a few minutes. If the process takes longer, click Click here to manually sync the details.
- In Step 3: Integrate Role ARNs to Site24x7, review the accounts listed under Select Accounts. Accounts that are already part of the integration are shown as grayed out and cannot be selected. Select the accounts you wish to add, or click Select All to select all available accounts.
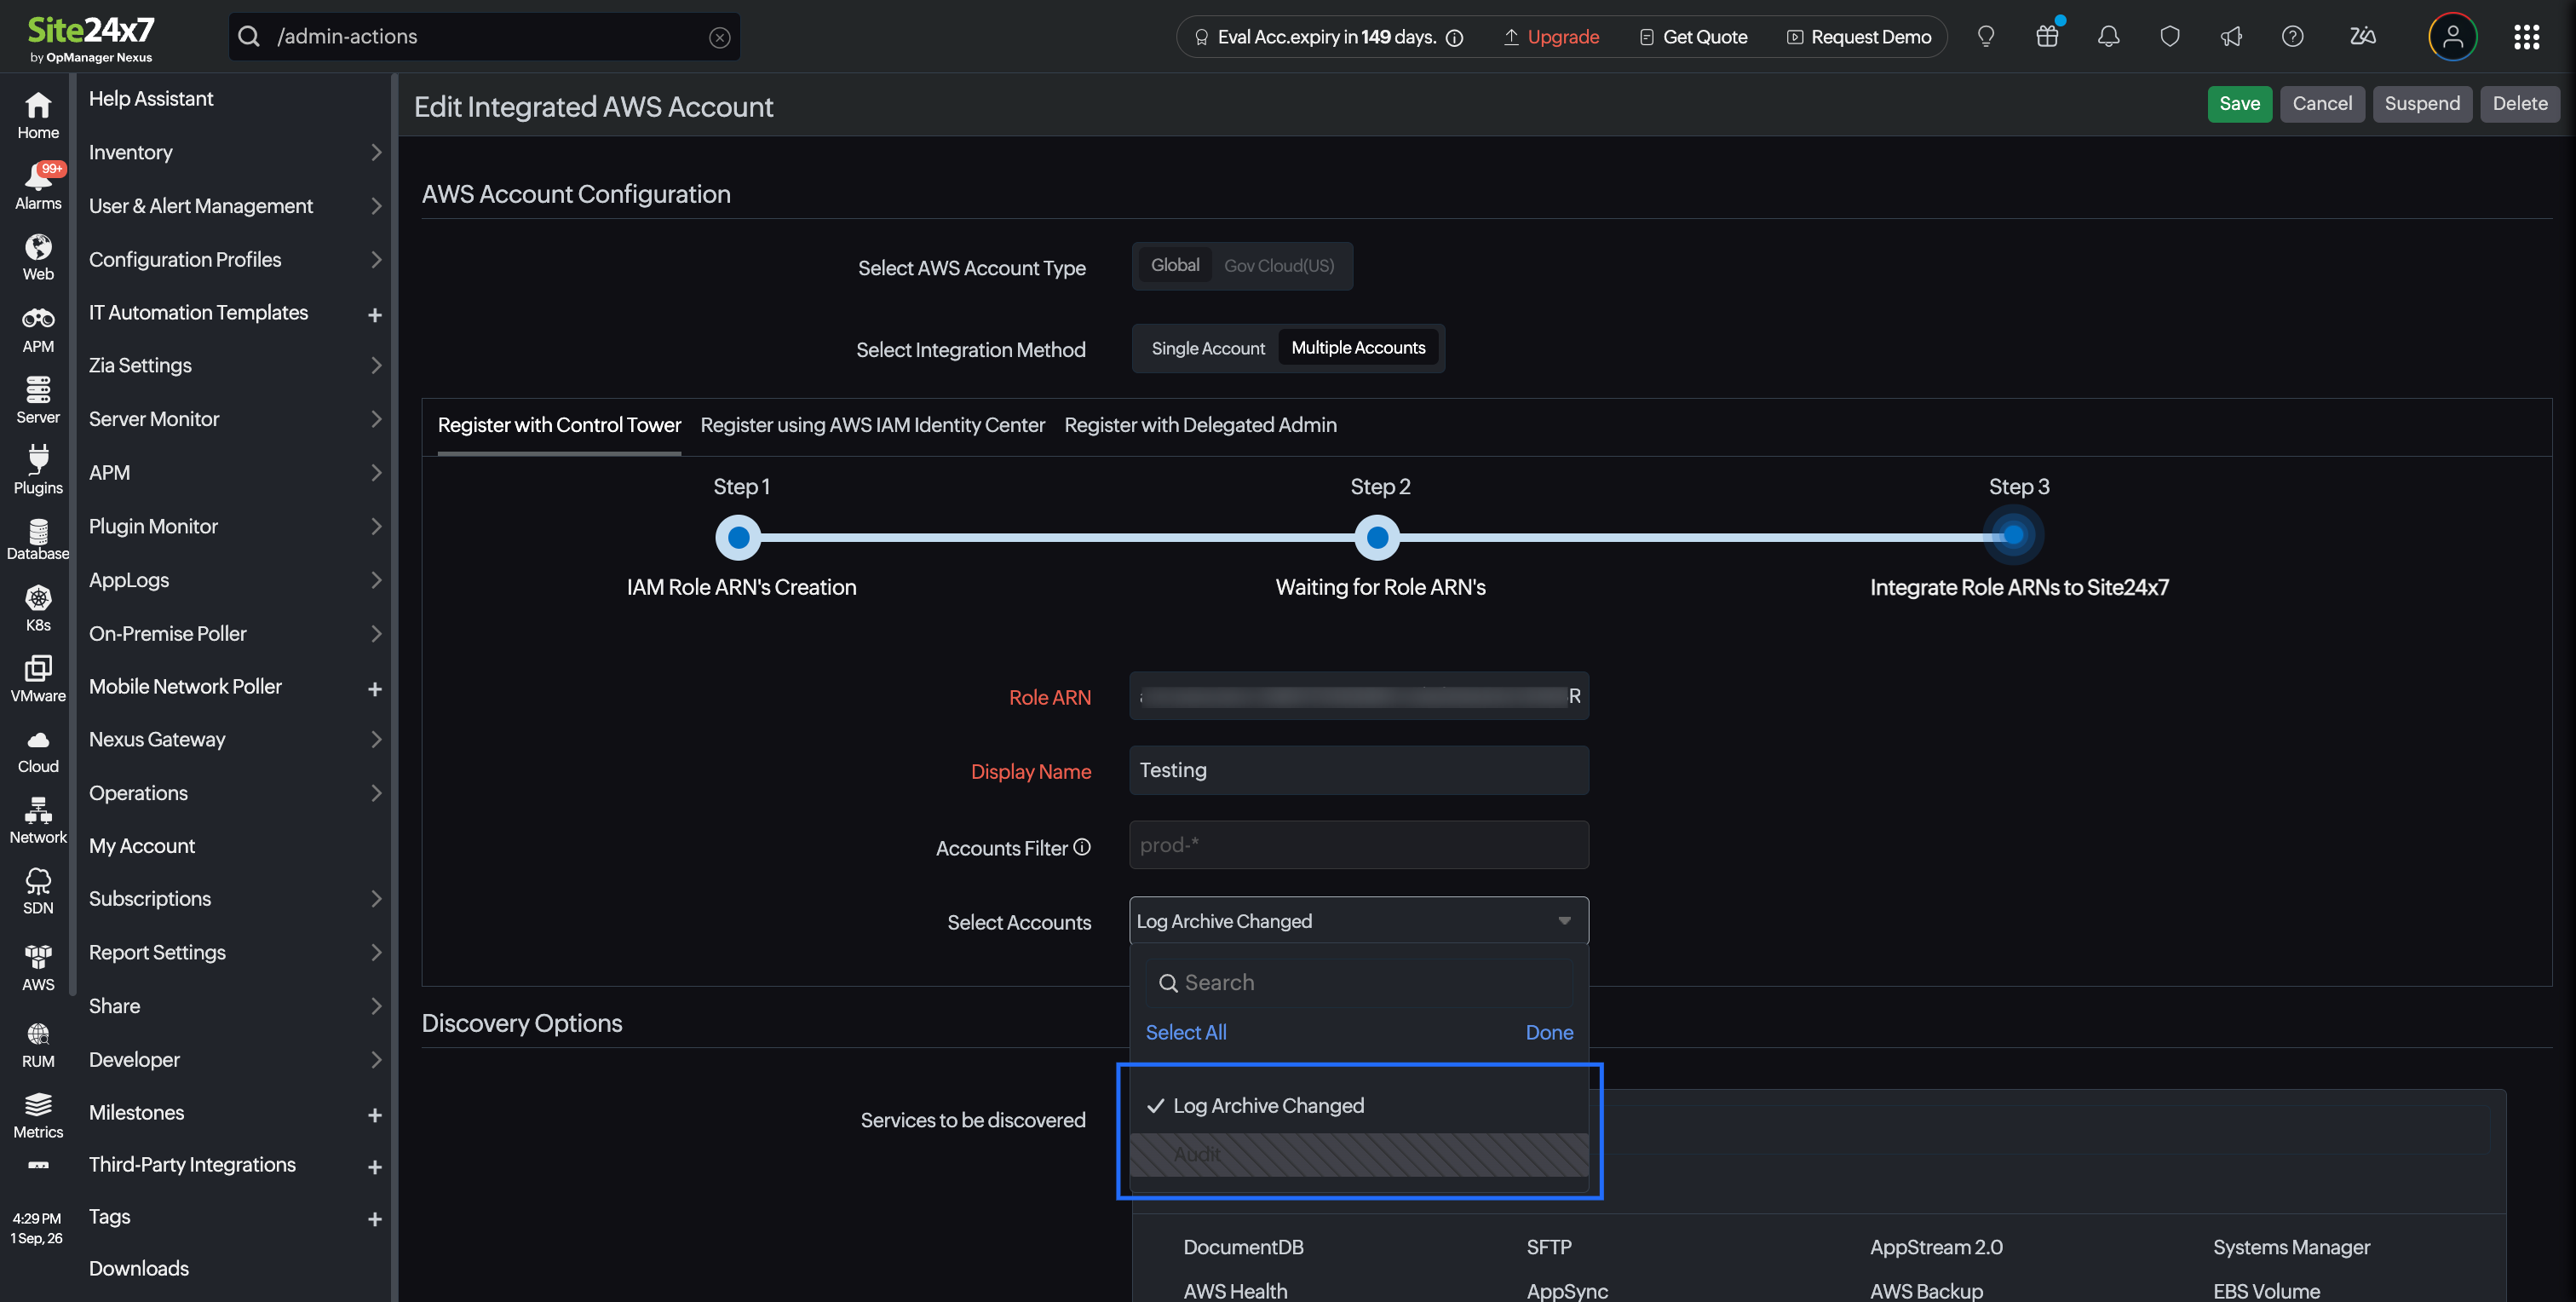 NoteIf your integration uses an Accounts Filter regular expression, you do not need to select individual accounts. Newly discovered accounts that match the filter are added automatically when you save the integration.
 - Click Save.
The selected accounts are added to the existing Control Tower integration. Resource discovery starts for the new accounts using the settings configured for the parent integration. The accounts then appear under Control Tower Linked Accounts.
Points to note
- No new integration is created. The accounts are added to the existing Control Tower integration and inherit its configuration, including discovered services, thresholds, notification settings, and advanced settings.
- Accounts that are already integrated are not duplicated, even if you run the account resync process again.
- Complete the process within one hour of the CloudFormation stack completing. If this window expires, click Create Role ARNs again to restart the process.
- The Site24x7AWSSync... CloudFormation stack is a one-time helper stack. After the accounts are added, you can delete the stack from the AWS console. The IAM roles created by the stack are retained, so monitoring continues without interruption.
- To cancel the process, click Back in Step 2 and confirm the cancellation. Any CloudFormation stack already created in AWS is not removed automatically and can be deleted from the AWS console.
- The IAM role name is the same as the one used during the initial integration. Choose the same permission model you used initially, and do not change the prefilled values in the CloudFormation page unless instructed by the Site24x7 support team.
Troubleshooting
-
The Register with Control Tower tab is not visible
Make sure Multiple Accounts is selected under Select Integration Method and that you have Admin or Super Admin privileges. -
Step 2 continues to wait
In the AWS console, verify that the Site24x7AWSSync... CloudFormation stack has reached CREATE_COMPLETE. If the stack failed, review the stack's Events tab and recreate the stack. -
An expected account is not listed
Verify that the account is an active member of the same AWS organization. If the CloudFormation stack was restricted to specific organizational units, verify that the account belongs to one of them. -
An account is grayed out
The account is already part of the Control Tower integration and does not need to be added again.
Control Tower Inventory Dashboard and Custom Dashboard
The Control Tower Inventory Dashboard provides a centralized view of all your AWS Control Tower parent and linked accounts resources. It offers insights into monitored resources, resource breakdown by region, and key metrics to help you efficiently manage your AWS environment.
To view the Control Tower parent account details, go to the Inventory Dashboard and in the top-right corner, toggle to the Parent Account option to view data for resources discovered in the parent account. To access combined data for all resources discovered through Control Tower integration, toggle the option to Linked Accounts.
The Geo Map widget in the Custom Dashboard provides a regional breakdown of resources for your Control Tower parent and linked accounts. You can choose to view the region map or the numerical data of the resources from a region.
The Monitor Count widget in the Custom Dashboard displays the total monitor count for all Control Tower accounts. It shows:
- The total number of monitored resources for both parent and linked accounts.
- A numerical split-up of the region-based service count.
- The region-based service distribution in a table format with the numerical option.
- The vertical bar chart option, allowing you to visualize how different AWS services have been operating over a selected time range.
Updating a stack for Control Tower account
To use the latest features implemented for Control Tower accounts, you have to update the existing stacks configured for your Control Tower accounts.
To update a stack in AWS console:
- Login to AWS console.
- Navigate to All services > Management & Governance > CloudFormation.
- Select the stack that needs to be updated from the Stacks list.
- Click Update.
- Select Replace current template.
- Copy and paste the Template URL from the Site24x7's Edit Integrated AWS Account page in the Amazon S3 URL field.
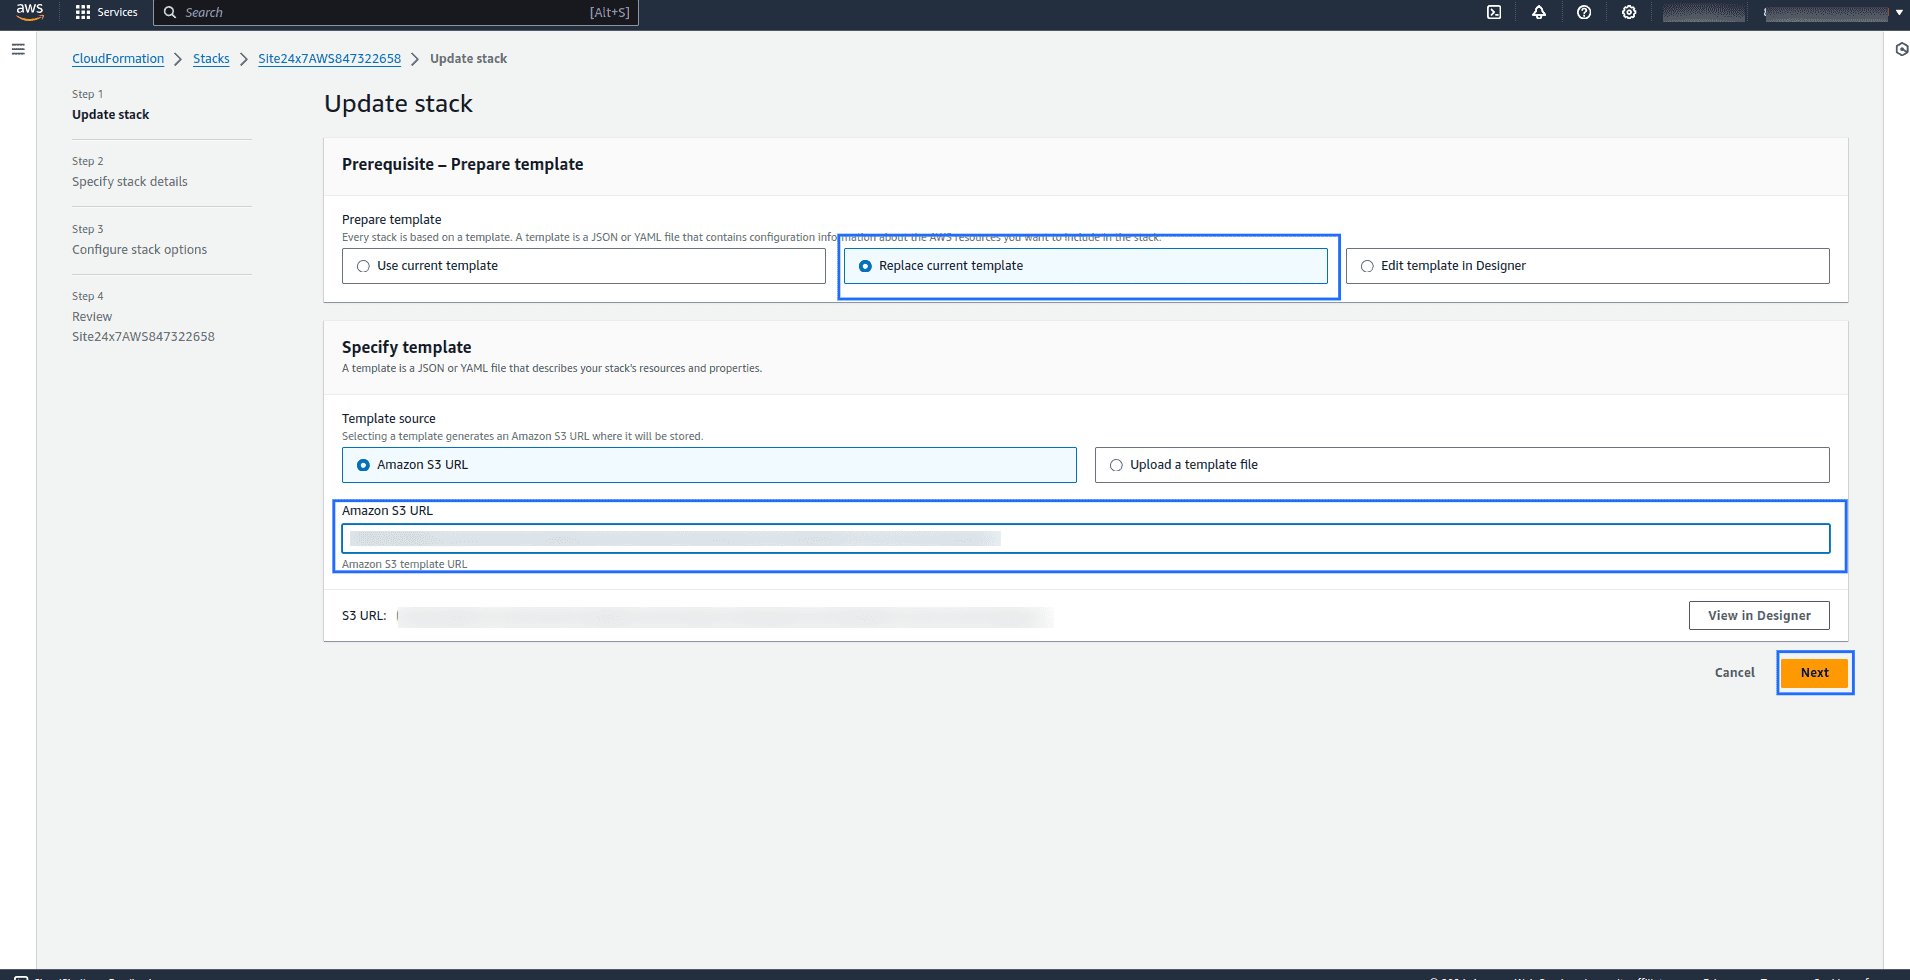
- Click Next.
- Copy and paste the Secret Rotation Key from the Site24x7's Edit Integrated AWS Account page in the APIRotateKey field.
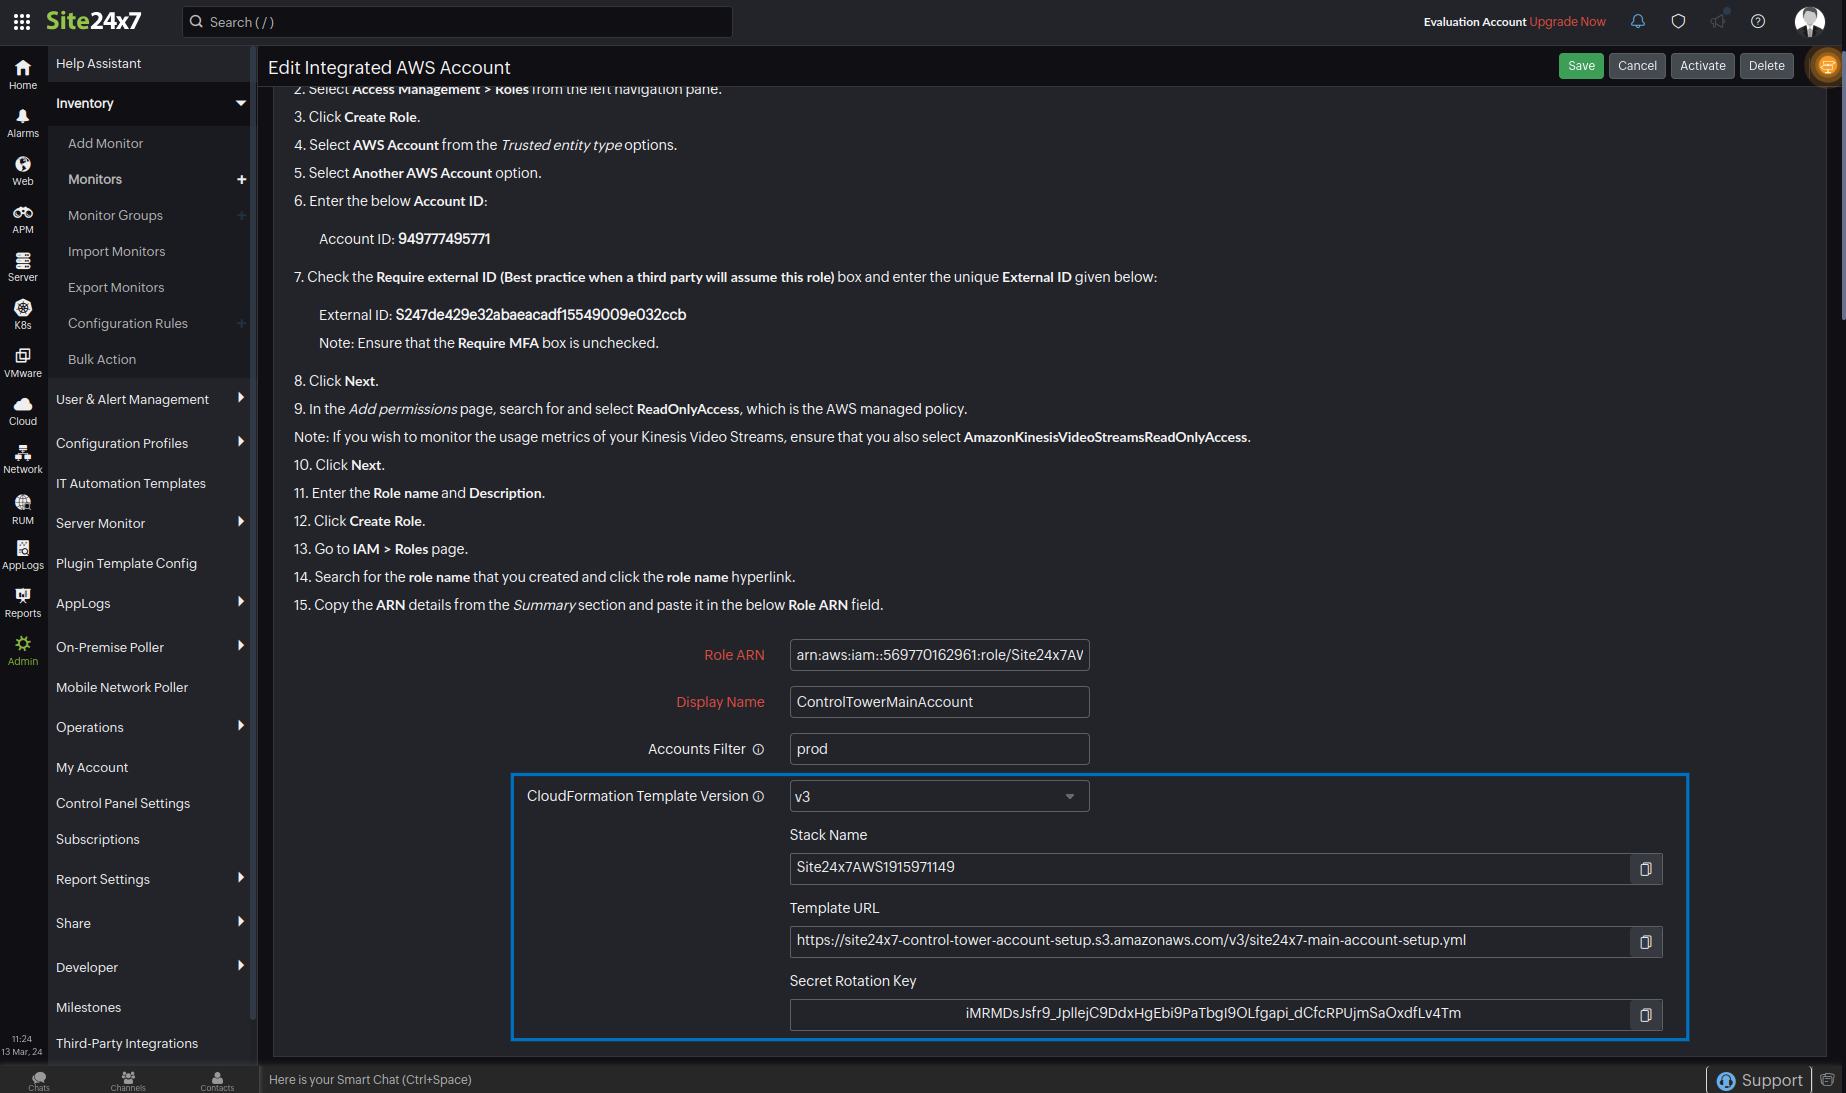 NoteThe secret rotation key feature is available only for version 3, which is the latest version. The key rotation feature enables the rotation of keys stored in the AWS Secrets Manager.
 - Click Next.
- Verify the details in the Configure stack options page and click Next.
- Review the stack details and select the acknowledgement check box below the Capabilities.
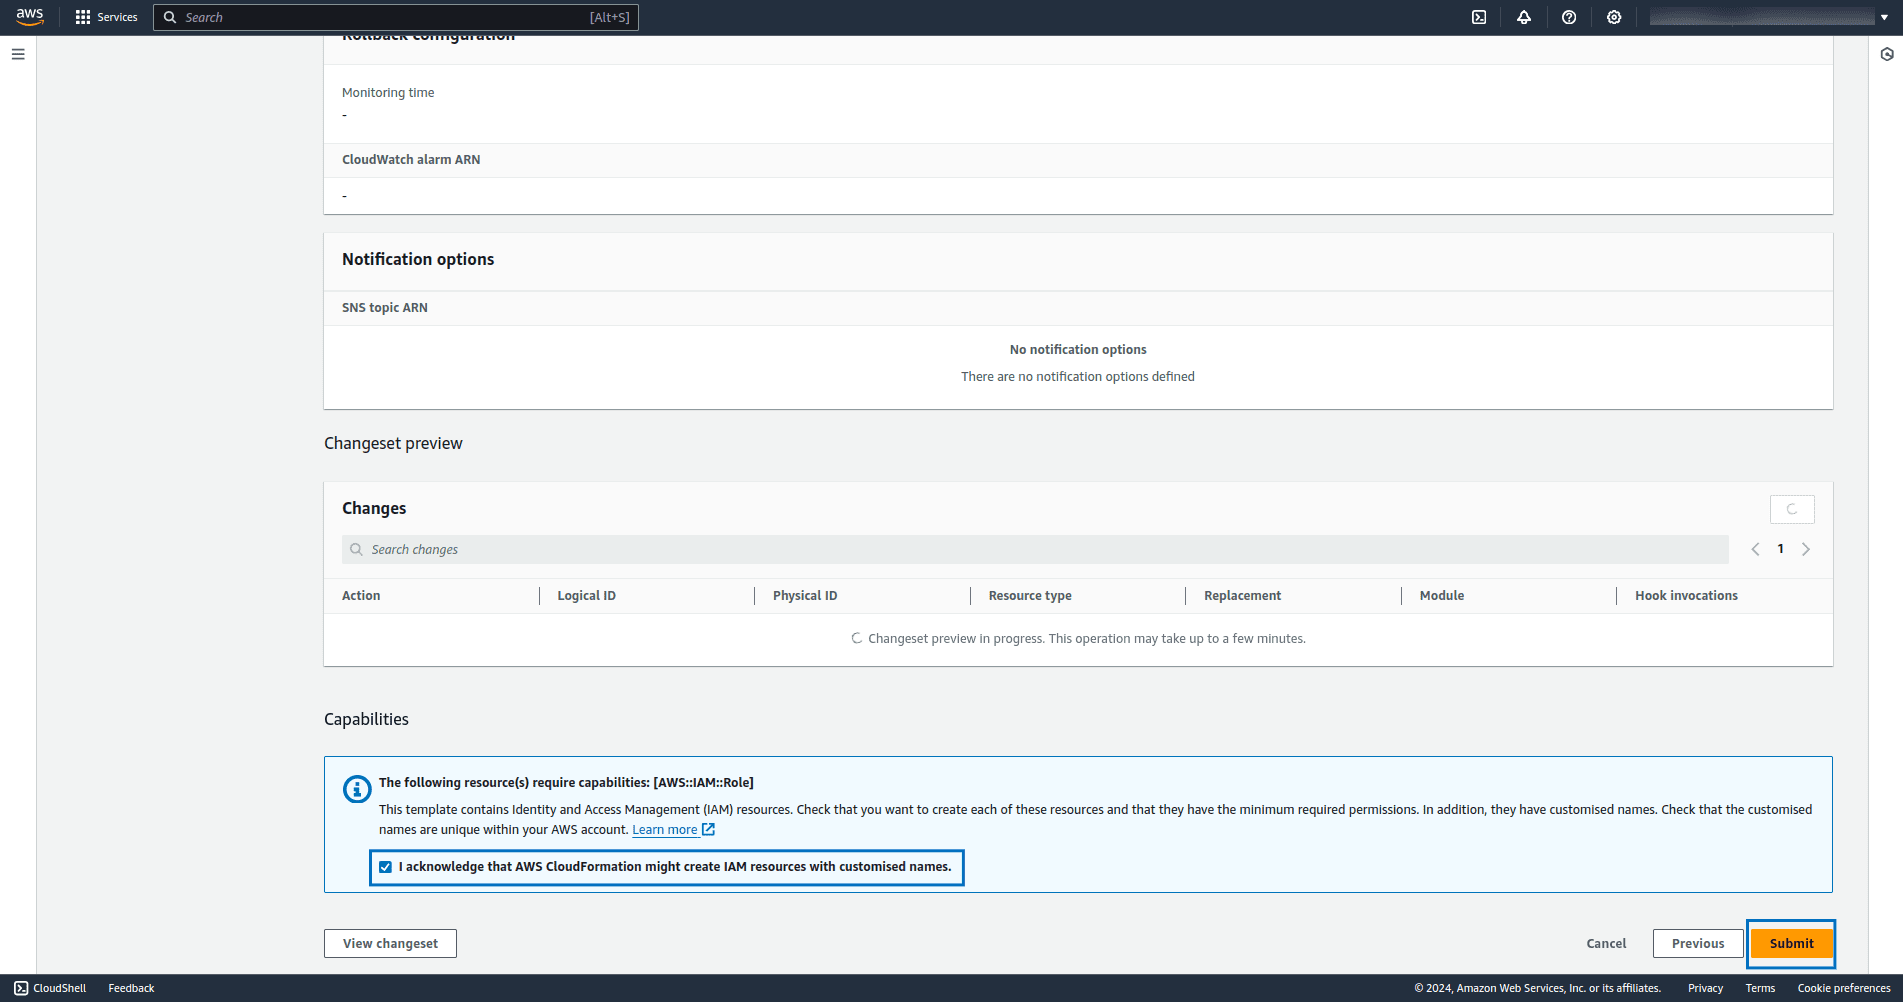
- Click Submit.
Once the stack update process is completed, the update status will be displayed for the selected stack in the Events tab.
-
On this page
- Use cases
- Prerequisites
- Permissions
- Benefits of using AWS Control Tower for integration
- Integrate your AWS account with Site24x7 using AWS Control Tower
- Add AWS accounts to an existing Control Tower integration
- Control Tower Inventory Dashboard and Custom Dashboard
- Updating a stack for Control Tower account