Web Tokens
About Web Tokens
A JSON Web Token (JWT) is an industry standard defined in RFC 7519 as a compact and self-contained way to create access tokens for securely transferring information between two parties. When a user logs in to an authentication server with their credentials, a Web Token is returned. When this same user makes API calls to an application, the application uses the Web Token to authenticate the user attempting to access protected resources.
Creating a Web Token
Register Site24x7 with your authentication server to monitor protected websites and endpoint APIs using Web Tokens. To set up monitoring, follow the steps below:
- Log in to Site24x7.
- Navigate to Admin > Configuration Profiles > Web Tokens.
- Click Add Web Tokens.
- You'll be prompted with an Add Web Token form.
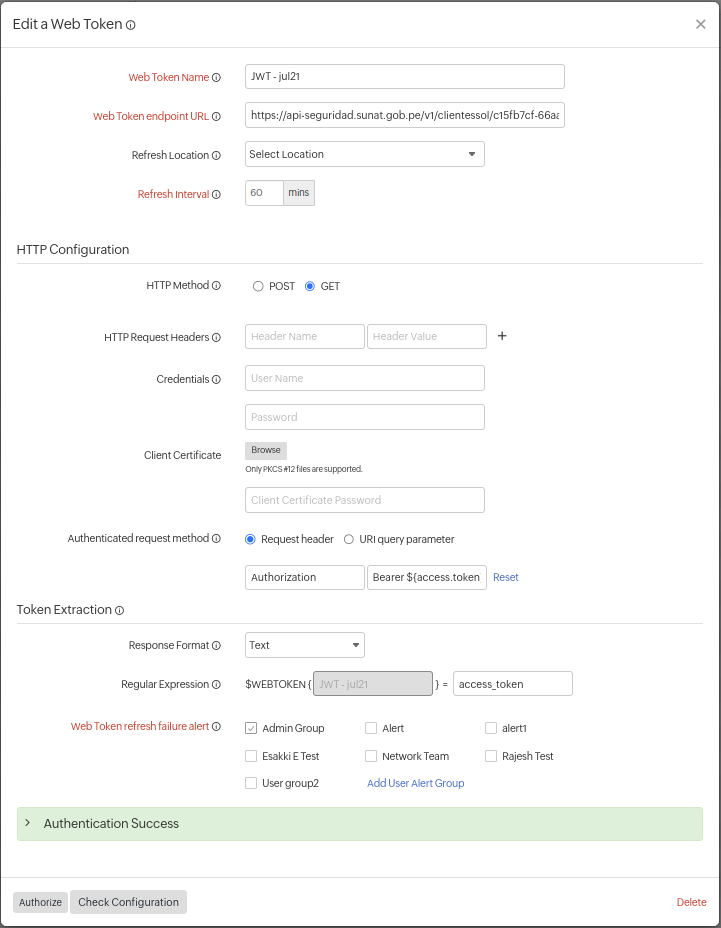
- Specify the following details:
- Web Token Name: Provide a Web Token name that will be used to authenticate the API endpoints.
- Web Token endpoint URL: Specify the URL of the endpoint of your authentication server.
- Refresh Location: Choose the location from the drop-down menu where you want to refresh the token. This will collect configuration data based on the selected location.
- Refresh Interval: The Web Token is refreshed after the specified time interval by querying the endpoint URL.
- Specify the following details under HTTP Configuration:
- HTTP Method: Specify the method to be used for connecting with the webpage– POST or GET. Use the radio buttons to configure the form submission method and appropriate body type for the POST HTTP method.
- HTTP Request Headers: There are times you may want to customize the default HTTP request header information. In such cases, the additional header name and value can be added here.
- Credentials: Specify your username and password for URLs requiring Basic/NTLM-based authentication.

- Authenticated request method: Choose the method used to submit Web Tokens for authenticating API endpoints. Pick and define the method to pass the access Token. You can always use customized nomenclatures in the parameter fields.
- Request header: The access token is sent as the request header. Send the bearer token in the following name-value syntax:
"Authorization: Bearer ${access.token}" - URI query parameter: You can send the access token in the URI query parameter using the following syntax:
"access_token=${access.token}"
- Request header: The access token is sent as the request header. Send the bearer token in the following name-value syntax:
-
Specify the following under Token Extraction:
The token value in the response is extracted and can be further used to customize request parameters, headers, and more for other monitor types where authentication is needed in the request URI.- Response Format: Extract values from the Web Token as regular expressions, JSONPath expressions, or XPath expressions based on the chosen format: Text, XML, or JSON.
- Web Token refresh failure alert: Choose a user alert group to receive notification when a Web Token refresh fails three consecutive times.
- A Sample Webtoken Response:
{
"access_token": "XXXXXXX","token_type": "bearer","expires_in": 3599,"refresh_token": "YYYYYYY",".issued": "Mon, 20 Jan 2020 09:39:44 GMT",".expires": "Mon, 20 Jan 2020 10:39:44 GMT"
}'$.access_token' is the Json Expression for fetching the token from the response.
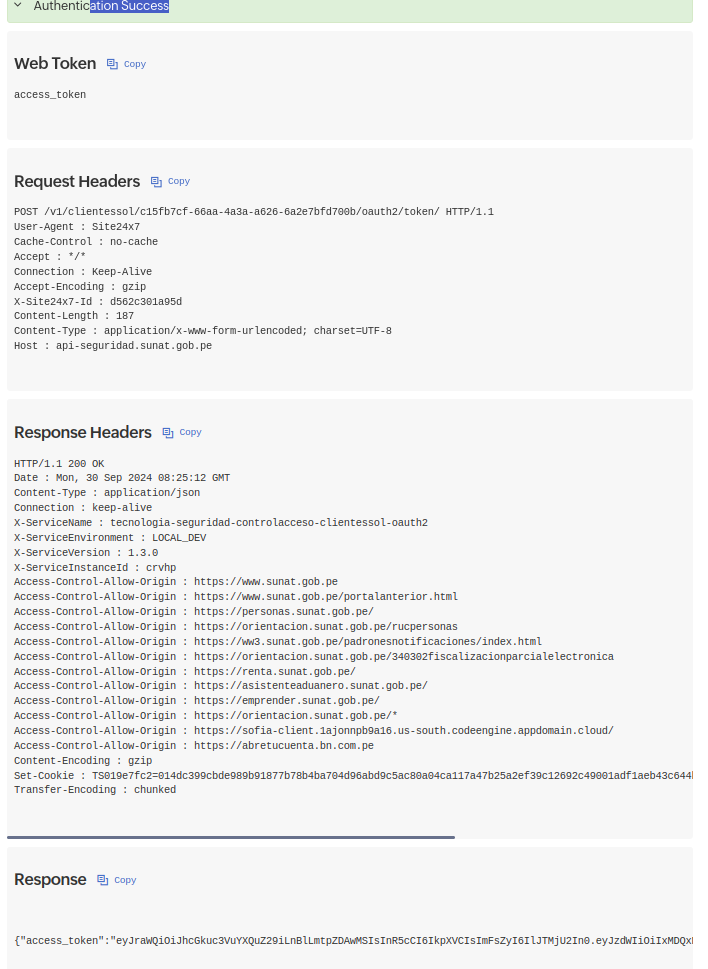
- Click the Check Configuration button to test the Web Token once you have entered all the details related to your Web Token configuration. Once the test is complete, the result will display the related Web Token, Response Header, and the Responses of your Web Token.
 Note
Note- Configure the Regular Expression extractor to locate the token's key from the response.
- Set the key based on the token received in the response.
- Unsuccessful requests and responses will be highlighted in red color with the message Authentication failed.
- You can easily copy the responses by clicking on the Copy
 icon.
icon.

- Click the Authorize button to get the Web Token for your endpoint URL. This token will be refreshed based on the time provided in the Refresh Interval.
Enabling cookies via request headers
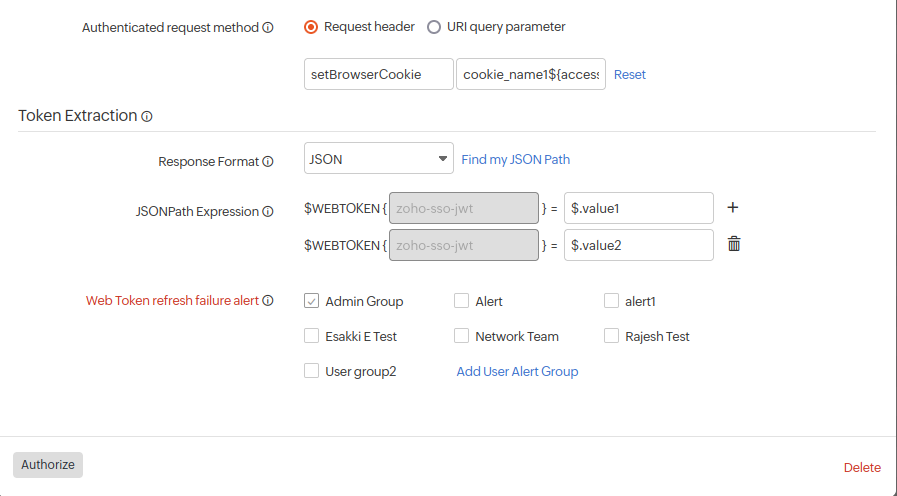
To send cookies via a request header, you need to specify a custom header in your requests. For instance, by setting the header name to setBrowserCookie, you can include multiple tokens in JSON format, which will be treated as cookies.
Follow the steps of creating a web token and modify the Authenticated request method and Token Extraction as below:
- Authenticated request method: Request header
- Request header: You can add multiple access tokens. These tokens will be sent as cookies when using setBrowserCookie as the request header name. Cookies are managed in the back-end during data collection.
Cookie tokens should be sent in the following name-value syntax:
cookie_name1${access.token}cookie_name2${access.token}globalparameter{global.token}
Ensure that the tokens are listed in sequential order from top to bottom in the JSONPath Expression field.

- Request header: You can add multiple access tokens. These tokens will be sent as cookies when using setBrowserCookie as the request header name. Cookies are managed in the back-end during data collection.
- Token Extraction: The token values from the response are extracted and can be reused for custom request headers, particularly in scenarios where authentication is needed for other types of monitors via the request URI.
- JSON Path Expression: The values in the JSONPath Expression field should be added as access tokens in the Request header. Ensure that the tokens are added sequentially from top to bottom as specified in the JSONPath.
Consider the below example:
Authentication request method : Request Headers
Header Name: setBrowserCookie
Header value: cookie_name1${access.token}cookie_name2${access.token}cookie_name3${access.token}globalparameter{global.token}
Token Extraction:
     Response Format: JSON
       1)$.value1
       2)$.value2
       3)$.value3
       4)$.12.00

Output:
     The final JSON Output, that will be set as cookies in the WebPage Speed (Browser) Monitor.
   {
       "cookie_name1":"$.value1",
       "cookie_name2":"$.value2",
       "cookie_name3":"$.value3"
       "current_time":"$.12.00"
   }
Sample:
setBrowserCookie: sessionId=abc123; date=2024-09-24; path=/; domain=.example.comNoteAdding multiple tokens in JSON format as cookies is only applicable in the Webpage Speed (Browser) monitor when using setBrowserCookie as the request header name.
- JSON Path Expression: The values in the JSONPath Expression field should be added as access tokens in the Request header. Ensure that the tokens are added sequentially from top to bottom as specified in the JSONPath.
