Network configuration compliance with our NCM tool
The network configuration compliance feature included in our network configuration management (NCM) tool helps protect your networks from security threats that may arise from not adhering to industry standards and policies. It ensures that your network remains compliant with Cisco IOS, SOX, HIPAA, CIS Cisco ASA, the PCI DSS, and any other customized policies.
What is network configuration compliance?
Network configuration compliance helps:
- Implement rules and policies to defend your network from potential threats.
- Ensure compliance with industry standards like Cisco IOS, SOX, HIPAA, the PCI DSS, or any other custom organizational policies.
Network administrators face a significant workload due to the increasing complexity of networks and the growing number of threats. Moreover, non-compliance with industry standards can lead to costly and risky consequences for organizations. Managing various network devices from different vendors is an overwhelming task; this is where our NCM tool helps.
The network configuration compliance feature in our NCM tool ensures network compliance by conducting compliance checks on backed-up device configurations. In the event of a rule or policy violation, network administrators are promptly alerted.
How it works
The NCM tool includes a set of rules, rule groups, and compliance policies that can be modified or added to by network administrators. These rules are essential for protecting the network. Rules are present in rule groups, and rule groups are present in compliance policies.
The NCM tool automatically backs up device configurations when a change is detected. To ensure compliance with network configurations, the NCM tool performs a compliance check and identifies non-compliance based on established policies that contain rule groups and rules. Accordingly, network administrators receive alerts based on their threshold settings.
Compliance Dashboard
- Log in to your Site24x7 account.
- Navigate to Network > NCM > Compliance > Dashboard.
- View violations according to:
- Policy in the Policies view. Learn more about the compliance policies available by default in our NCM tool and the rules associated with them.
- Devices in the Devices view.
- Compliance rules in the Rules view.
- Click each record to view more details about the violation.
- In the Policies view, click on a record and then click the device name to navigate to the device compliance page.
 Figure 1. Compliance dashboard
Adding a compliance rule
- Navigate to Network > NCM > Compliance > Rules. You can view all the already available rules on the Compliance Rules page.
- Click the Add Rule button in the top-right section of the page.
- In the Add Compliance Rule pop-up, provide the following details:
- In the Display Namefield, provide a name to identify the rule.
- Enter an appropriate Description.
- For Severity, toggle between Critical, Major, and Warning.
- For Criteria, toggle to select between Simple, Advanced, and Custom as needed.
- Simple Criteria: Single pattern check allowed.
- Advanced Criteria: Multiple pattern checks allowed.
- Custom Criteria: Multiple pattern checks allowed within a single configuration block that start and end based on user-defined conditions.
- In the Configuration File field, select one of these options from the drop-down: should contain all lines, should not contain any line, should contain exact set, or should not contain exact set. Also select the number of time(s) the configuration file should be checked for a pattern that you will be entering in the next field.
- In the Pattern field, enter the value that should be checked.
In the example shown in Figure 2, the configuration file will be scanned for the pattern check. If it is present only once, then the rule is not violated. Otherwise, this rule is violated.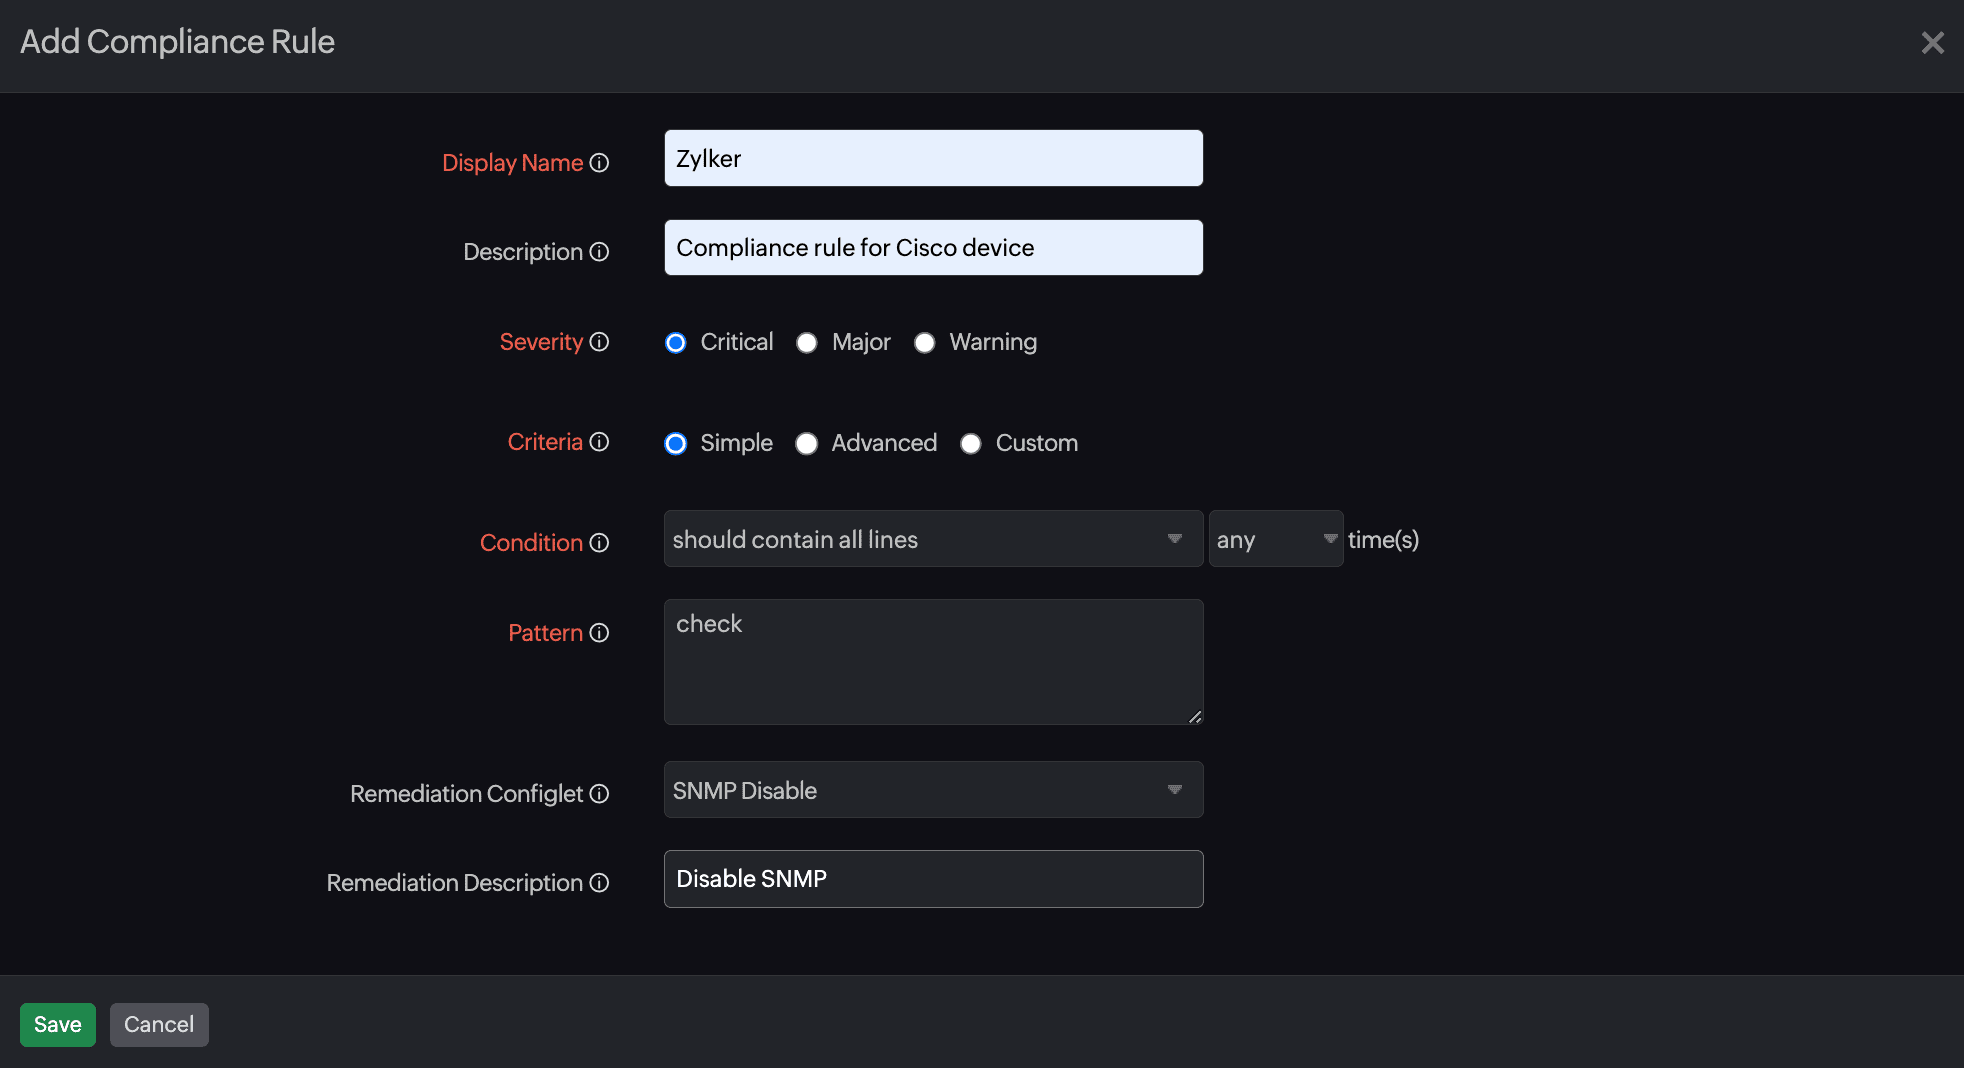
Figure 2. Adding a compliance rule with a Simple Criteria. - If you select Advanced Criteria, provide the following details:
- In the Condition field, select one of these options from the drop-down: should contain or should not contain.
- For Pattern, provide the value that should be checked in the configuration file.
- Enter the number of times the pattern should be checked in the Time(s) field. Click the plus + icon beside the Time(s) field to add more rows.
In the example shown in Figure 3, the rule will be violated only if both conditions are not satisfied.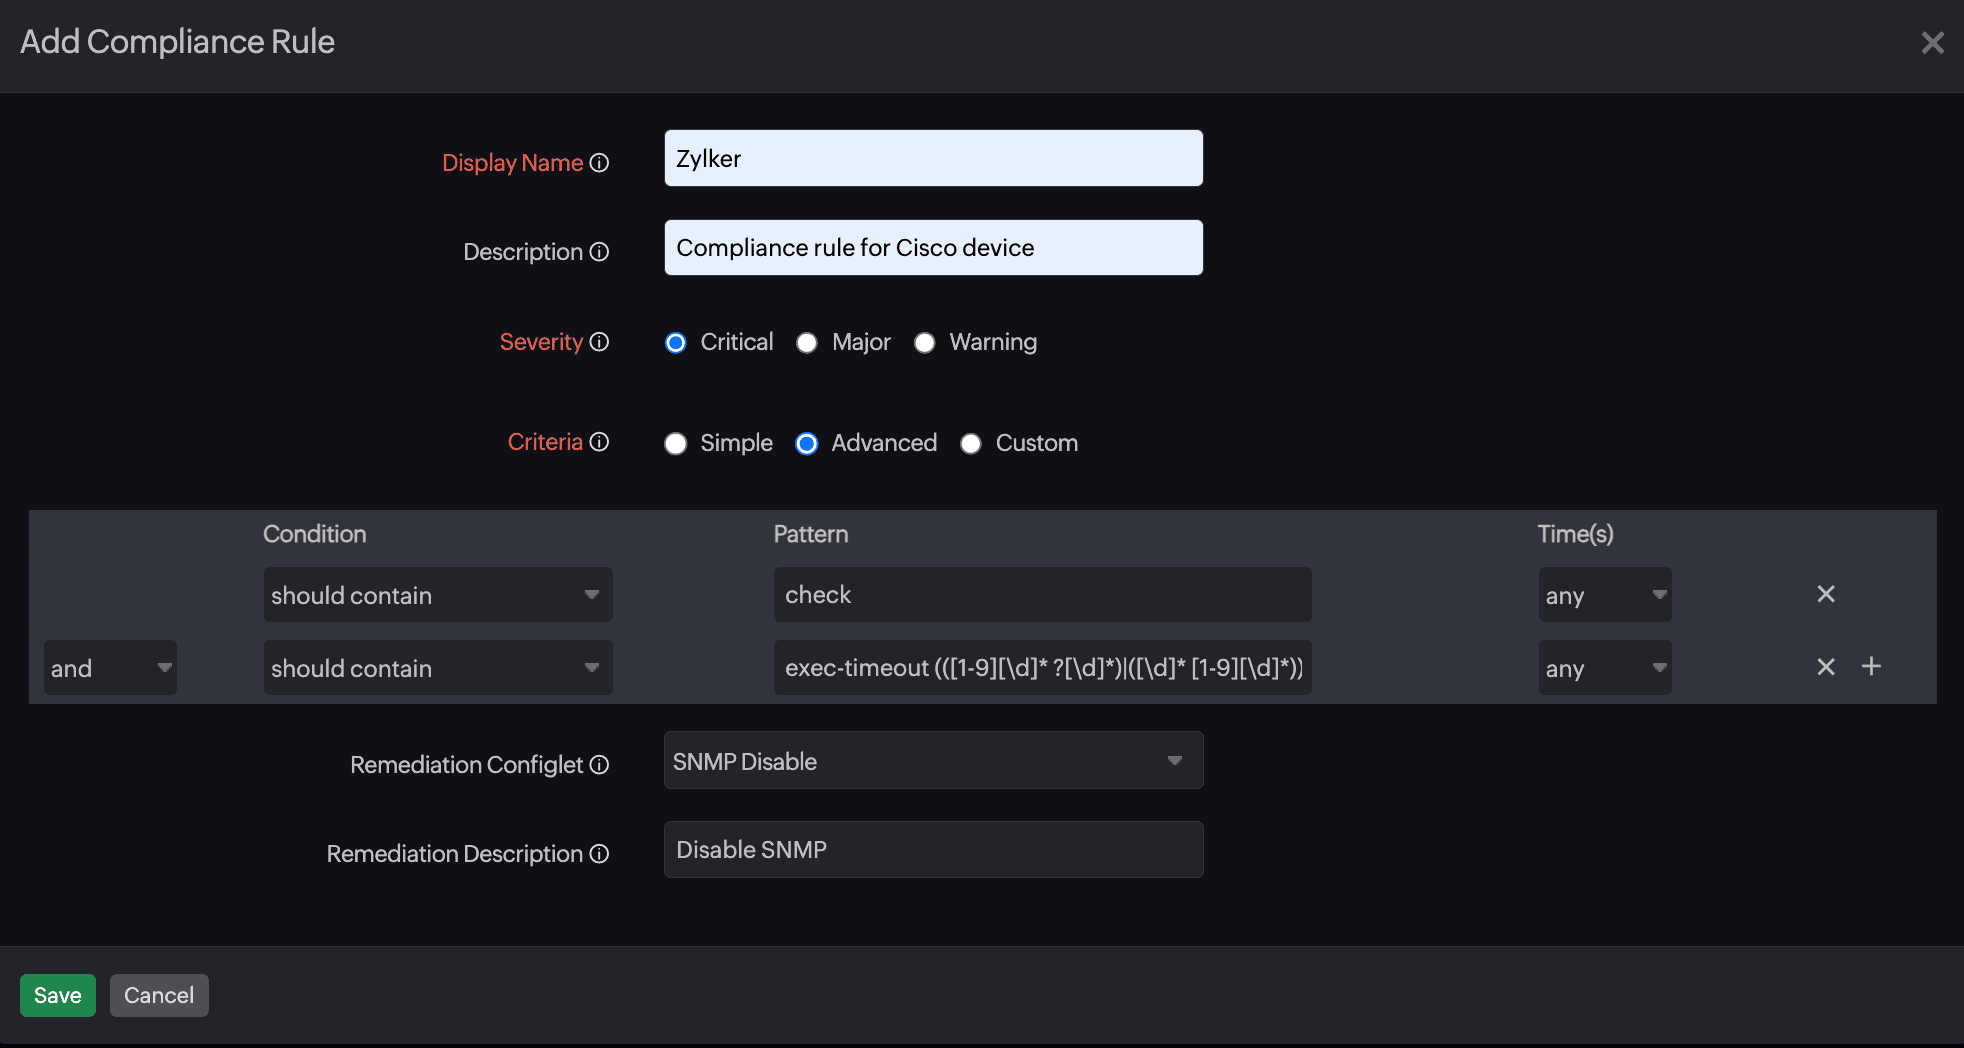 Figure 3. Adding a compliance rule with Advanced Criteria.
- If you select Custom Criteria, provide the following details:
- Provide a value in the Configuration Block Start and Configuration Block End fields to check for a value within a block in the configuration file.
- Provide additional criteria to be checked in theConfiguration Block field. Select an option between should contain and should not contain in the drop-down. Then, provide the value that should be present within the block in the empty field beside the drop-down.
- Next, provide the pattern that must be checked within the block. This is similar to the steps provided in Advanced Criteria (see step 7).
Figure 4. Adding a compliance rule with Custom Criteria.According to the given example in Figure 4, if a configuration file has a block that starts with check and ends with end, and includes the element date, it will be examined for the patterns utc (occurring any number of times) and GMT-4 (occurring once). If these conditions are present, a Critical alert will be produced for the rule.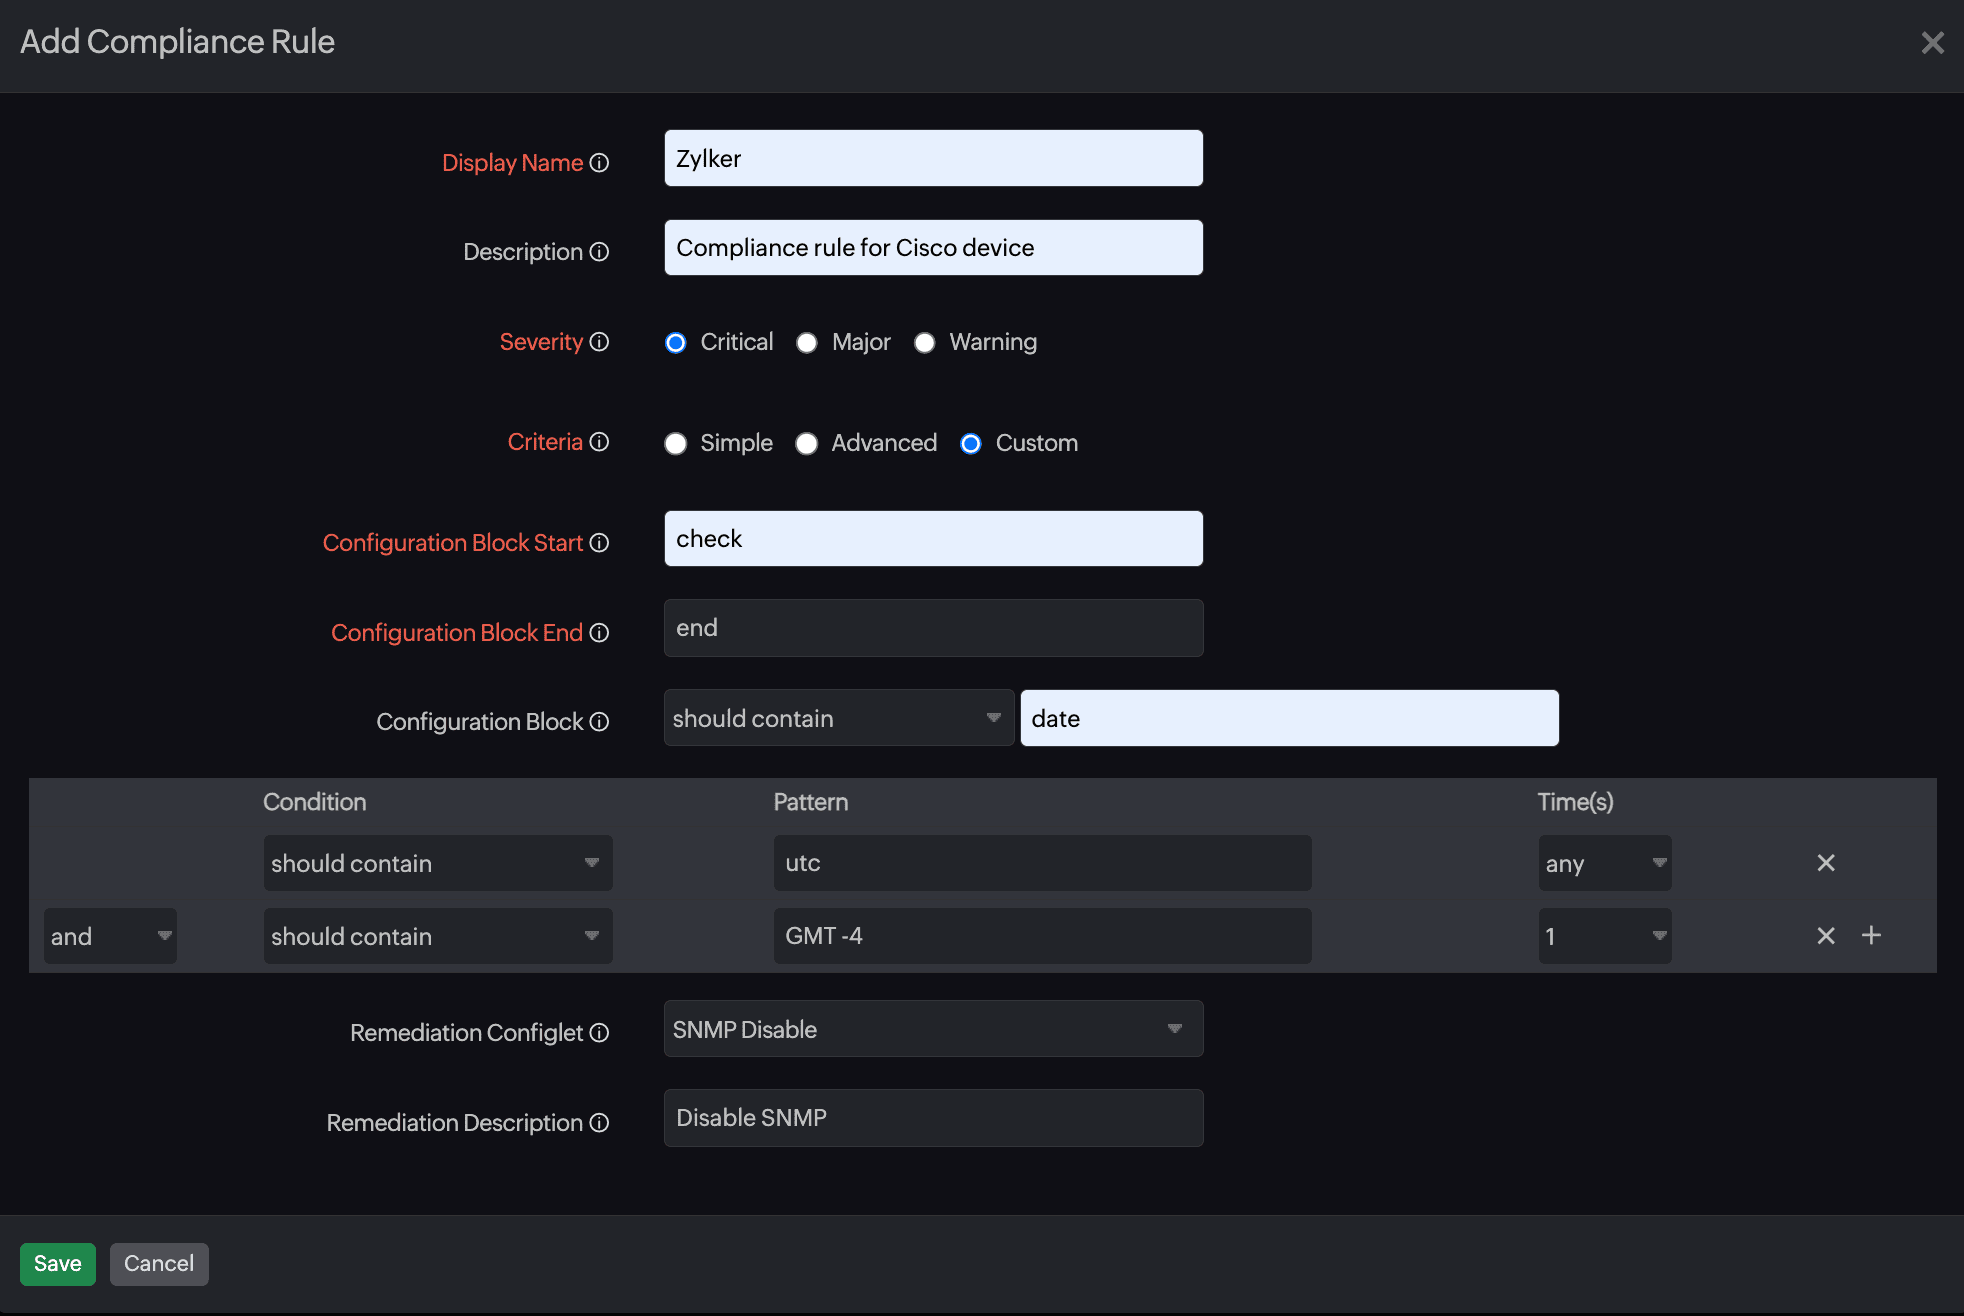 Figure 4. Adding a compliance rule with Custom Criteria.
- In the Remediation Configlet drop-down menu, select a configuration template or configlet that should be executed if the configuration rule fails.
NoteOnly configlets without any input parameters will be displayed in the drop-down menu.
- Provide a description about the Remediation Configlet selected in the Remediation Description field.
- Click Save.
Modifying a compliance rule
- Navigate to Network > NCM > Compliance > Rules.
- Then, click the pencil
 icon beside the rule that you wish to edit (Figure 5, marked as 1).
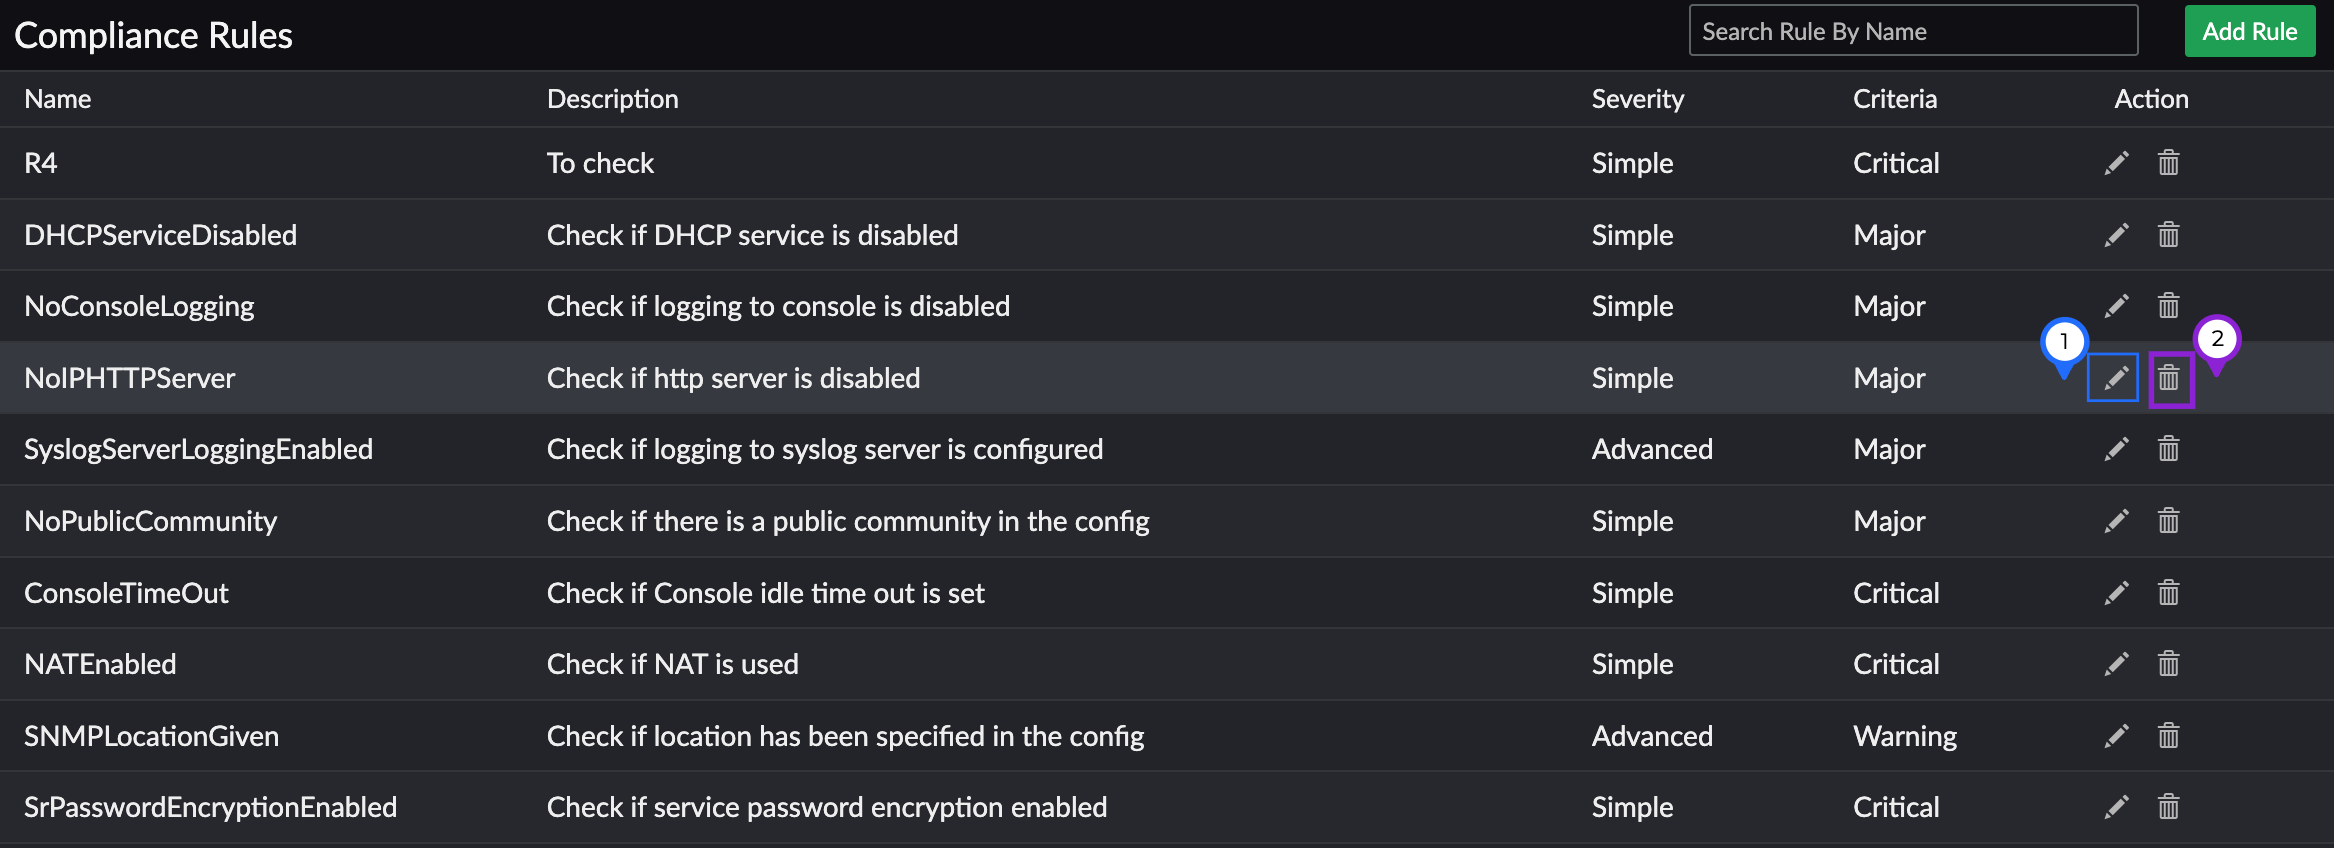
Figure 5. Editing a compliance rule. - You can also click a compliance rule to view more details about it and click Edit Rule at the bottom-left of the Compliance Rule pop-up.
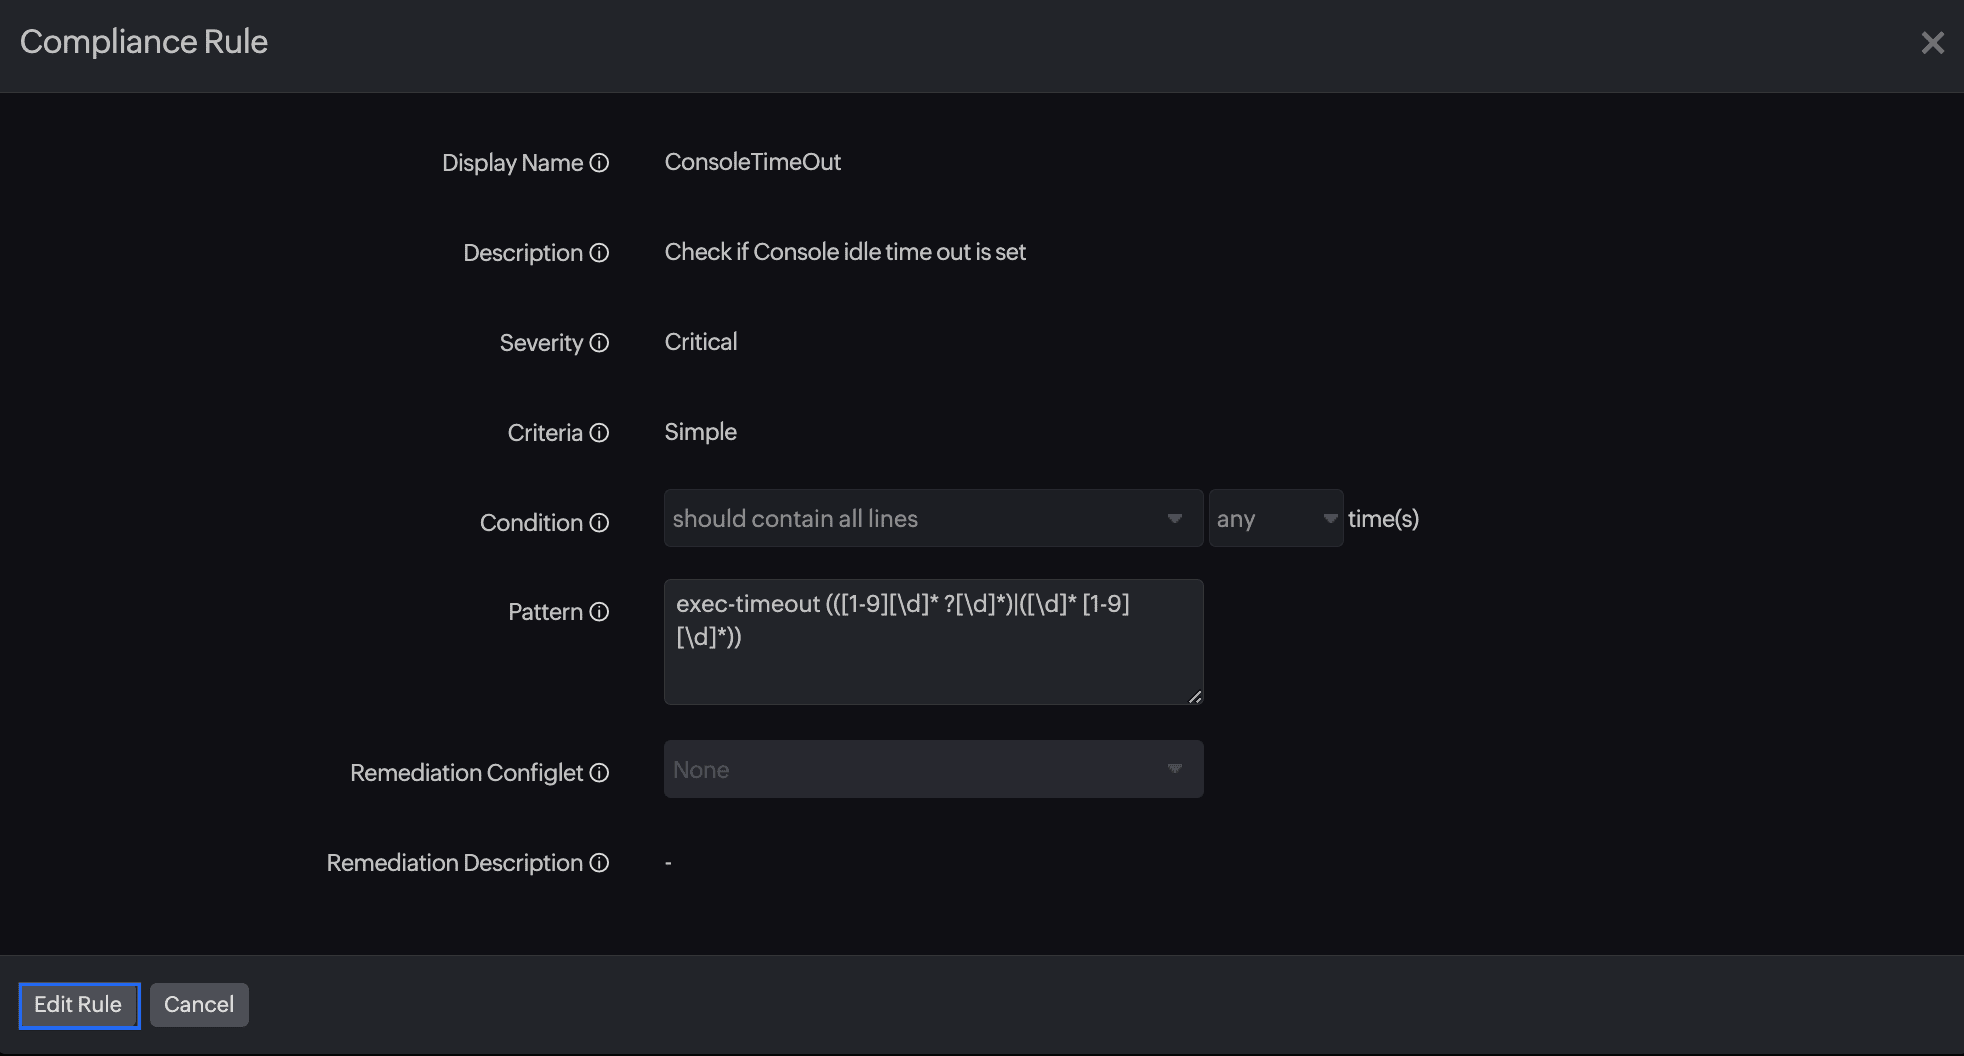
Figure 6. View details about a compliance rule. - This will open the Edit Compliance Rule pop-up (Figure 7).
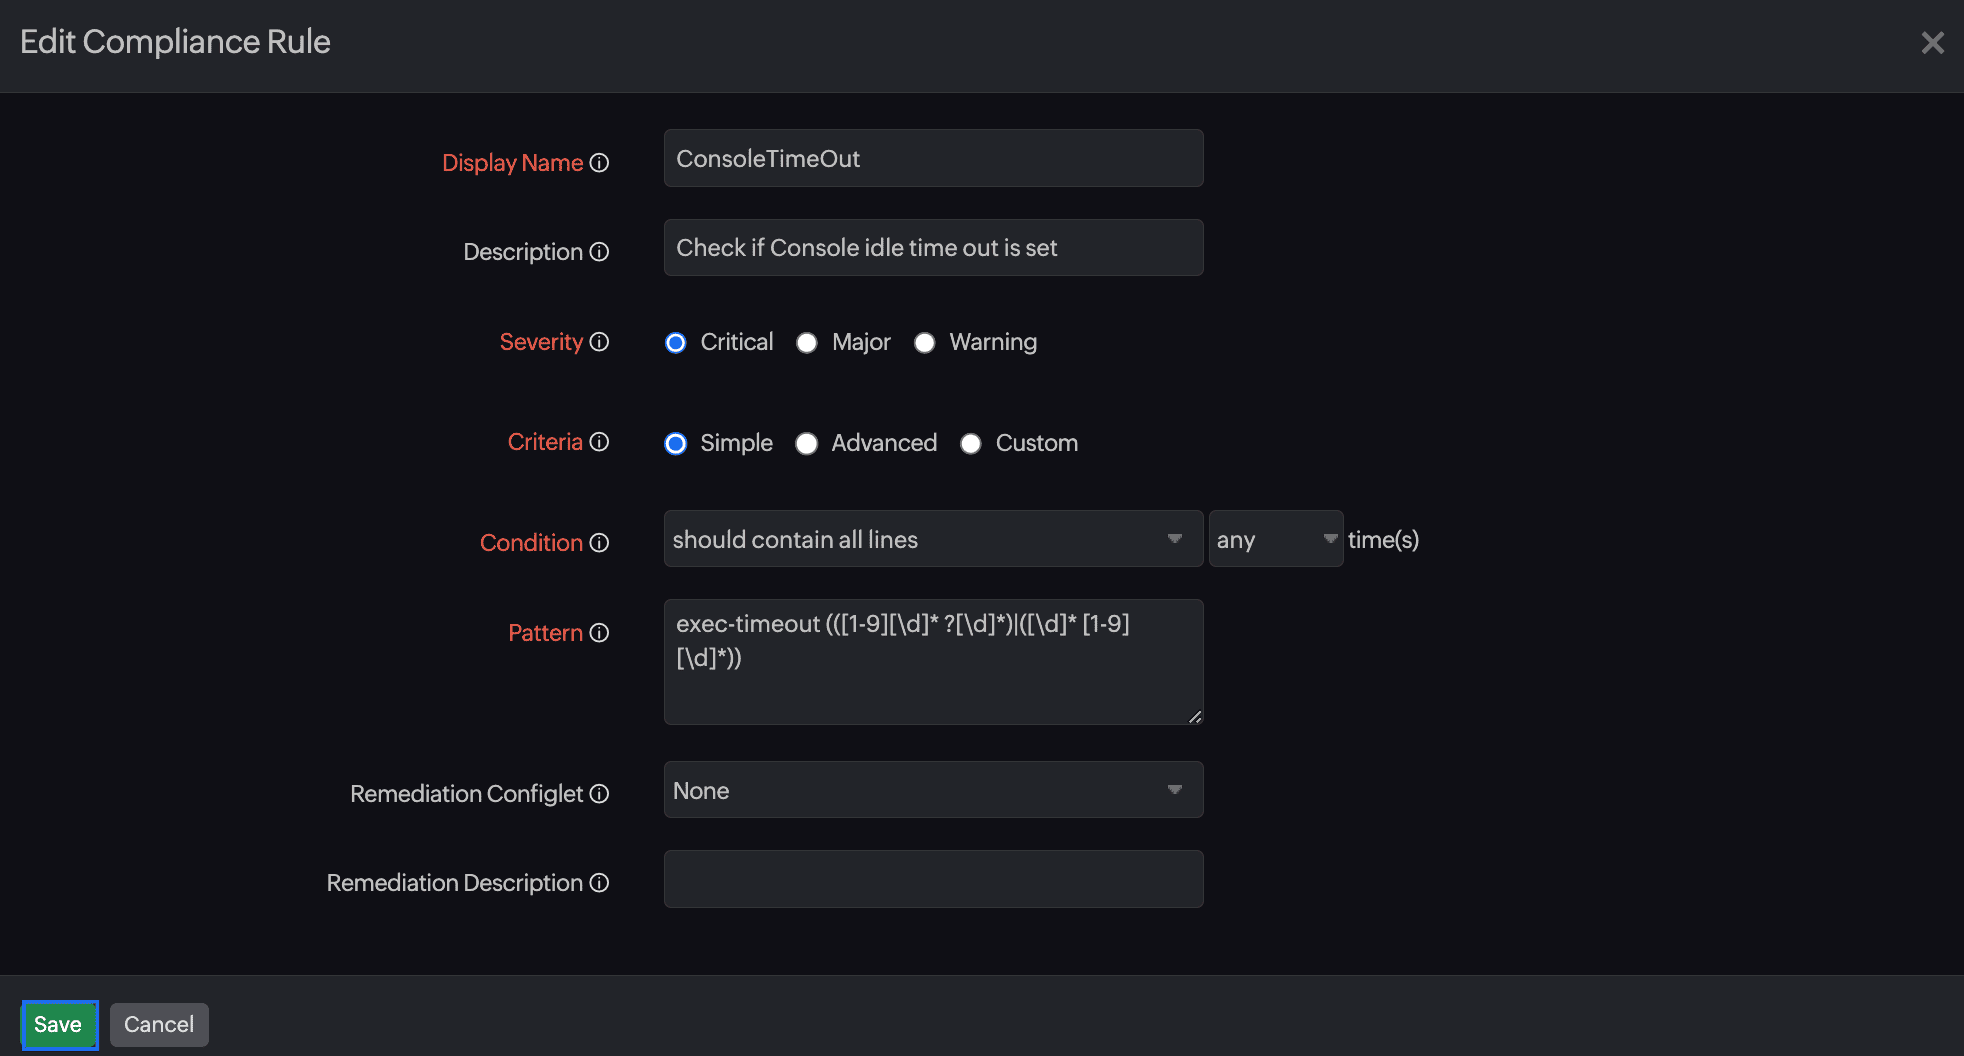
Figure 7. Edit Compliance Rule pop-up. - Edit the fields as required, and then click Save at the bottom-left section of the pop-up.
- To delete a rule, click the trash
 icon beside a rule (Figure 5, marked as 2) on the Compliance Rules page.
NoteA rule can be deleted only if it is not associated with any rule group. - In the dialog box to verify if you wish to delete, click Delete.
Adding a compliance rule group
- Navigate to Network > NCM > Compliance > Rule Groups.
- Click the Add Rule Group button in the top-right section of the Compliance Rule Groups screen.
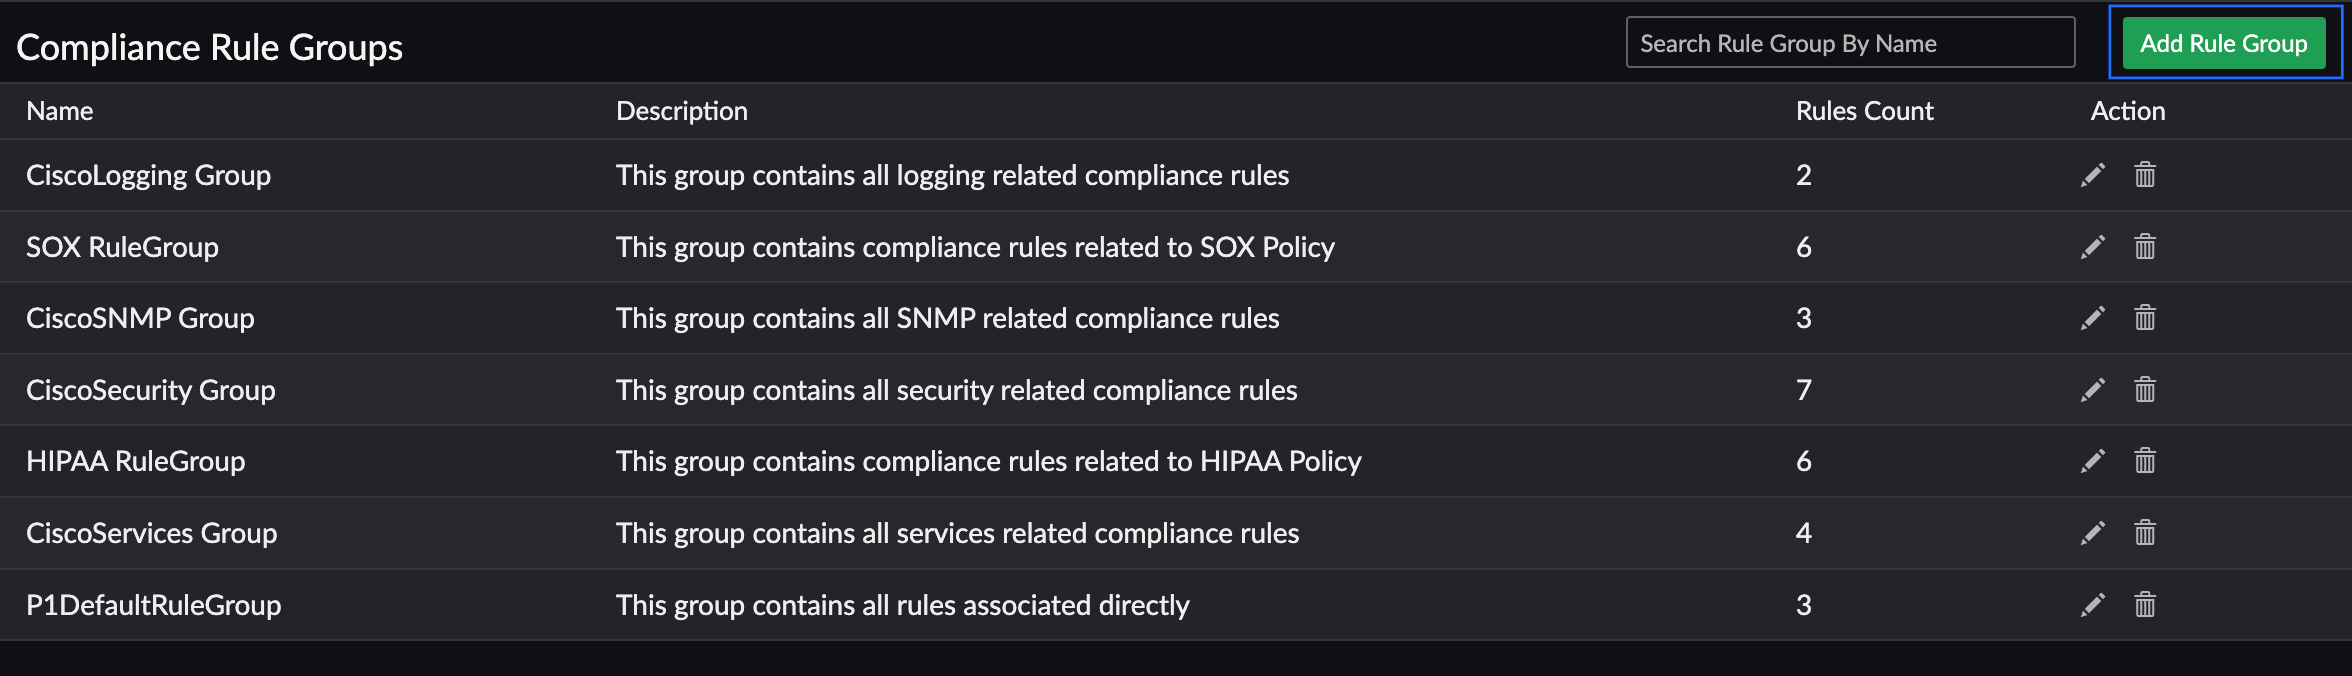
Figure 8. Compliance Rule Groups page. - In the Add Compliance Rule Group pop-up, provide the following details:
- Enter a Display Name to identify the rule group.
- Then, provide a Description to describe it.
- Next, in the Select Rules section, select all the rules that should be added to the rule group. Then, click Save (Figure 9).
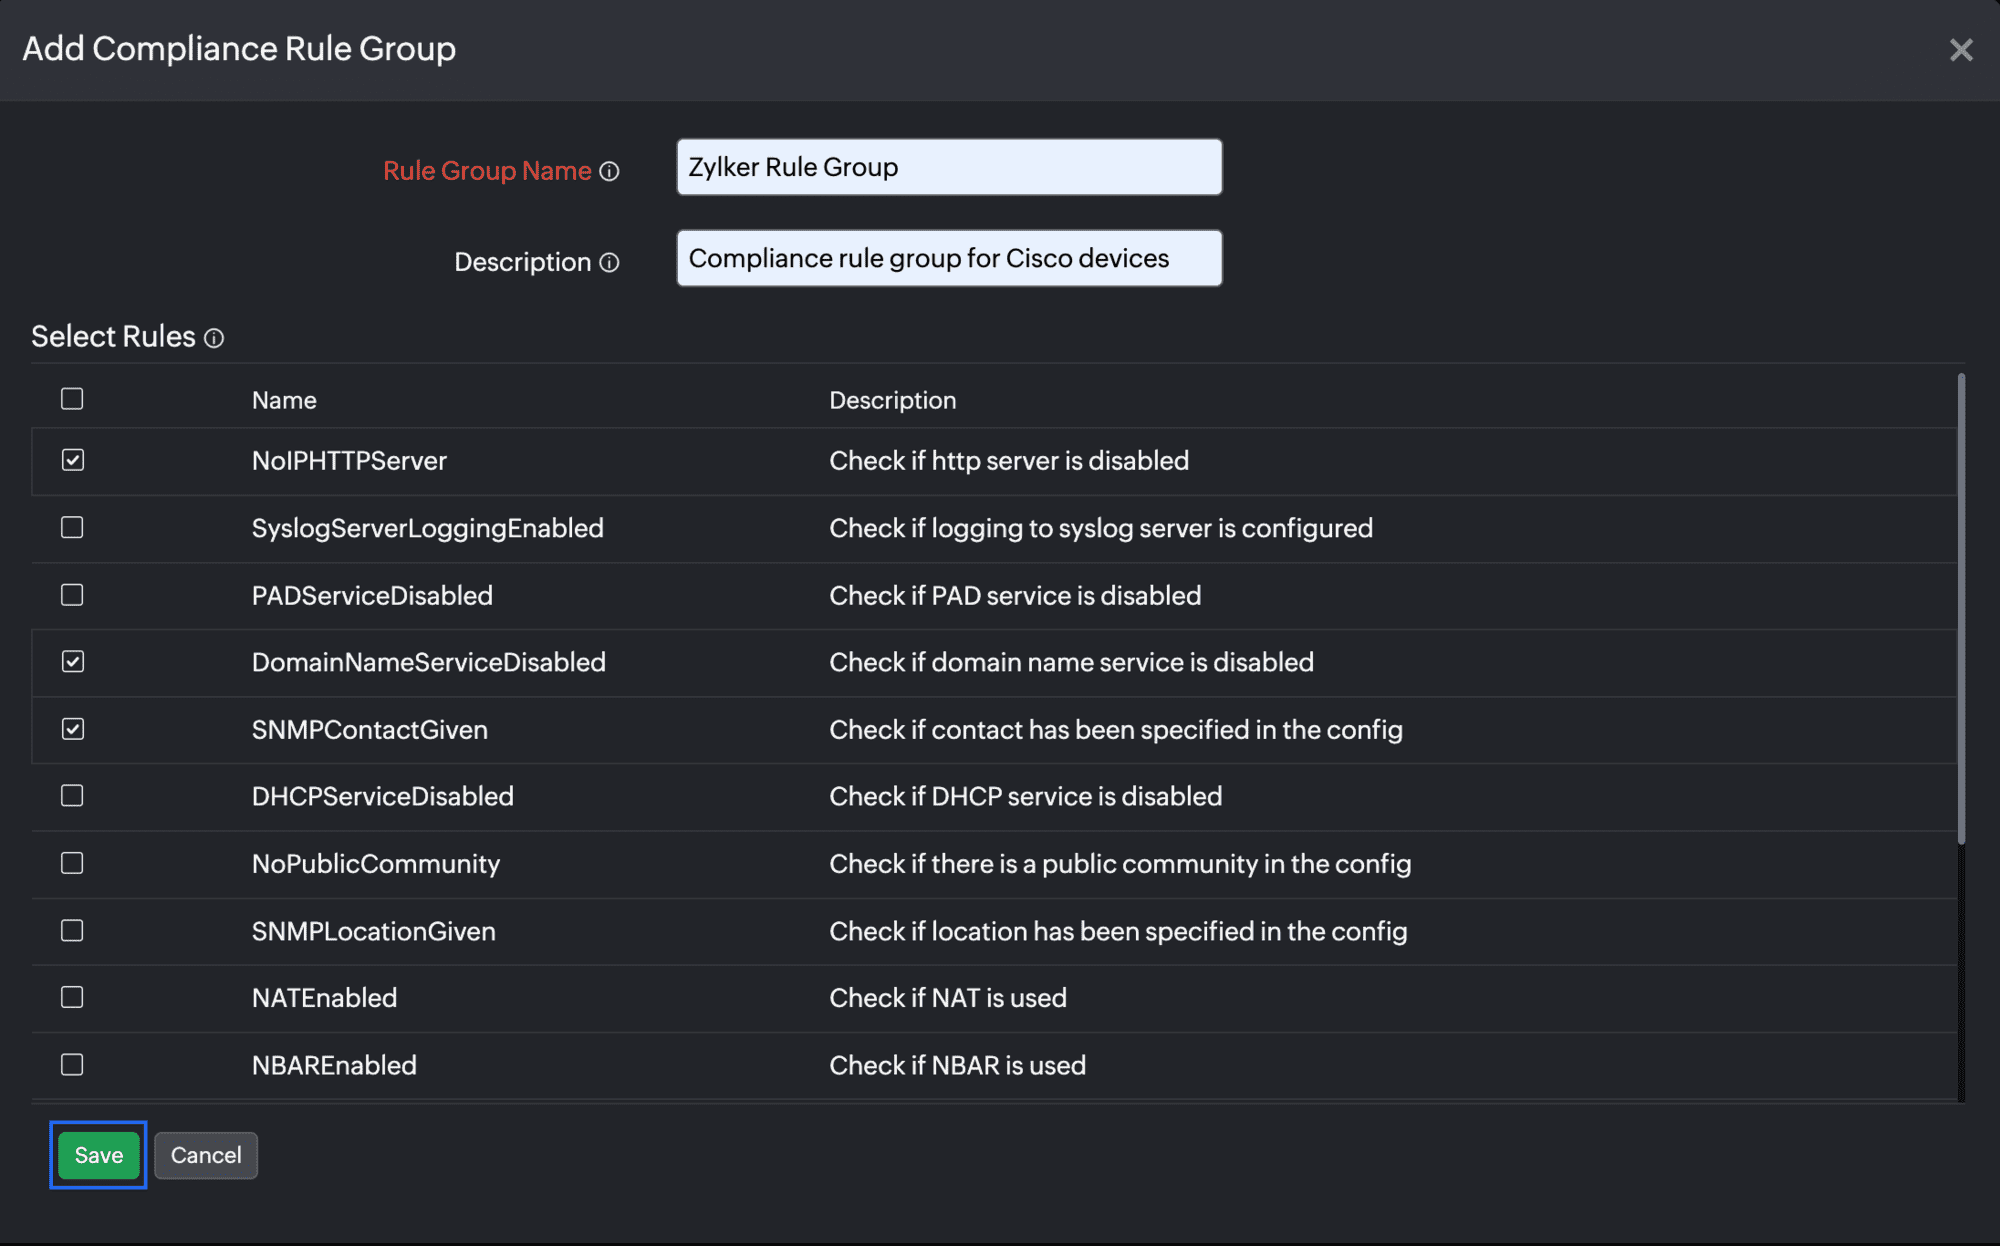
Figure 9. Adding a compliance rule group.
Modifying or deleting a compliance rule group
- Navigate to Network > NCM > Compliance > Rule Groups.
- Click the pencil icon beside a compliance rule group to edit the record (Figure 10, marked as 1).
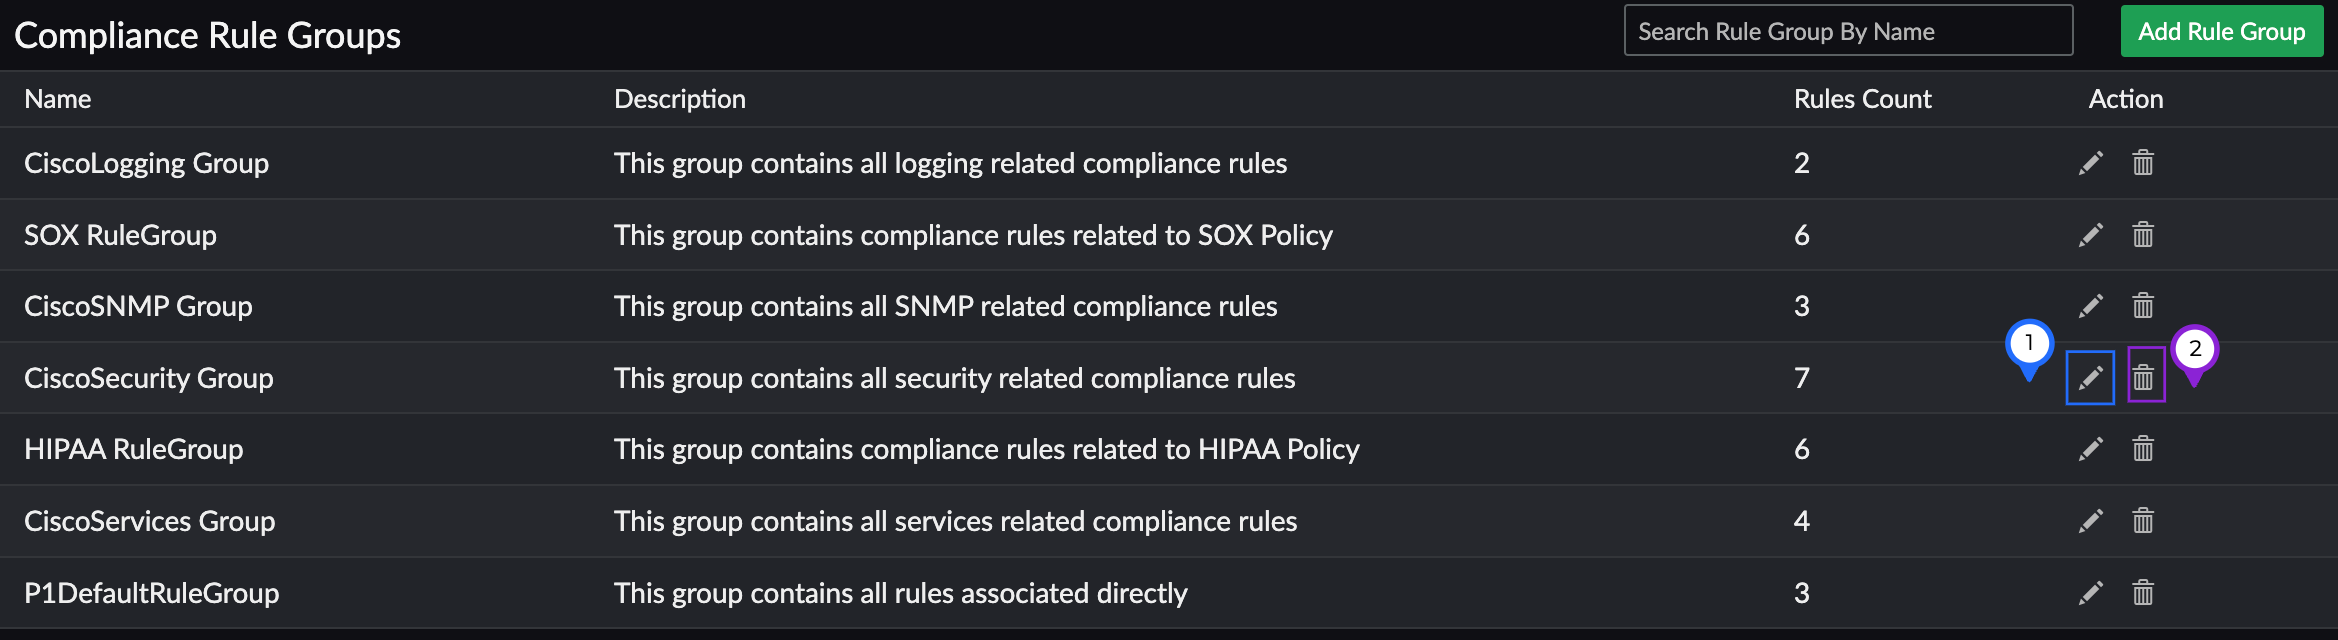 Figure 10. Editing a compliance rule group.
 - You can also click anywhere on the row to view more details about the compliance rule group, and then click Edit Rule Group at the bottom-left of the pop-up.
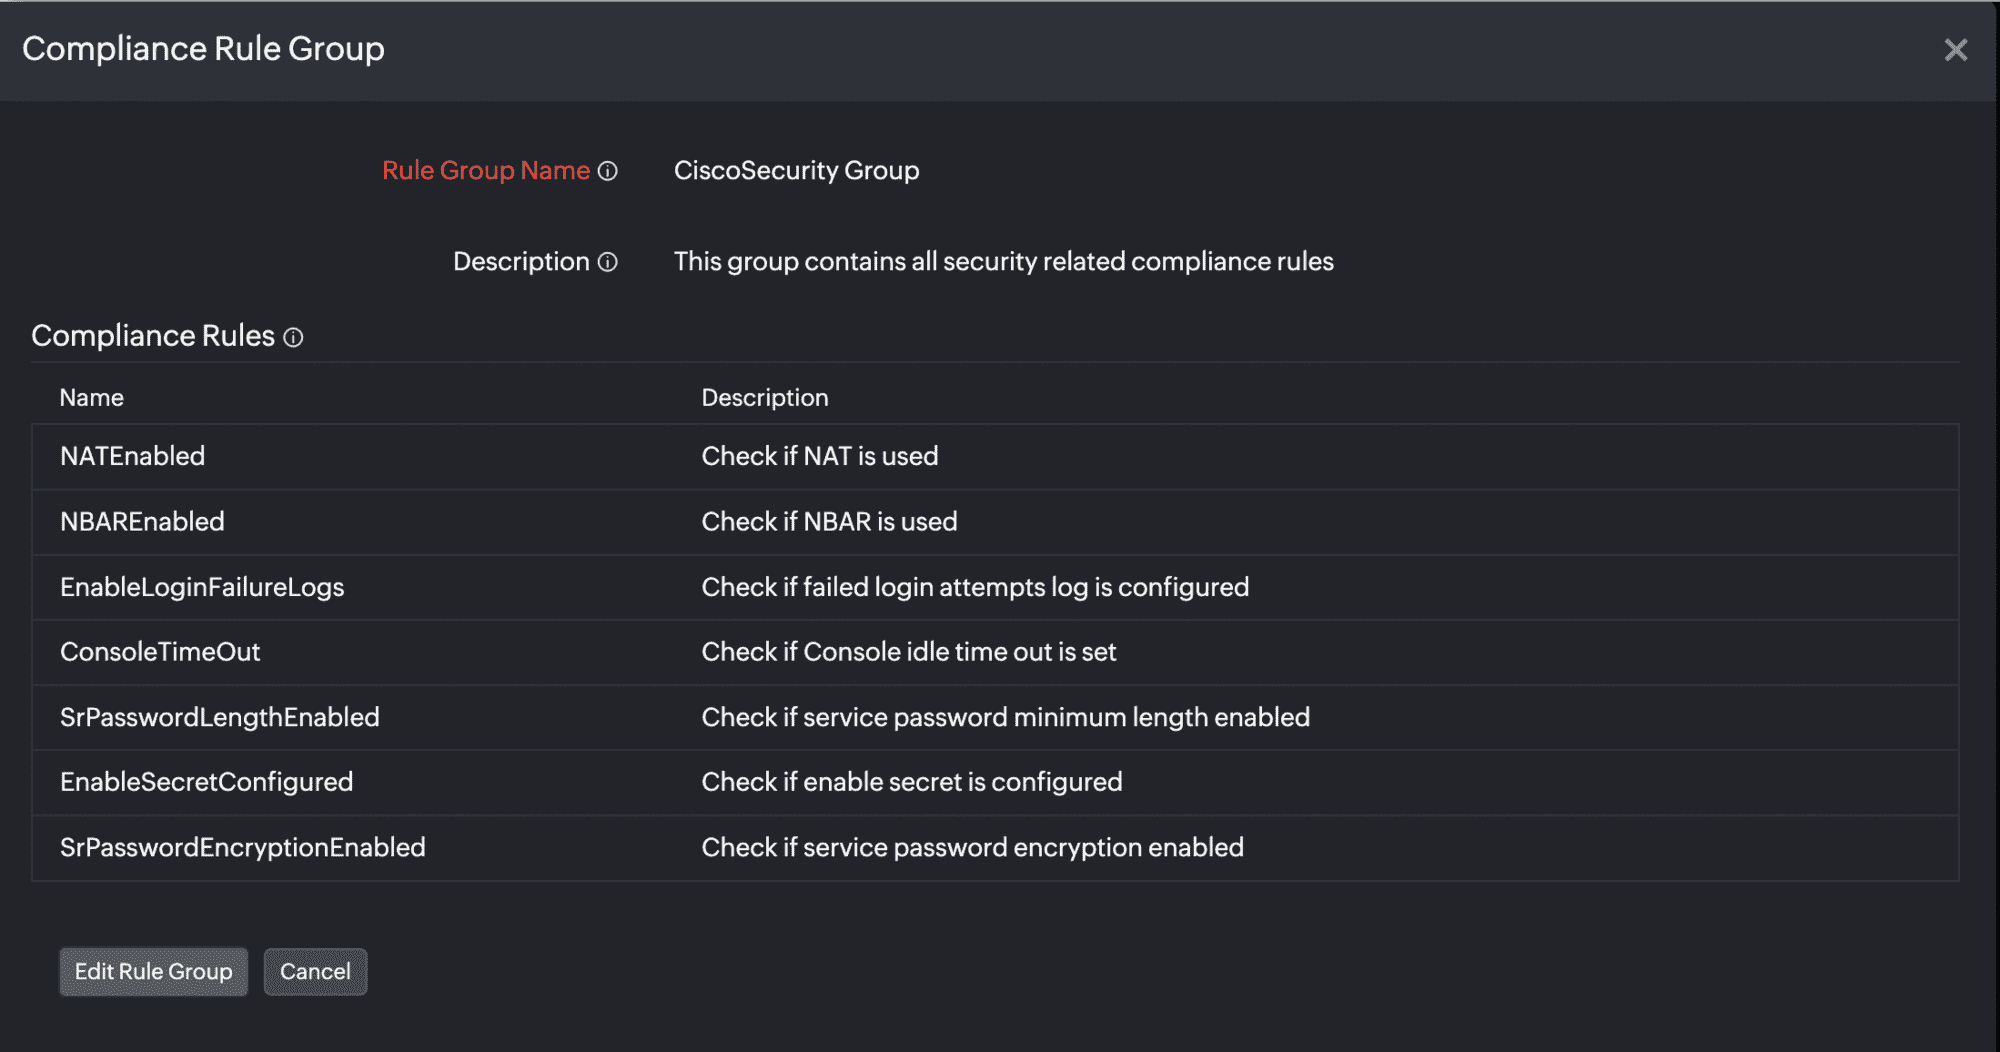
Figure 11. Editing a compliance rule group. - On the Edit Compliance Rule Group pop-up, modify the details as required, and select or deselect rules in the Select Rules section.
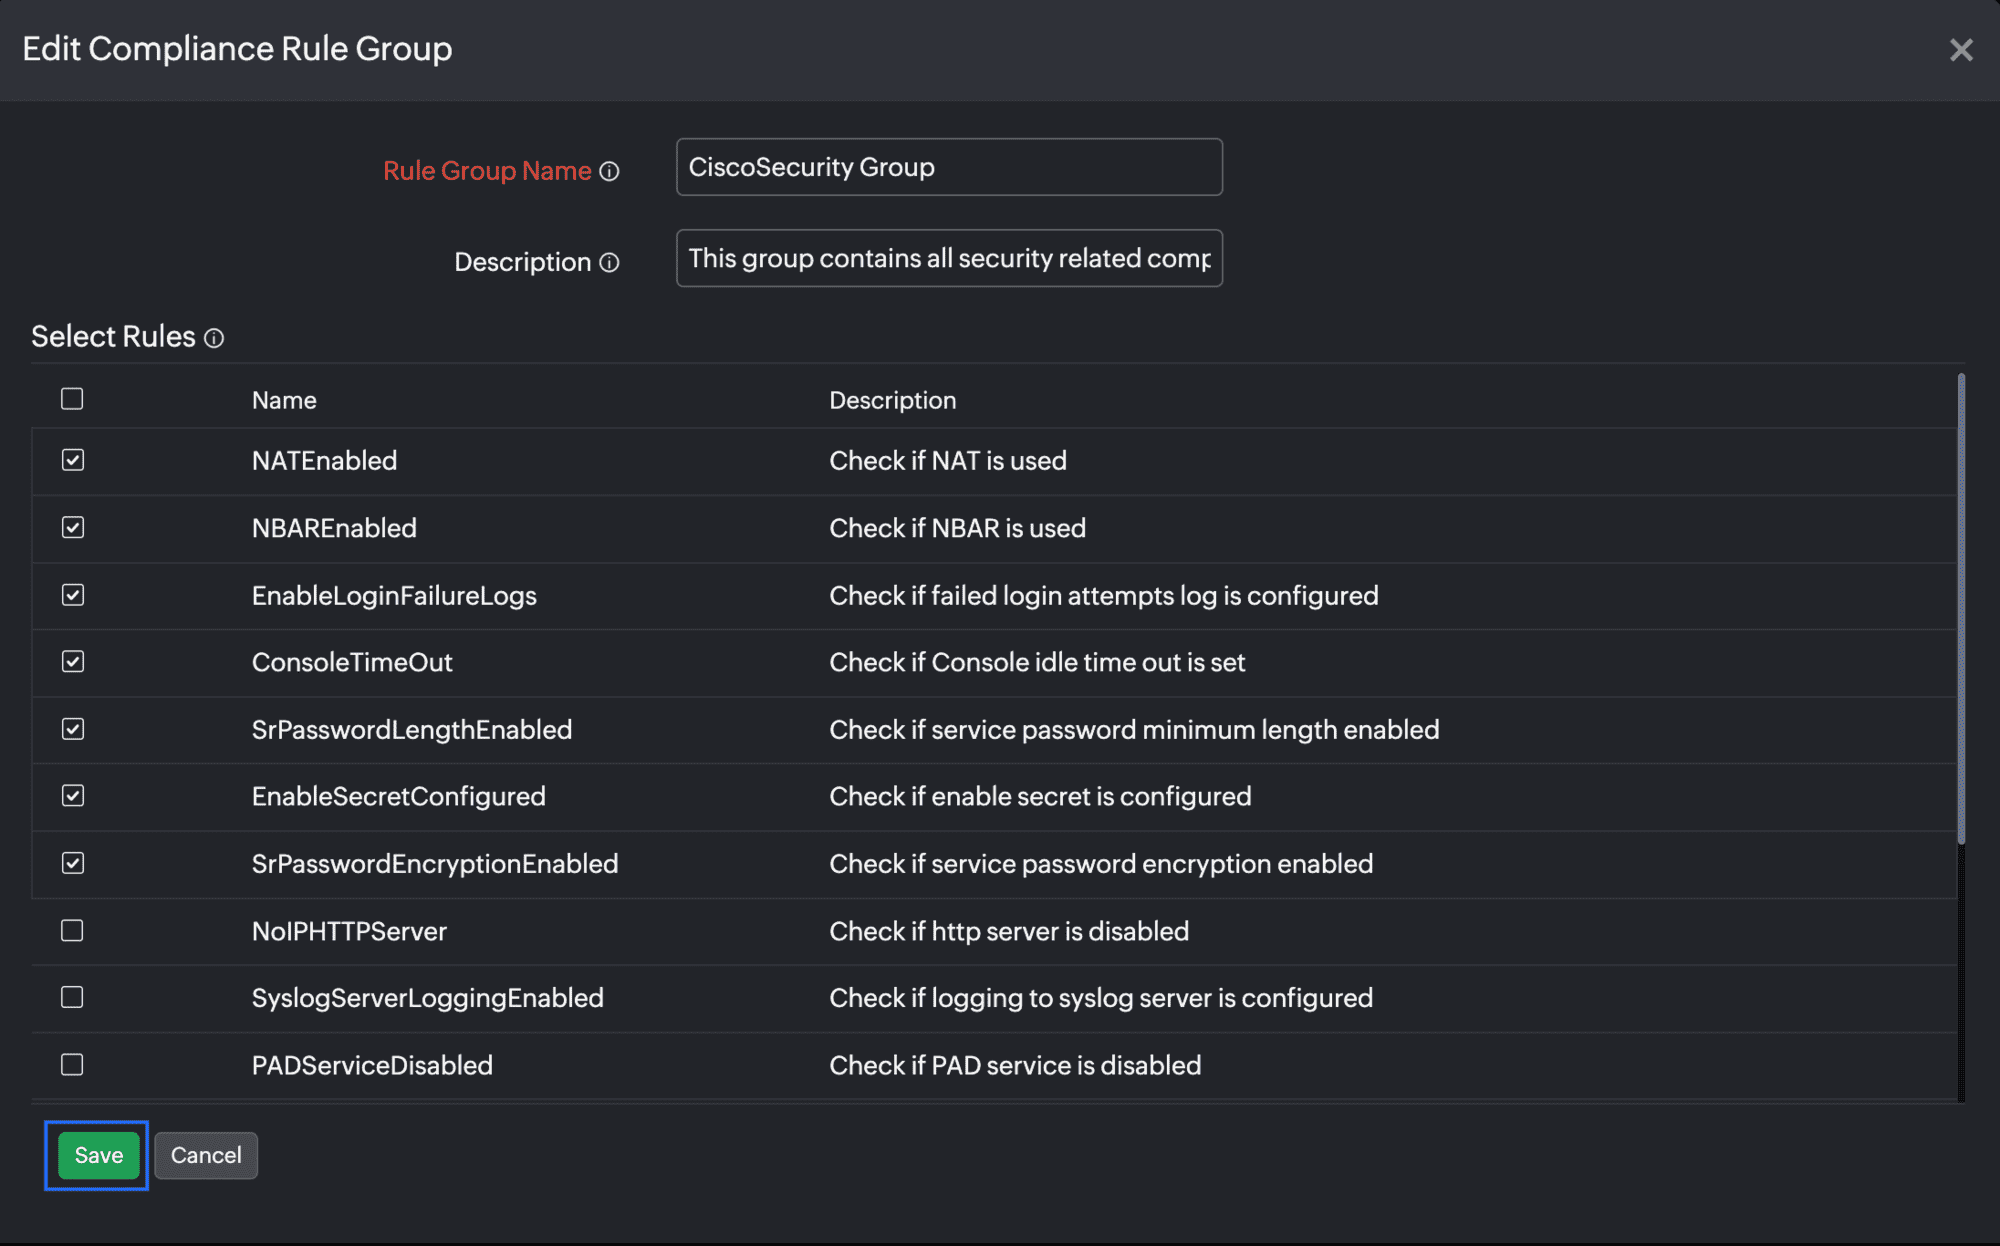
Figure 12. Edit Compliance Rule Group pop-up. - Once you have completed all the changes, click Save.
- To delete a rule group, click the trash icon beside a rule group (Figure 10, marked as 2) on the Compliance Rule Groups screen.
NoteA rule group can be deleted only if it is not associated with any policy. - In the dialog box to verify if you wish to delete, click Delete.
Adding a compliance policy
- Navigate to Network > NCM > Compliance > Policies.
- Click Add Policy in the top-right section of the Compliance Policies screen (Figure 13, marked as 1).

Figure 13. Adding a compliance policy. - On the Add Compliance Policy page, provide the following details:
- Enter a Display Name to identify the compliance policy.
- Then, provide a Description to describe it.
- Select a Configuration Type by toggling between Startup or Running.
- Toggle between Any rule in this policy is violated and Only if a Critical or Major rule in this policy is violated in the Policy Violation Criteria field.
- If you wish to add rules, click the Rules tab.
- Add a new rule by clicking the Add Rule button (Figure 14, marked as 1).
This will take you to the Adding a compliance rule pop-up. Once you save the rule, it will be added to the compliance policy.
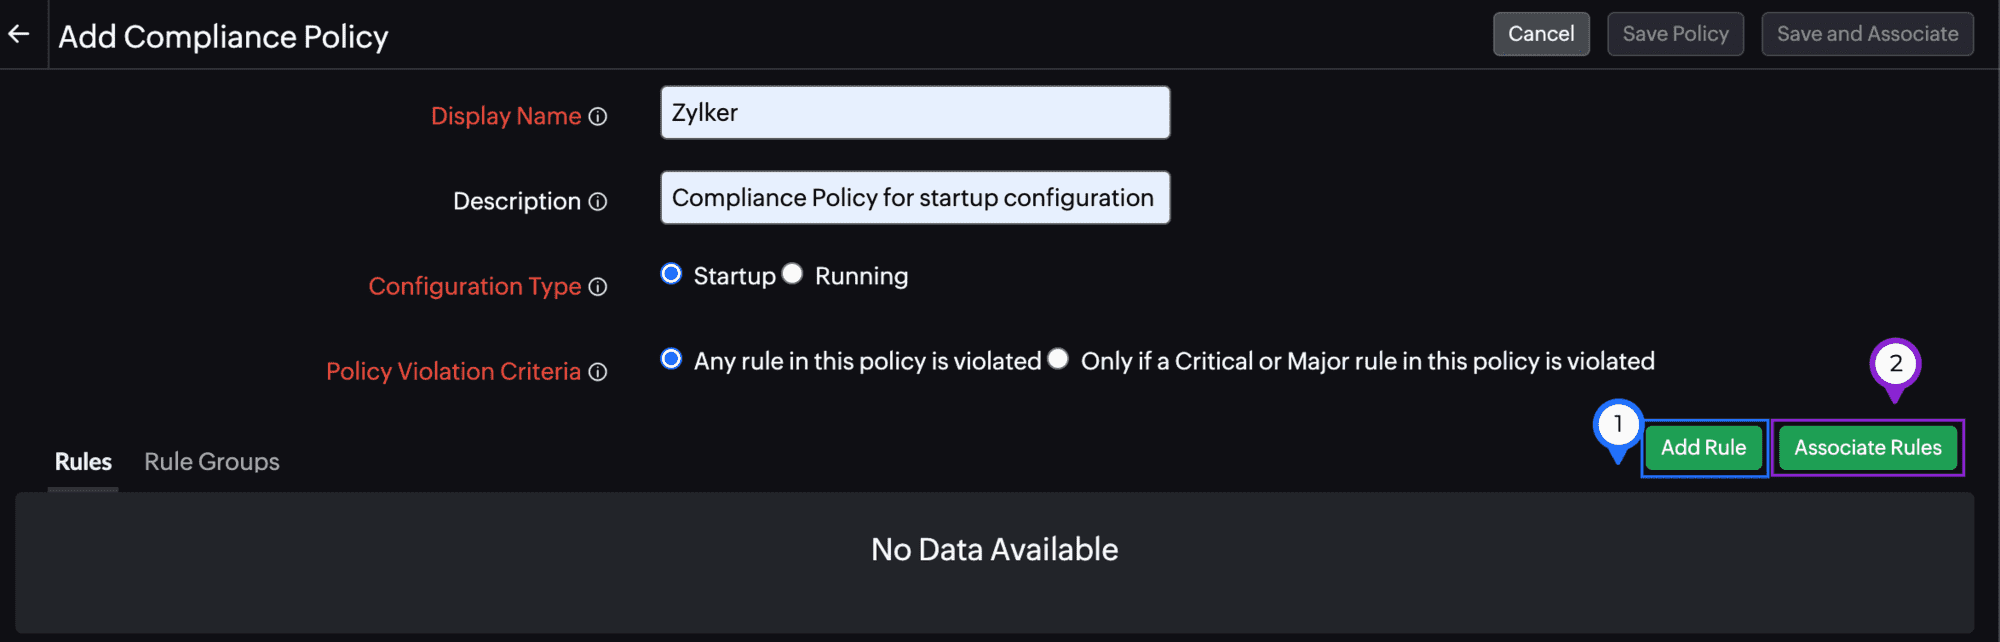
Figure 14. Add Compliance Policy page. - You can also associate an existing rule by clicking Associate Rules (Figure 14, marked as 2). Once you do that, the Associate Rules pop-up window will open where you can select the rules to be added to a Default Rule Group. Then, click Save (Figure 15).
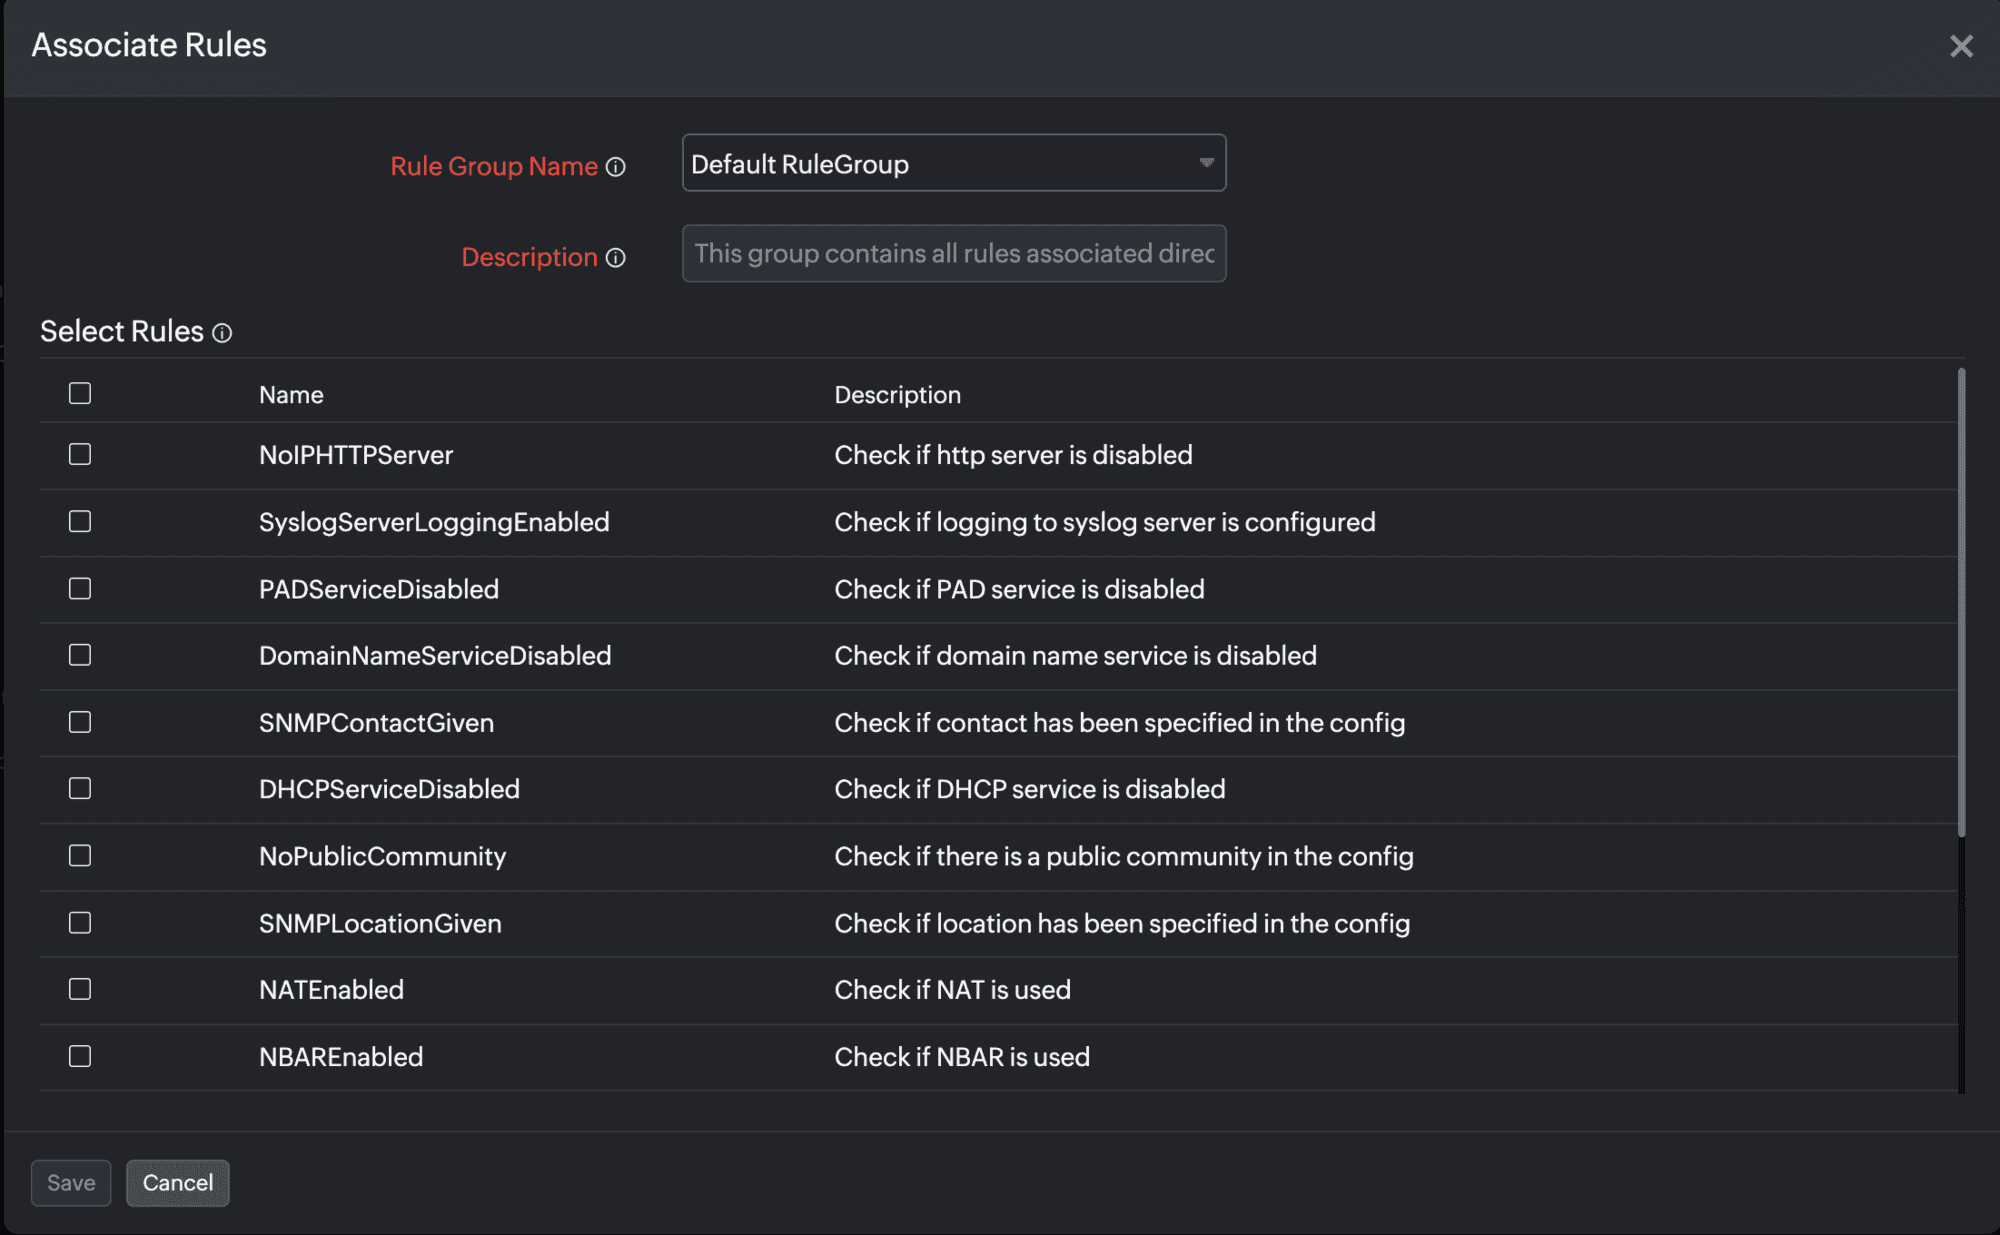
Figure 15. Adding rules to a compliance policy.
- Add a new rule by clicking the Add Rule button (Figure 14, marked as 1).
- If you wish to add a rule group, click the Rule Groups tab.
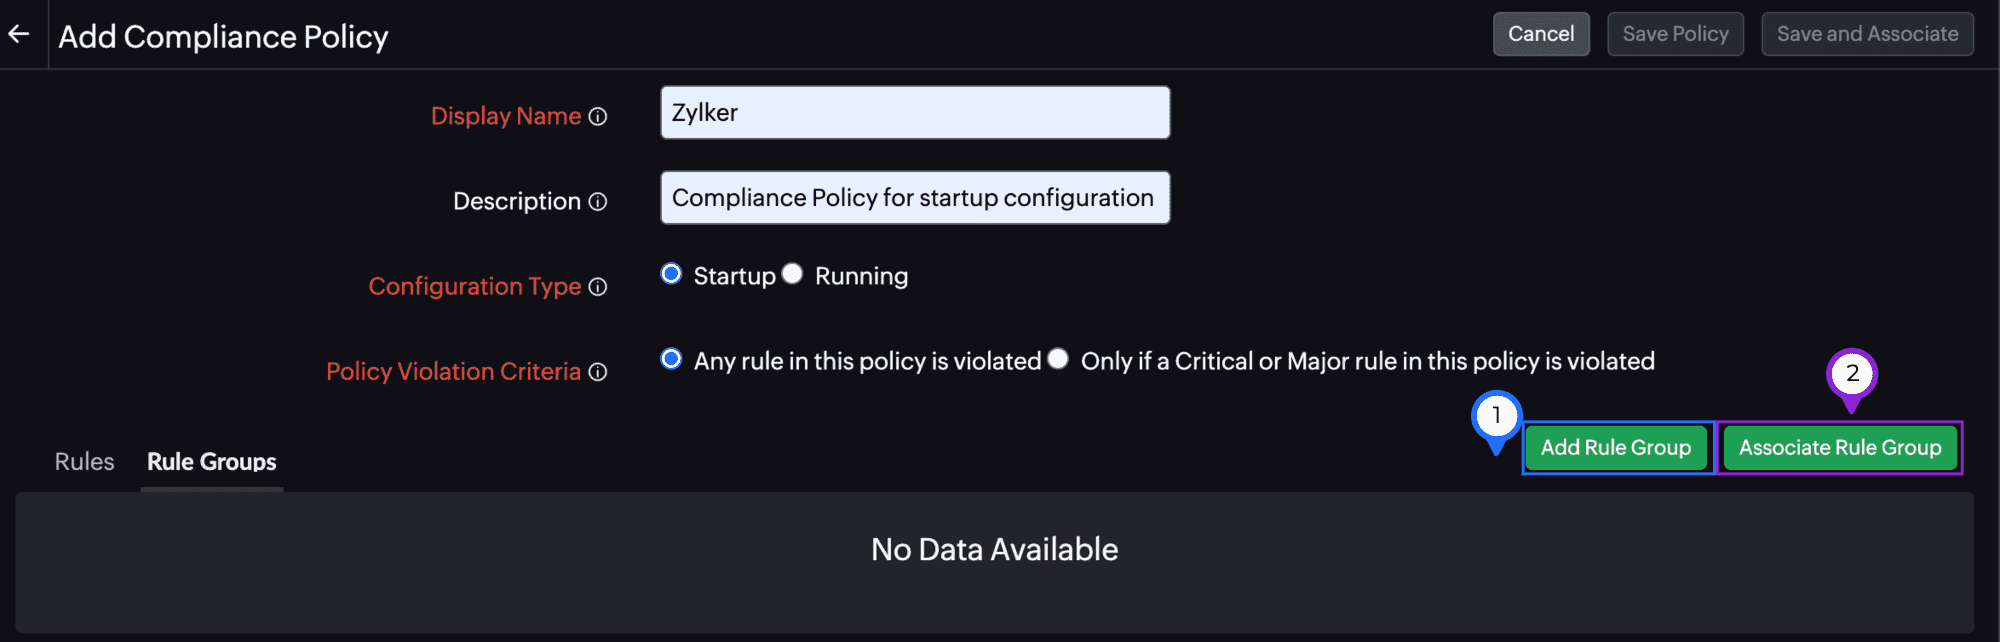
Figure 16. Adding rule groups to a compliance policy.- Click Add Rule Group to add a new rule group (Figure 16, marked as 1). Provide details in the Adding a compliance rule group pop-up, and then click Save.
- To associate one or more existing rule groups to the compliance policy, click Associate Rule Group (Figure 16, marked as 2), and select the desired rule groups in the pop-up window (Figure 17).
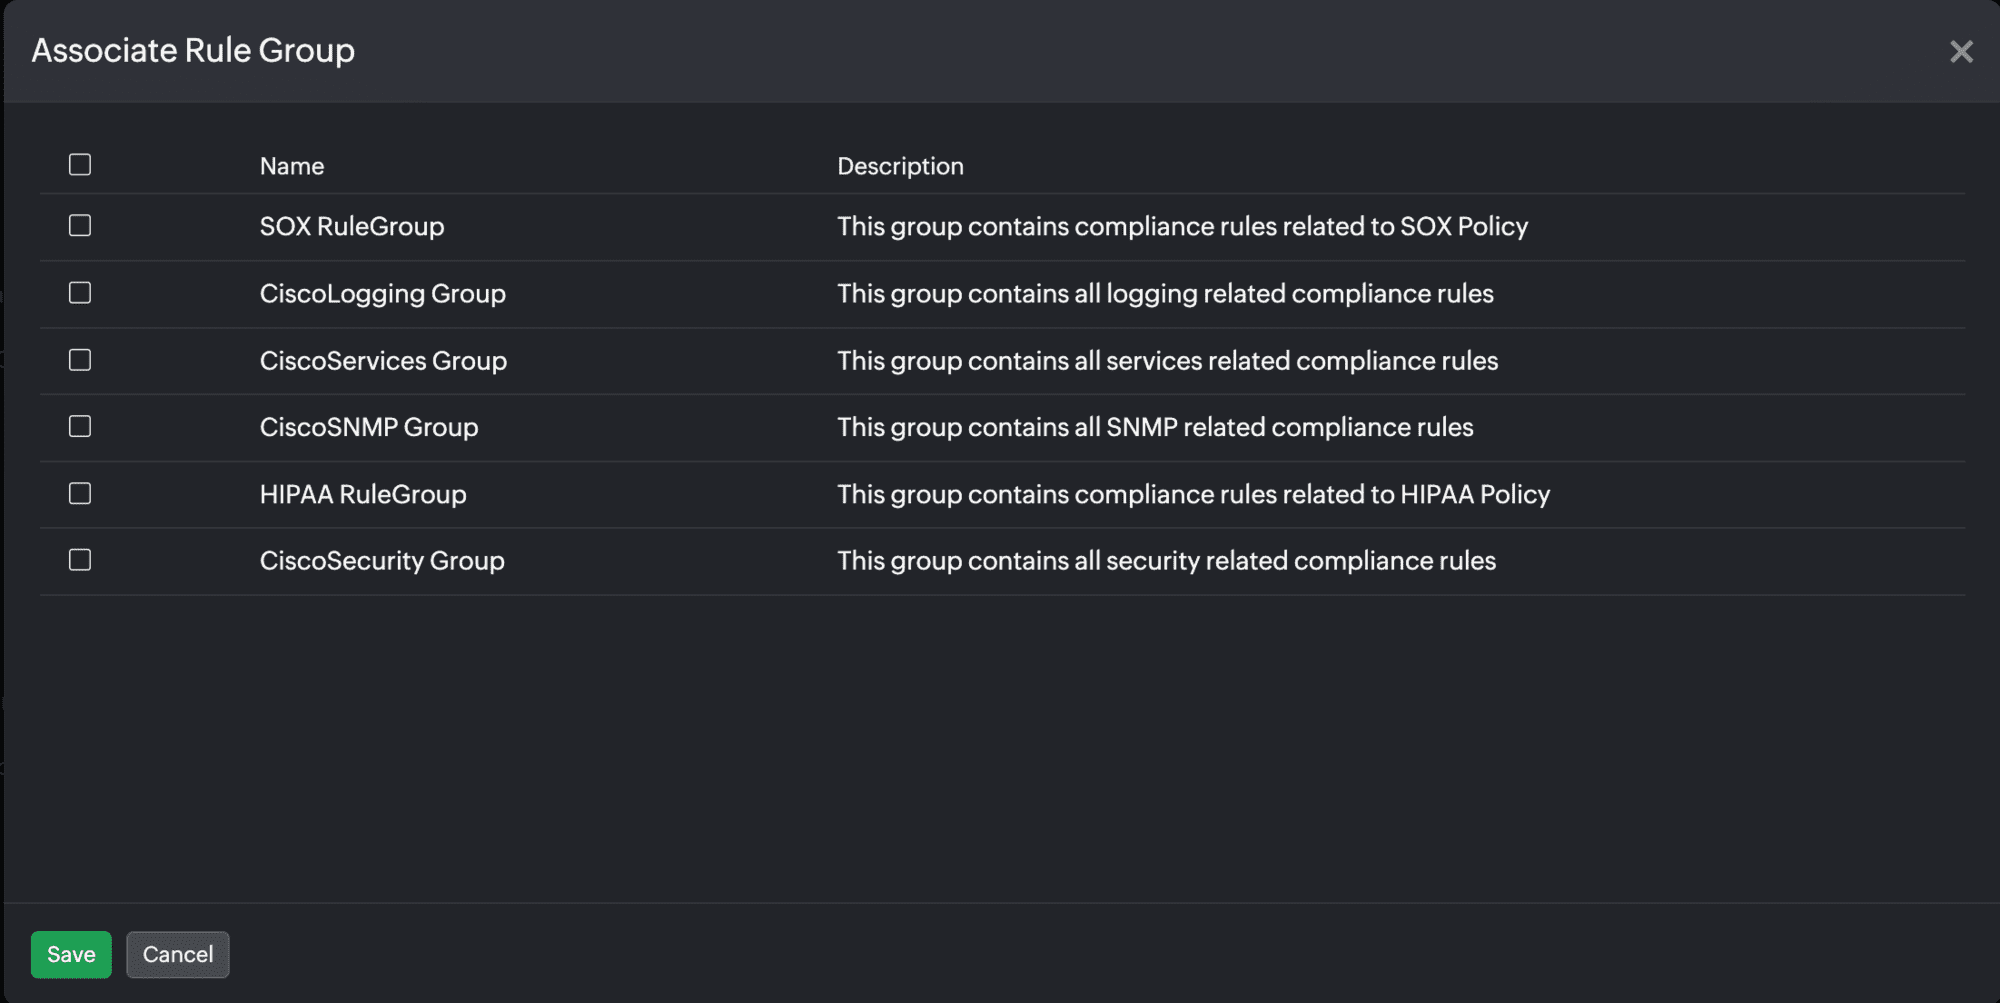
Figure 17. Associating a rule group to a compliance policy.
- Once you've added all the details, click Save Policy in the top-right section of the screen (Figure 18, marked as 1).
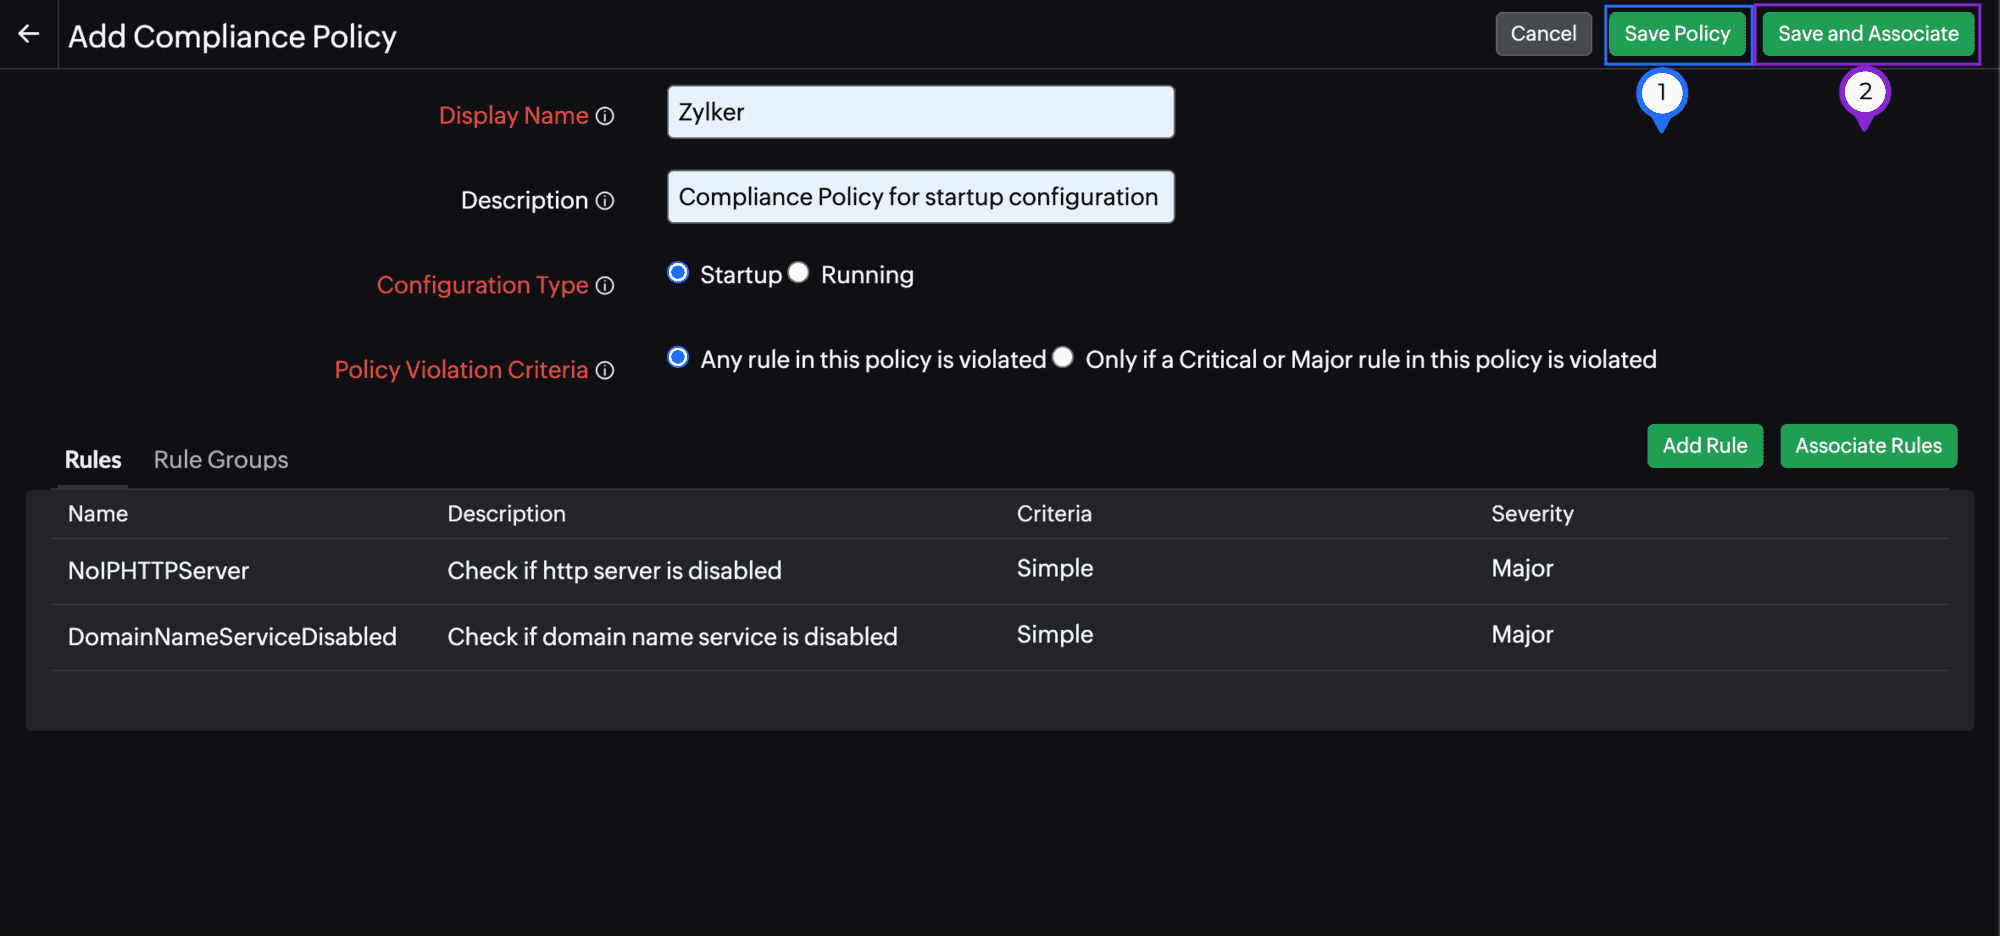
Figure 18. Saving and associating a new compliance policy. - Click Save and Associate to associate the policy to an NCM device (Figure 18, marked as 2). In the Associate Devices pop-up (Figure 19), select the devices to which you wish to associate this policy, and then click Save.
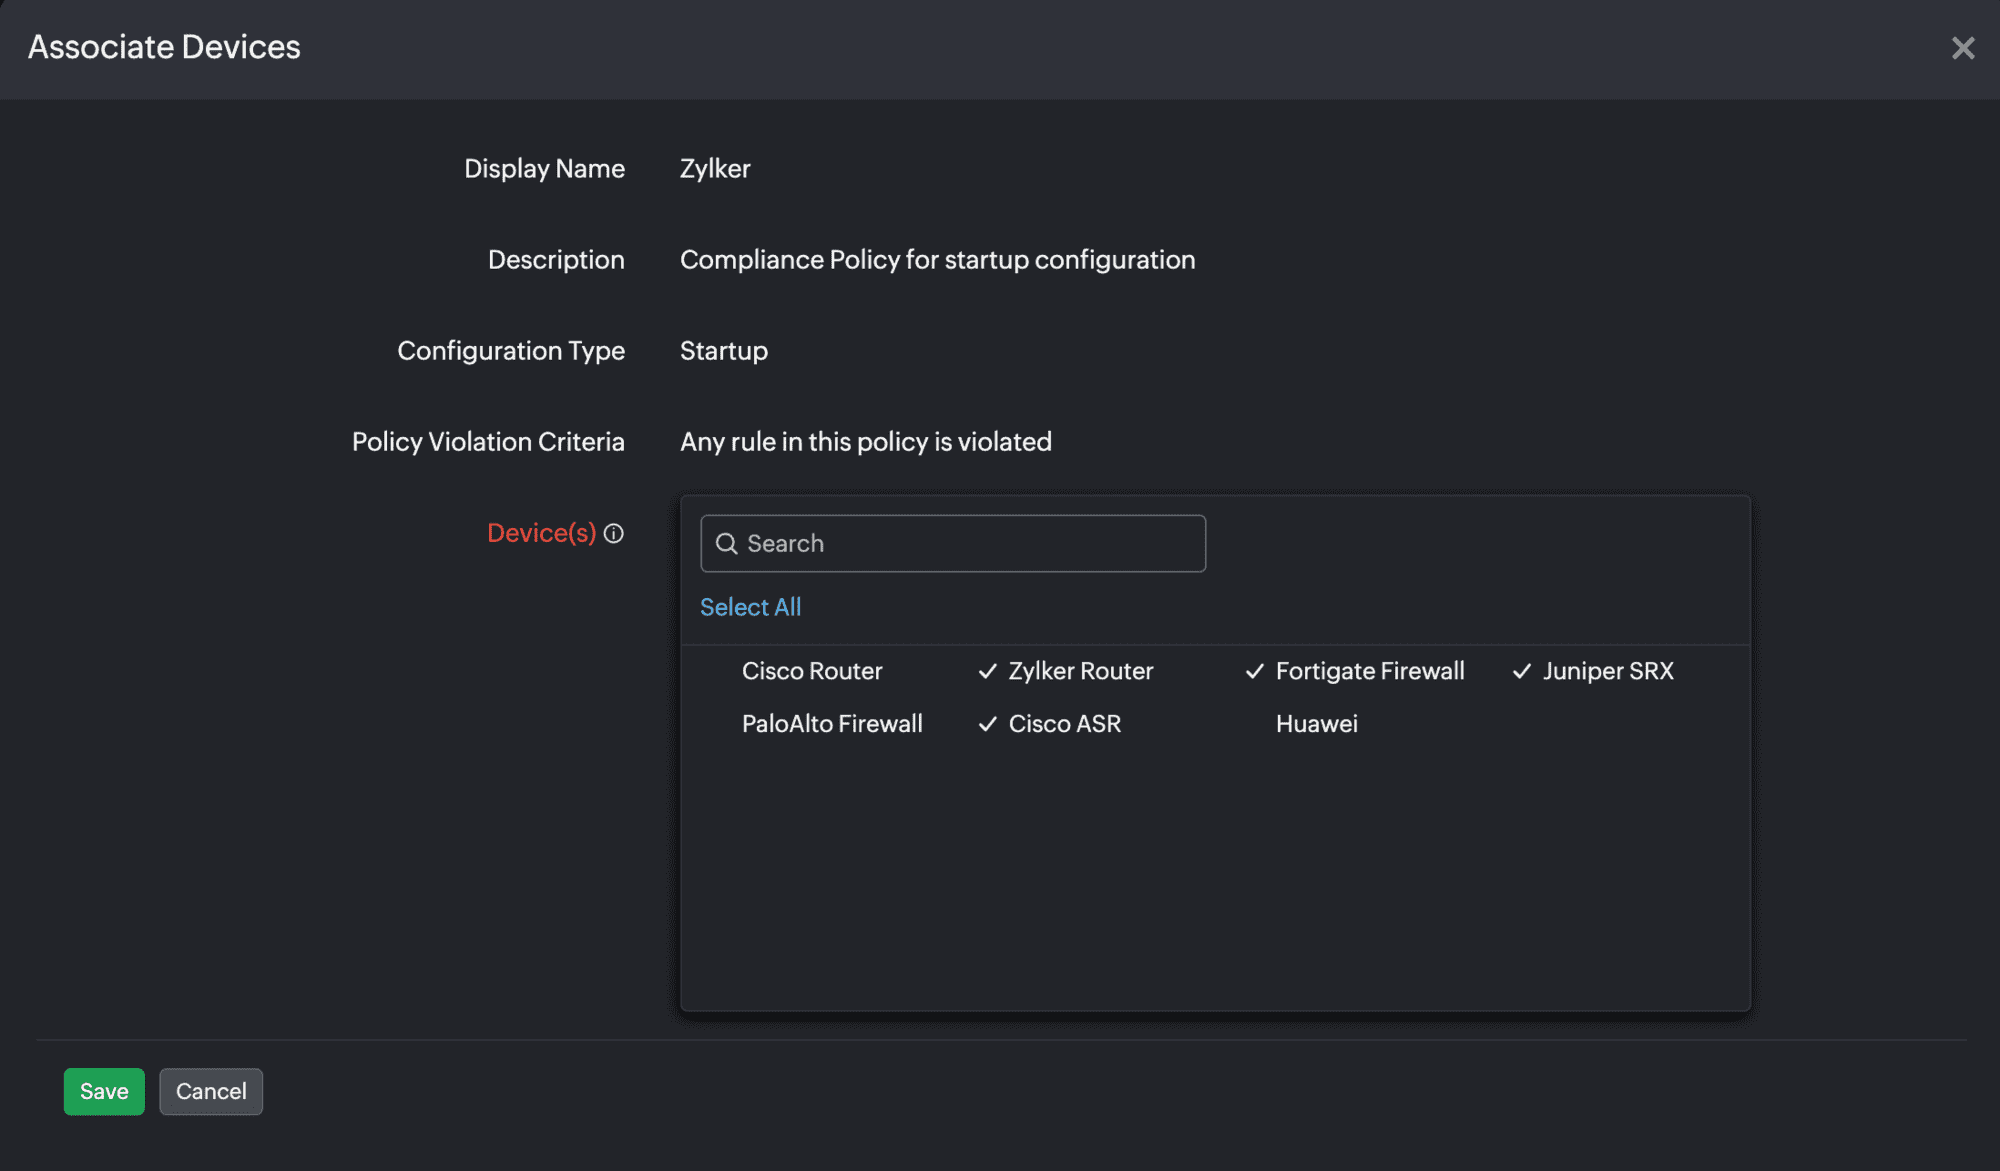
Figure 19. Associating devices to a new compliance policy.
Associating devices with a compliance policy
- Navigate to Network > NCM > Compliance > Compliance Policies.
- Click Associate beside the compliance policy which you wish to associate to a device (Figure 13, marked as 2).
- You can also click a record to view more details and click Associate Devices in the top-right of the page (Figure 20, marked as 1).

Figure 20. Associating devices to a compliance policy. - In the Associate Devices pop-up (Figure 19), select the devices to which you wish to associate this policy, and then click Save.
Bulk-associating devices with a compliance policy
- Navigate to Network > NCM > NCM Compliance > Compliance Policies.
- Click Bulk Associate in the top-right section of the Compliance Policies page (Figure 13, marked as 3).
- In the Associate Devices pop-up (Figure 21), provide the following details:
- In the Policies drop-down, select all the compliance policies you wish to associate to devices.
- Next, in the Device(s) field, select all the devices which you wish to associate to the policies selected in the previous step. Then, click Save.

Figure 21. Associating devices to compliance policies.
Modifying or deleting a compliance policy
- Navigate to Network > NCM > Compliance > Compliance Policies.
- Then, click the pencil icon beside the rule that you wish to edit (Figure 13, marked as 4).
- You can also click a record to view more details and click Edit Policy in the top-right of the screen (Figure 20, marked as 2).
- Modify as needed. You can also perform operations like adding a rule, associating rules, adding a rule group, and associating a rule group as specified in the Adding a compliance policy section of this help document.
- In the top-right section of the screen, click Save Policy to save the changes, or click Save and Associate to associate the compliance policy to one or more devices (Figure 22).
- To delete a compliance policy, click the trash icon beside it (Figure 13, marked as 5) on the Compliance Policy screen.
NoteA compliance policy can be deleted only if it is not associated with any devices. If there is a default rule group while deleting, only the rule group will be deleted. The rules present in the rule group will remain untouched. - In the dialog box to verify if you wish to delete, click Delete.
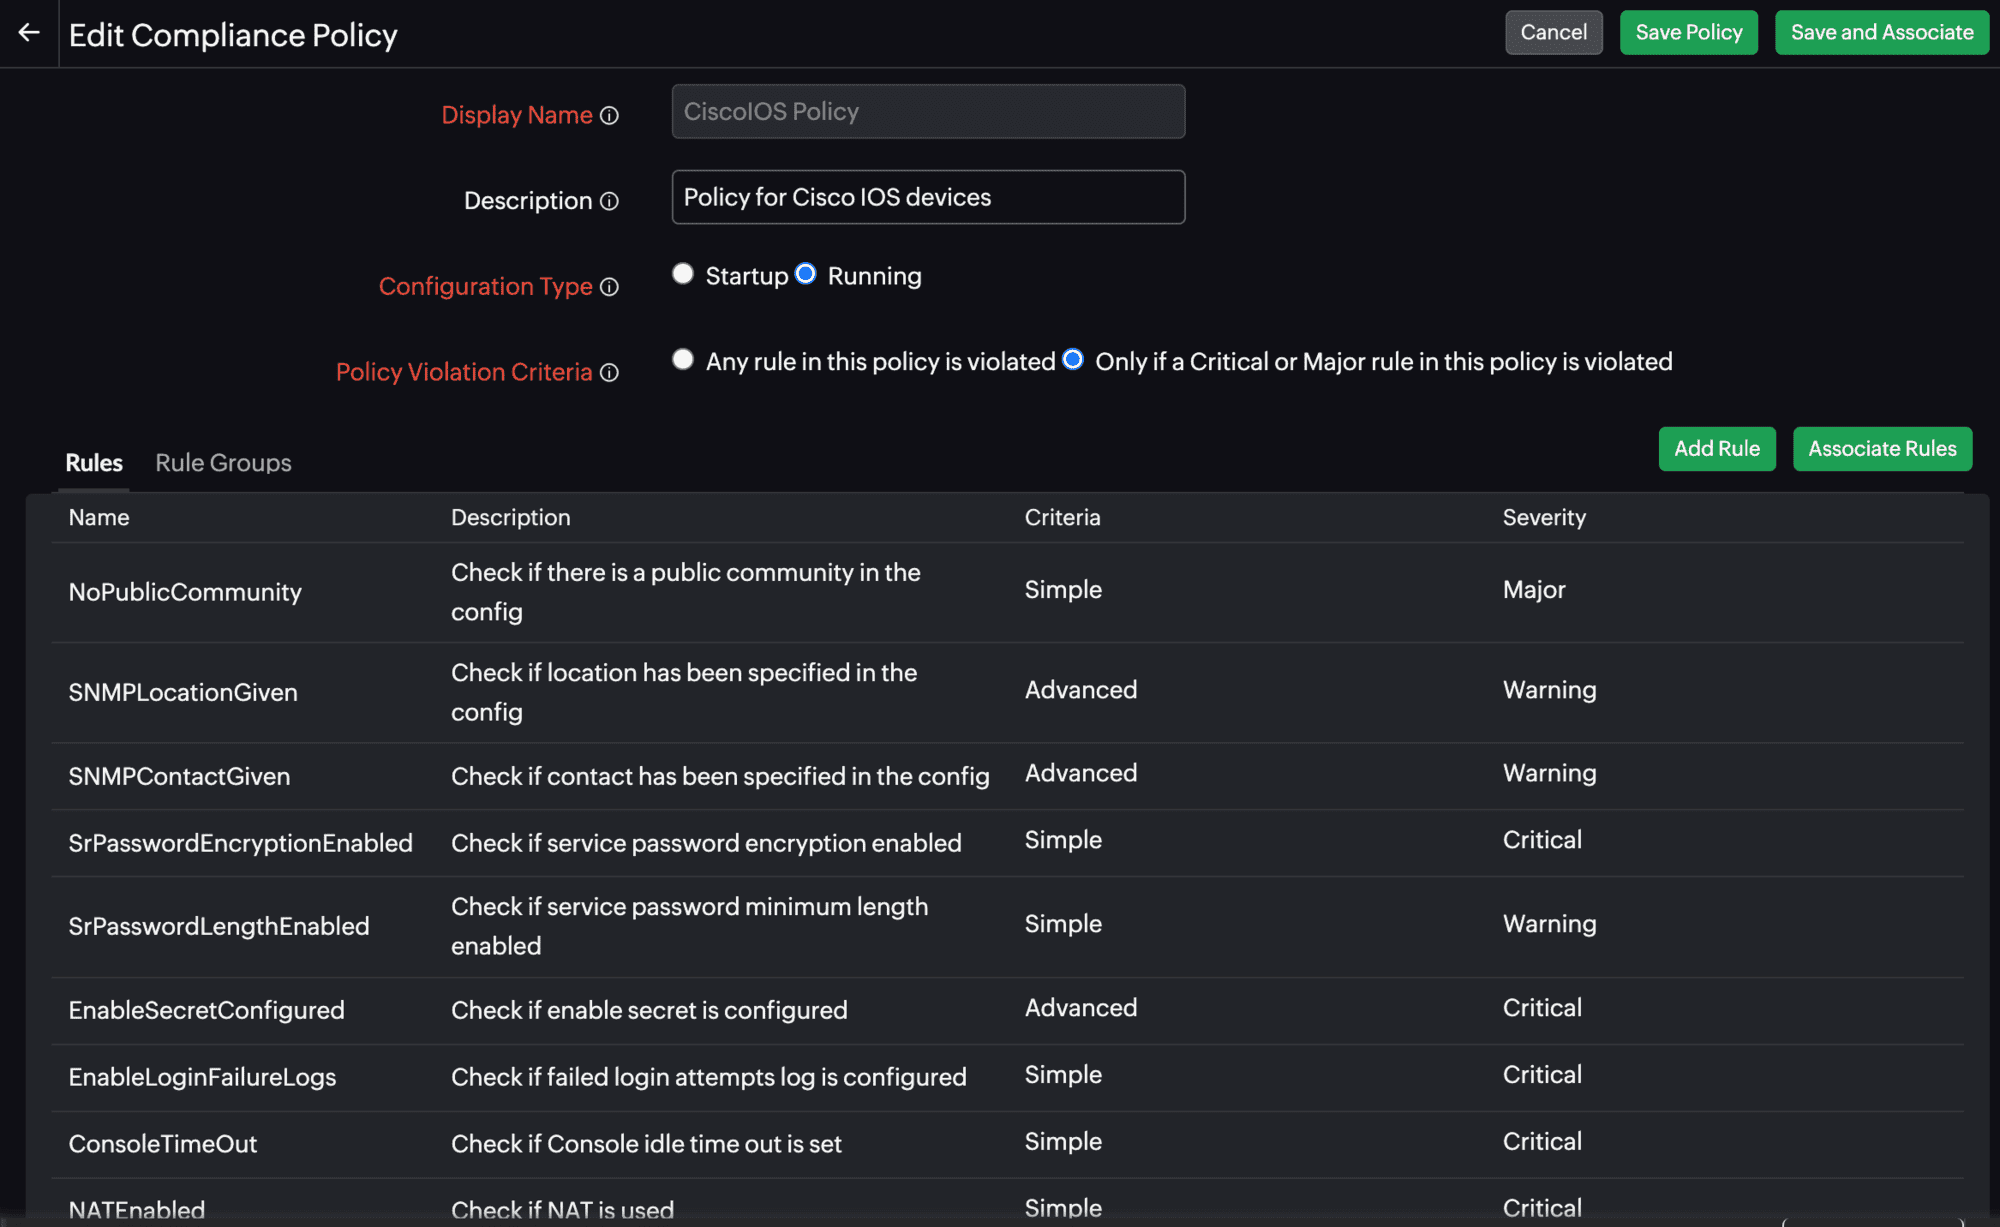 Figure 22. Editing a compliance policy.
Importing compliance policies
How it helps: If you're an MSP customer, you can create a compliance policy in one account, export it, and import it into other accounts to replicate the same policy. During import, if the policy includes any rules or rule groups that already exist in the target account, their content will be overwritten by the imported version.
-
Navigate to Network > NCM > Compliance > Policies.
-
Click Import Policy in the top-right section of the Compliance Policies screen (Figure 13, marked as 6).
-
You can now import any compliance policy from your machine.
NoteThe file must be in JSON format. To verify the correct structure, download an existing policy and use it as a reference.
Cloning a compliance policy
-
Navigate to Network > NCM > Compliance > Policies.
-
Click the copy icon
 beside the required policy in the Compliance Policies screen (Figure 13, marked as 7).
 -
The existing rules and rule groups will be automatically associated with the cloned policy. You can also modify them as needed in the form that opens.
Downloading a compliance policy
-
Navigate to Network > NCM > Compliance > Policies.
-
Click the download icon
 beside the required policy in the Compliance Policies screen (Figure 13, marked as 8).
 -
The compliance policy will be downloaded in JSON format.
NCM device compliance
Verify if an already added NCM device satisfies the compliance policies and rules. You can also associate compliance policies to an existing NCM device from the Edit NCM Device screen.
Compliance status
- Navigate to Network > NCM > NCM Devices. Then, select the required device.
- Click the Compliance tab.
- View Name, Policy Status, Rules Status, and Last Checked details to understand if a device has violated a policy or not and to verify how many rules have been met (Figure 23).
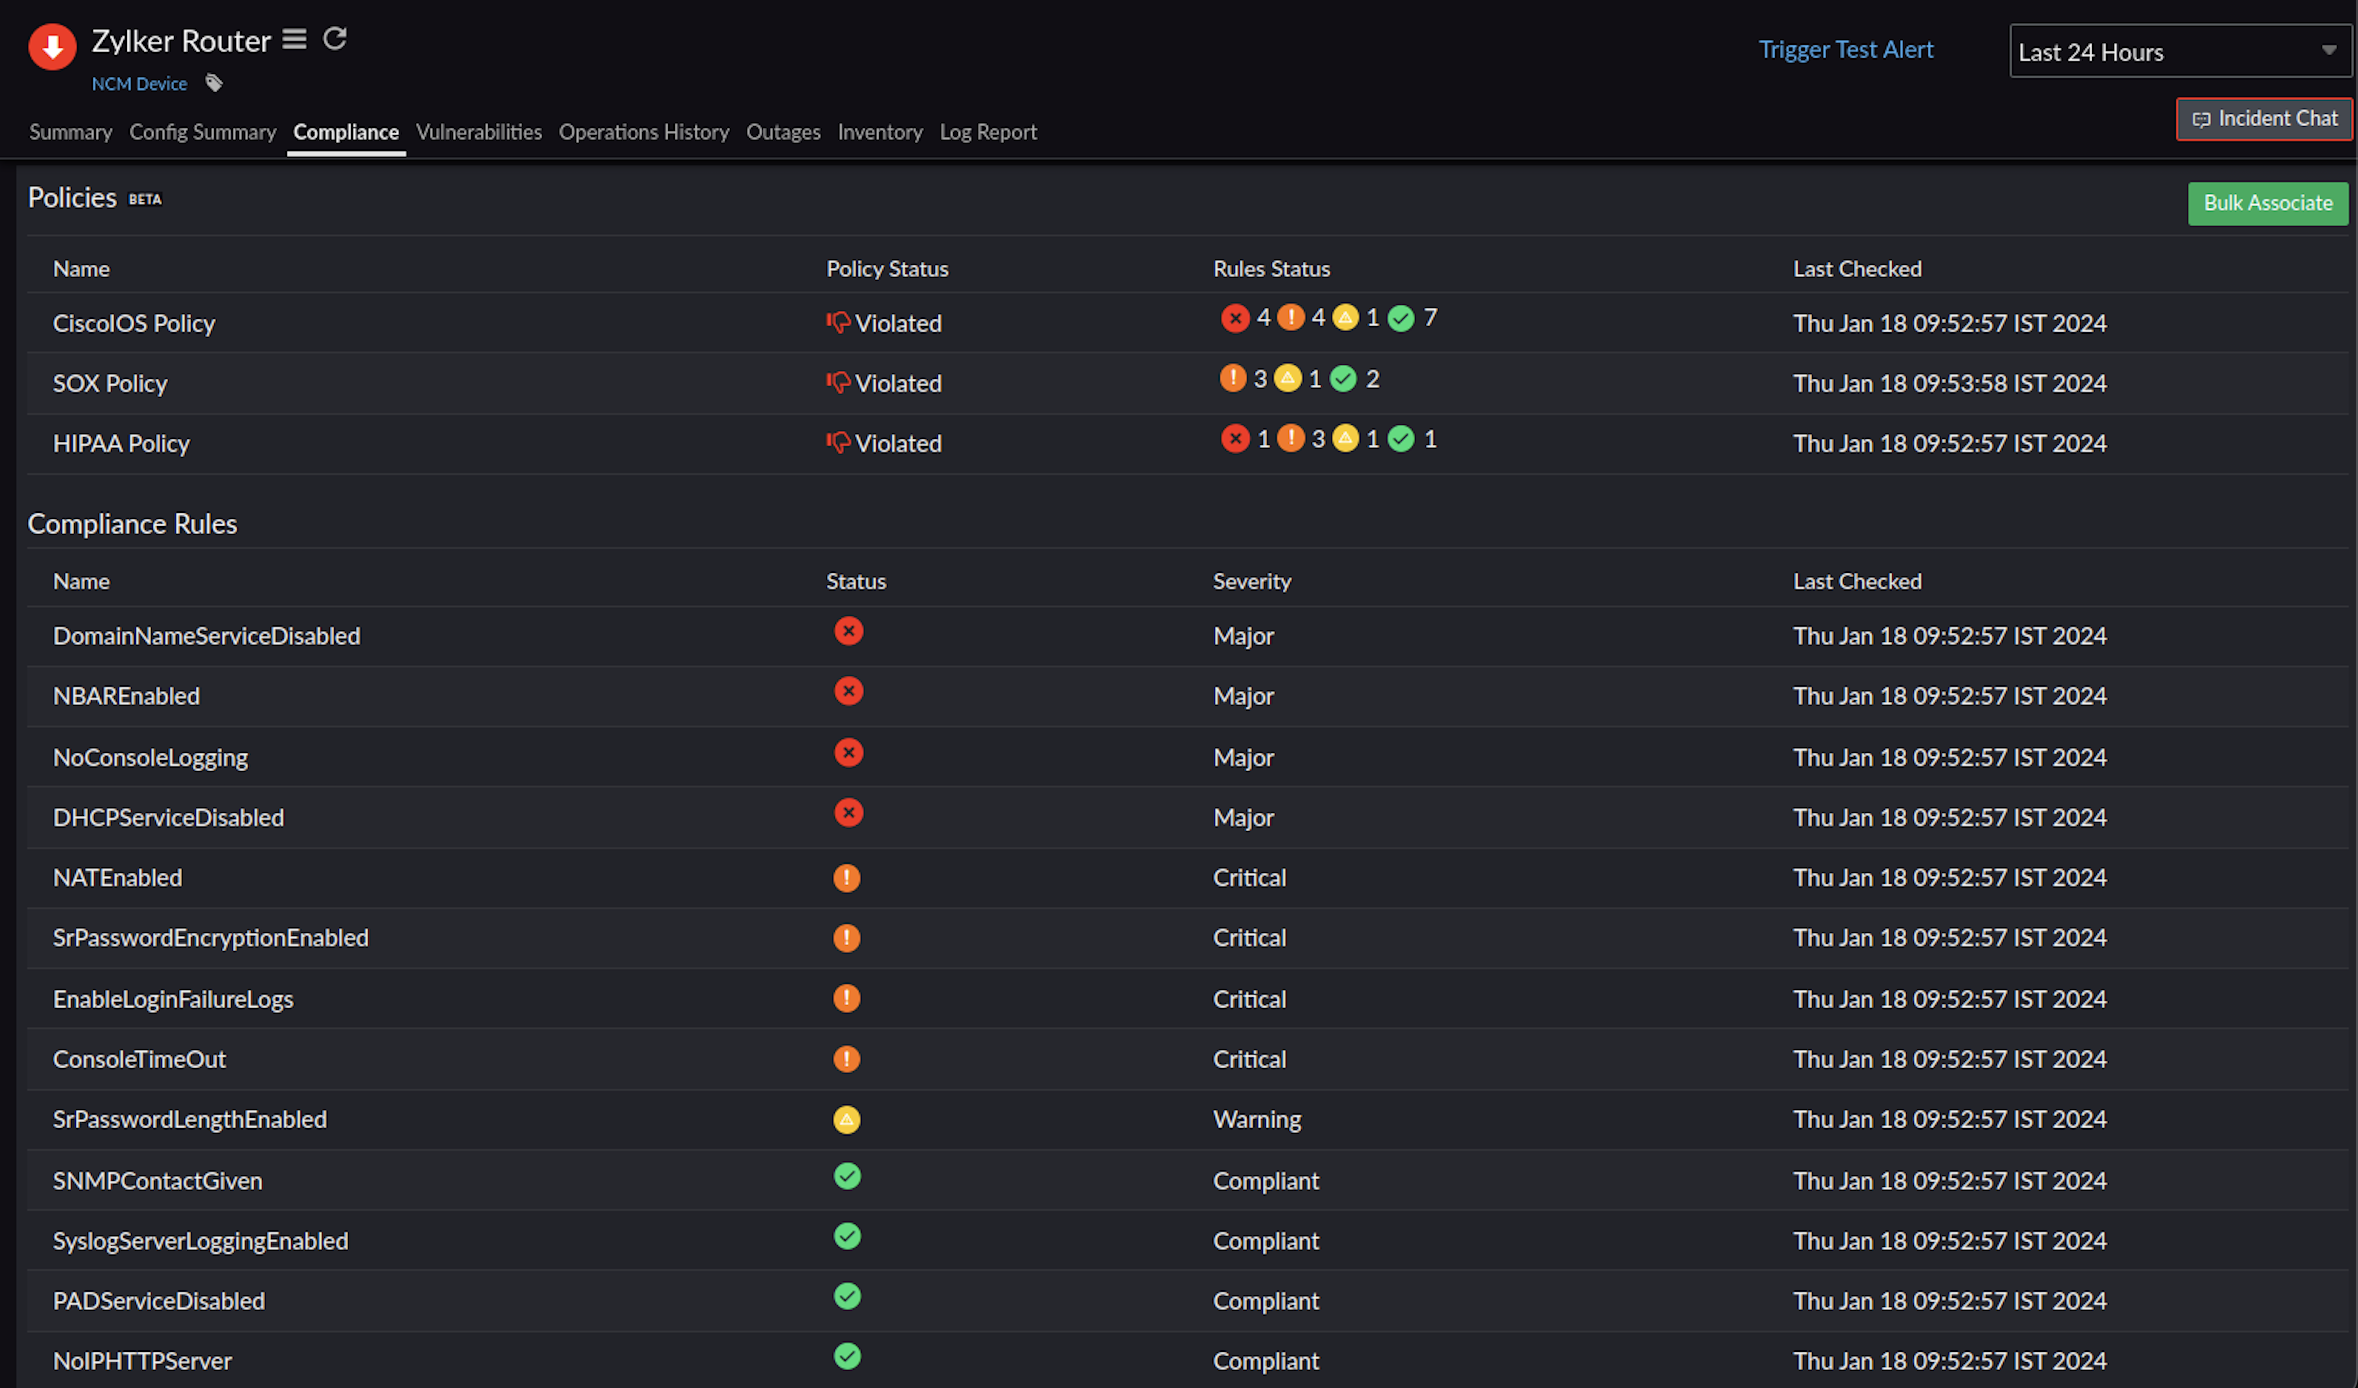 Figure 23. Compliance details of an NCM device.
Associating compliance policies to an NCM device
- Navigate to Network > NCM > NCM Devices. Then, select the required device.
- Click the hamburger
 icon to view options. Then, click Edit. You can also click a device, click the hamburger icon beside the monitor name in the monitor summary page, and then click Edit.
 - On the Edit NCM Device screen, scroll to the Compliance section.
- In the Compliance drop-down, select all the policies you wish to associate to the device. Then, click Done.
- Click Save in the top-right section of the screen to save the changes.
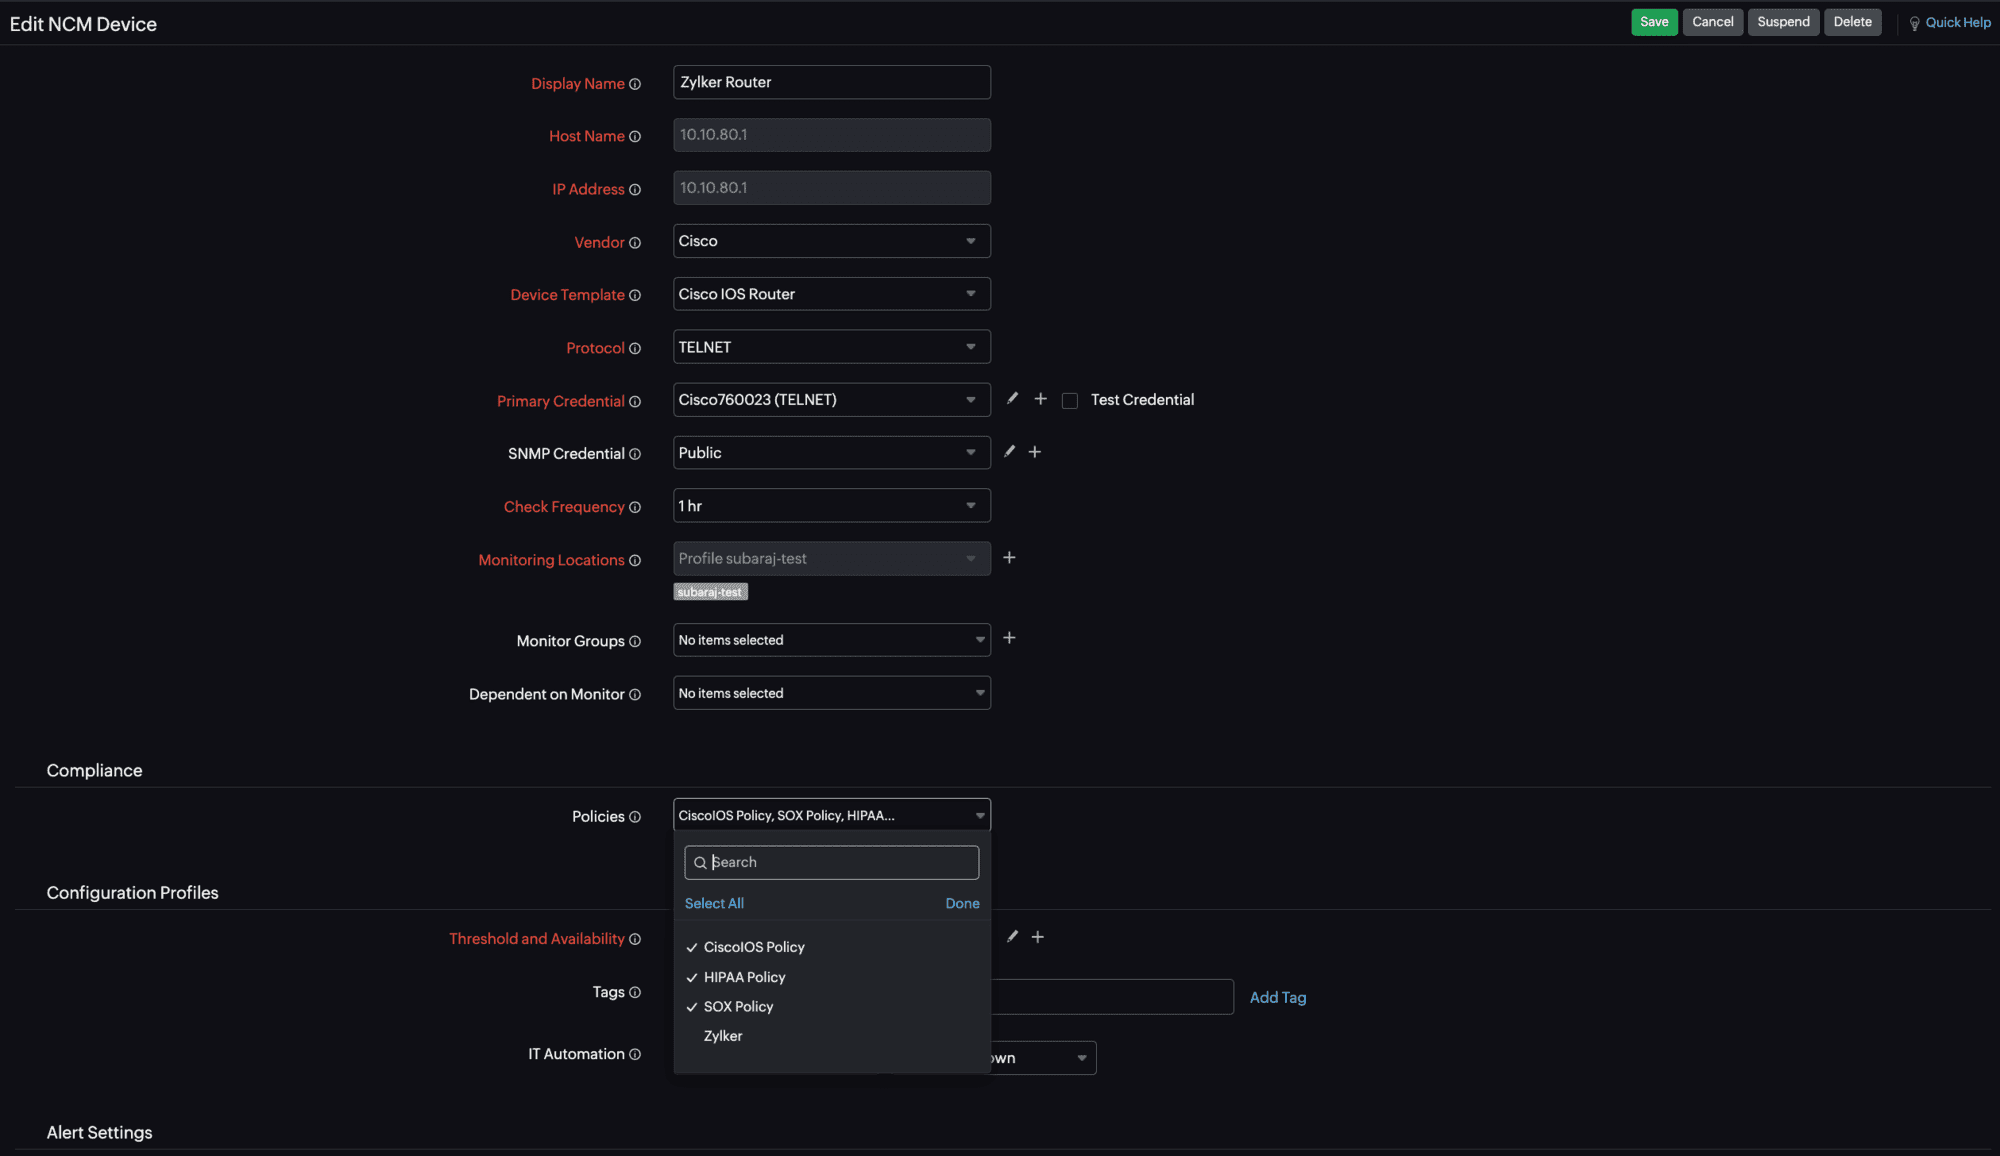
Figure 24. Associating compliance policies to an NCM device.
Related articles
-
On this page
- What is network configuration compliance?
- How it works
- Compliance Dashboard
- Adding a compliance rule
- Modifying a compliance rule
- Adding a compliance rule group
- Modifying or deleting a compliance rule group
- Adding a compliance policy
- Associating devices with a compliance policy
- Bulk-associating devices with a compliance policy
- Modifying or deleting a compliance policy
- Importing compliance policies
- Cloning a compliance policy
- Downloading a compliance policy
- NCM device compliance
- Associating compliance policies to an NCM device