Network Configuration Manager (NCM) Credentials
SSH, Telnet, or SNMP credentials are necessary to automate network configuration backups. You can use the credentials that are already added to your Site24x7 account or add new ones.
You can add new credentials in two ways:
- While adding devices to NCM, click the + icon next to Primary Credential.
If you have not selected any protocol in the Protocol field, the default options available are SSH or Telnet credentials. However, if you select SNMP - TFTP in the Protocol field, you can add SNMP credentials by clicking the + icon next to the Primary Credential or SNMP Credential fields.
- Or navigate to Network > NCM > NCM Credentials > Add Credential.
After this, select a Credential Type from SSH, Telnet, SNMP v1/v2, or SNMP v3 based on your device requirements.
The SSH credentials must have appropriate read-write permissions to execute all commands specified on device templates successfully. Site24x7 encrypts and stores all credentials to maintain security.
SSH/Telnet credentials
In the Add Credential pop-up, perform the following steps:
- Credential Type: Toggle SSH (for Secure Shell) or Telnet based on the protocol that you use to connect to the device.
- Display Name: Provide a name to identify the credentials. This name will be used to associate and fetch network configuration data.
- Description: Provide a short description to define and differentiate between different credentials.
- User Name: Enter the SSH or Telnet username.
- Password: Enter the SSH or Telnet password.
- Port: Enter the number of the port on which the SSH or Telnet service is running. By default, it is 22 for SSH and 23 for Telnet.
- Timeout (in seconds): Specify the amount of time Site24x7 should wait for the SSH or Telnet response. The default value is five seconds.
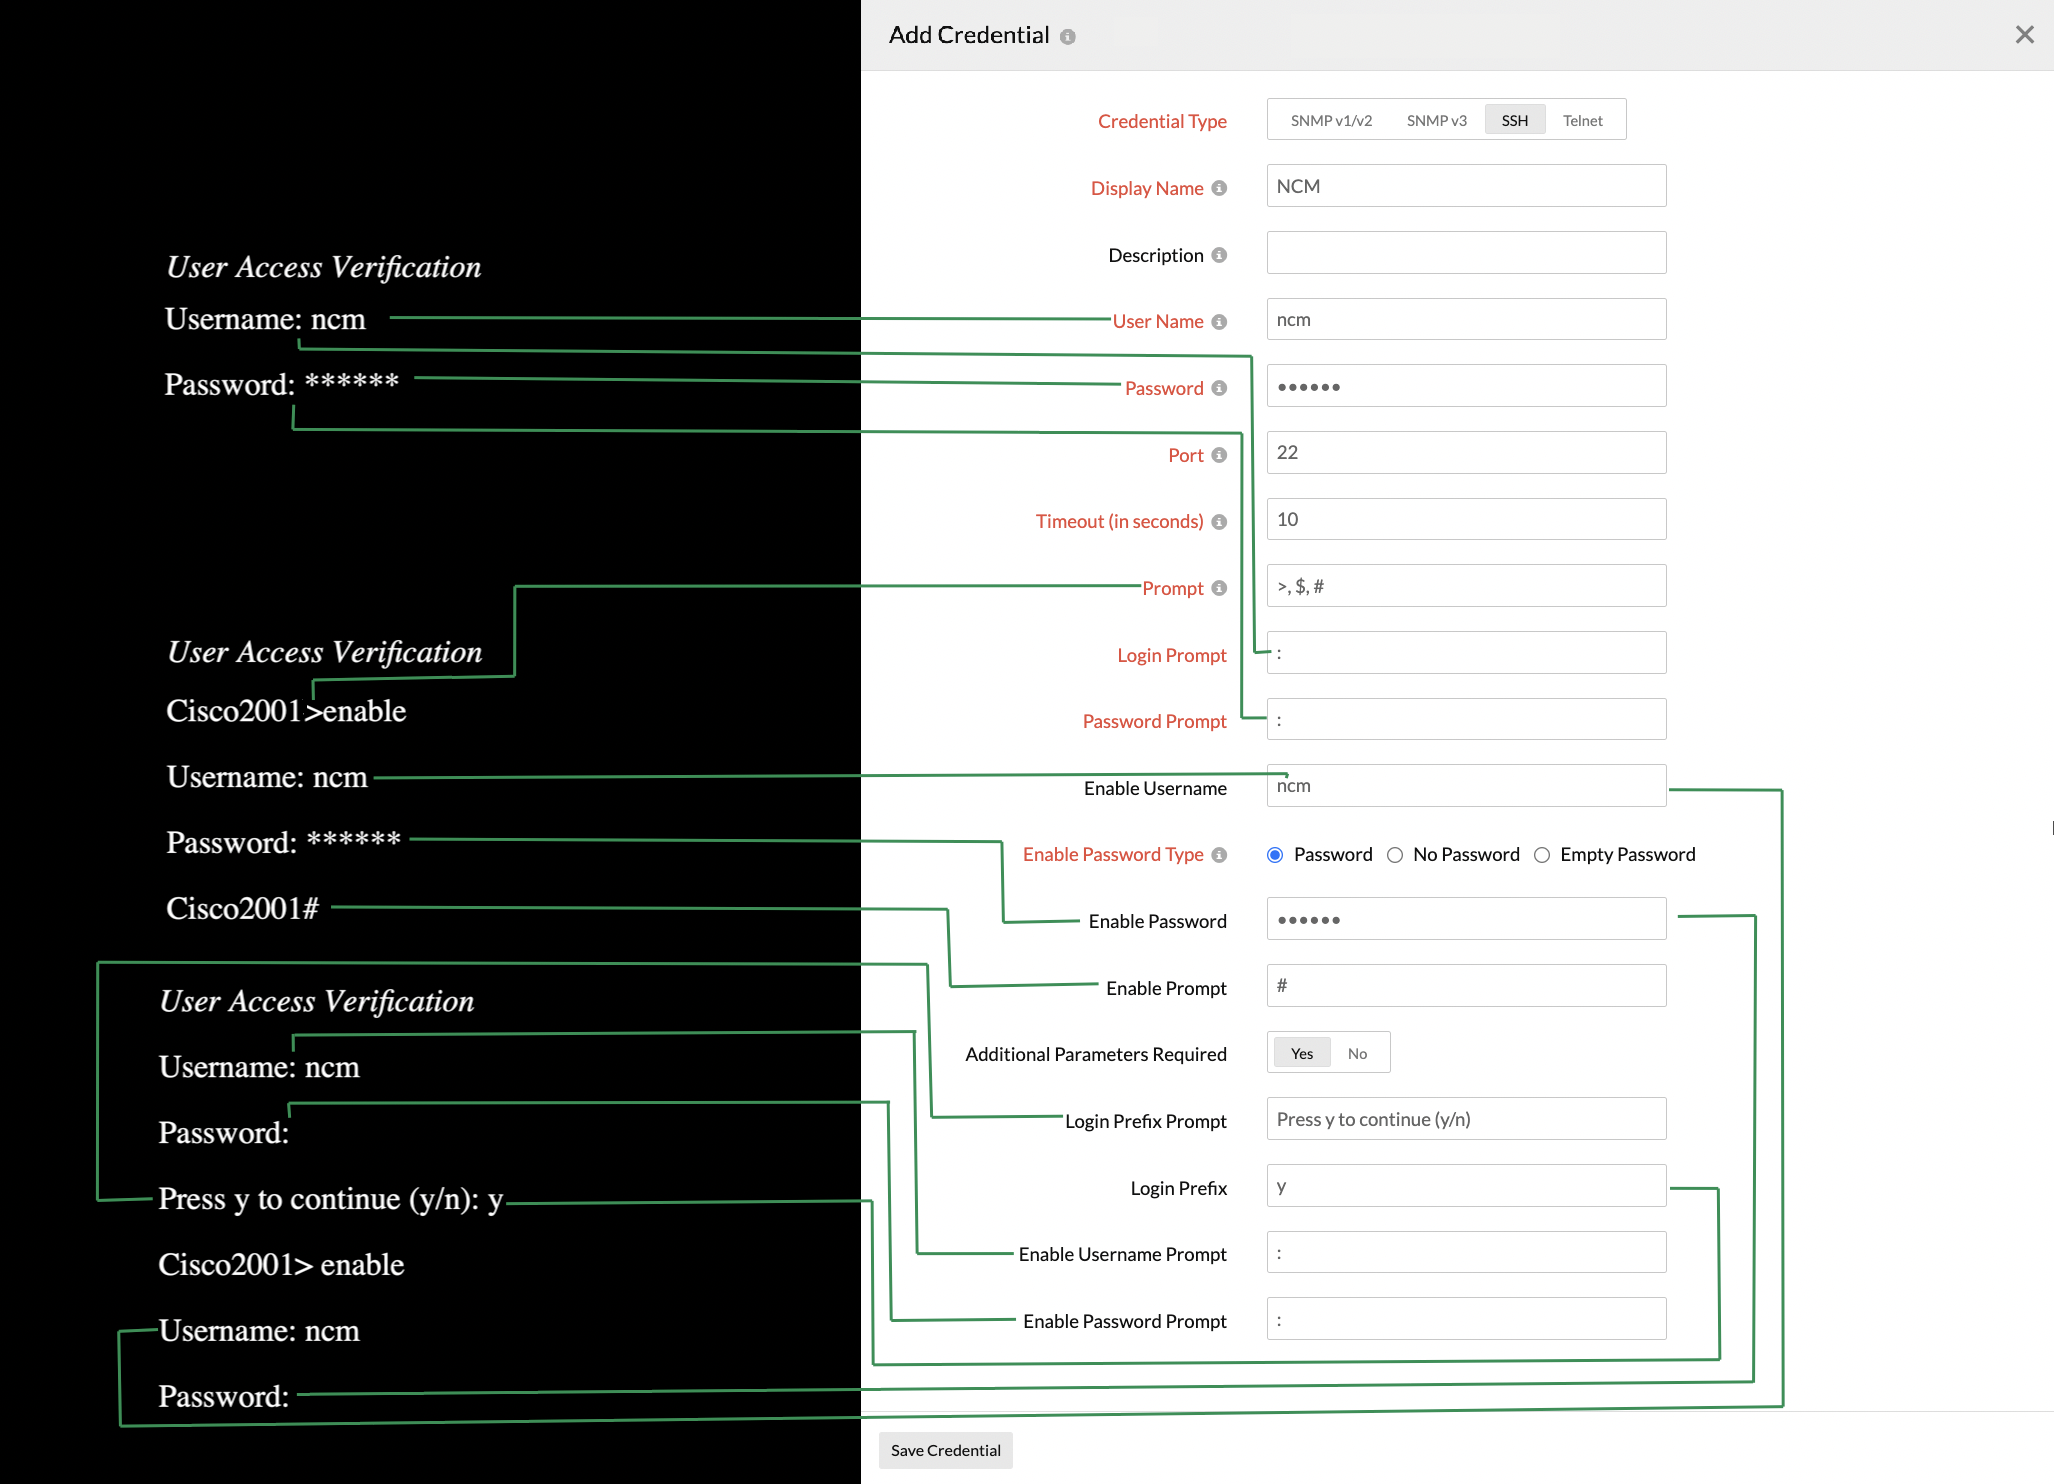
- Enter the details for the Prompt, Login Prompt, Password Prompt, and Enable Username fields as shown in Figure 1.
- For the Enable Password Type field, select an option from Password, No Password, or Empty Password.
- Password: Select this option when you need to provide the password to enter enable/privilege mode.
- No Password: Select this option when a password is not required to enter enable/privilege mode.
- Empty Password: Select this option when a password is required to enter enable/privilege mode but the password is an empty string.
NoteIf there is no enable mode on the device, select Password for Enable Password Type and leave the Enable Password and Enable Prompt fields empty.
- Additional Parameters Required is set to Yes by default if you selected Password or Empty Password in the Enable Password Type field. It is set to No by default if you selected No Password. However, you can toggle between Yes and No as required. If you select Yes, enter the Login Prefix Prompt, Login Prefix, Enable Username Prompt, and Enable Password Prompt for your respective credentials by referring to Figure 1.
- Click Save Credential
Figure 1. Enter the details in the Add Credential pop-up.
For existing SSH or Telnet credentials for which an option was not selected in the Enable Password Type field while adding credentials, Enable Password Type will be set to:
- No Password when both Enable Password and Enable Password Prompt are empty.
- Empty Password when Enable Password Prompt is filled in and Enable Password is empty.
- Password when both Enable Password and Enable Password Prompt are filled in.
SNMP credentials
In the Add Credential pop-up, toggle between SNMP v1/v2 and SNMP v3 as required.
SNMP v1/v2
- Display Name: Provide a name to identify the credentials. The credential name cannot include spaces or special characters.
- Description: Enter a short description to define and differentiate between different credentials.
- SNMP Read: Enter your SNMP read-only community string.
- SNMP Write: Enter your SNMP read-write community string.
- SNMP Port: Enter the port that should be used for SNMP communication. The default value is 161.
- SNMP Timeout (in seconds): Specify the amount of time Site24x7 should wait for the SNMP response. The default value is five seconds.
- SNMP Retries: Enter a numerical value for the number of times a request should be sent when a timeout occurs.
- Click Save Credential.
SNMP v3
- Display Name: Provide a name to identify the credentials. This name will be used to associate and fetch network configuration data.
- Description: Provide a short description to define and differentiate between different credentials.
- User Name: Enter the SNMP v3 username.
- Context Name: Enter the context name. This is an octet string that has at least one piece of management information. Within an administrative domain, the context ID identifies an SNMP entity that may recognize an instance of a context with a particular context name.
- Authentication Protocol: Select the protocol used for authentication (i.e., the protocol that checks the integrity of the transferred data).
- Authentication Password: Enter the chosen protocol's authentication password.
- Encryption Protocol: Select the protocol used for data encryption.
- Encryption Password: Enter the encryption protocol's password.
- SNMP Port: Enter the port that should be used to export flows to the Site24x7's On-Premise Poller. The default value is 161.
- SNMP Timeout (in seconds): Specify the amount of time Site24x7 should wait for the SNMP response. The default value is five seconds.
- SNMP Retries:Enter a numerical value for the number of times a request should be sent when a timeout occurs.
- Click Save Credential.
Related articles
-
On this page
- SSHTelnet credentials
- SNMP credentials
- Related articles
