
Installing Java Agent in WebLogic 12.1.3 and above
Note
Refer to this help page for the previous steps.
- Extract the ZIP file to a new directory to find the agent's JAR file and its configuration files.
- Open the apminsight.conf file in any text editor, enter your license.key (which can be obtained from the Site24x7 APM Insight page), configure the application.name and agent.server.port values as required, and save the file. Refer here to fine-tune the agent settings.
NoteIf multiple Java applications or instances are running on the same host, configure application-specific properties, such as application.name and agent.server.port, as JVM system properties instead of configuring them in the apminsight.conf file. For more information, refer to this KB article.
- Follow either of the following based on your setup:
For standalone setup
- Open the <ORACLE_HOME>/user_projects/domains/<doman_name>/bin/startWebLogic.cmd(.sh) file in any text editor
- Add the following lines to the top of the script file.
- For Windows,
set JAVA_OPTIONS=-DUseSunHttpHandler=true -javaagent:<agent_directory_full_path>apminsight-javaagent.jar %JAVA_OPTIONS%
- For Linux,
JAVA_OPTIONS="-DUseSunHttpHandler=true -javaagent:<agent_directory_full_path>/apminsight-javaagent.jar $JAVA_OPTIONS"
- Save the file and restart the WebLogic server.
For cluster setup
- Open the administrative console of WebLogic server and navigate to the Environment > Servers > Configuration tab.
- Select (Your server name) > Configuration > Server Start tab.
- Locate the Arguments textbox and enter the following argument:
-javaagent:<agent_directory_full_path>/apminsight-javaagent.jar -DUseSunHttpHandler=true
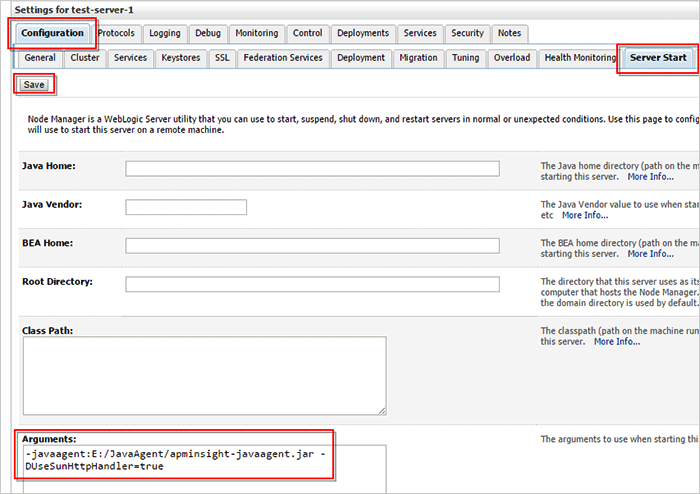
- Save the file and restart the WebLogic server.
-
On this page
- For standalone setup
- For cluster setup