Help MSP Subscription

Subscription

Our subscription model for MSP plan brings onboard a concept of basic monitors and advanced monitors based on the type of monitors. The subscription plan offers a set number of basic monitors, advanced monitors, RUM Pageviews, Network Interfaces, AppLogs, and Alert Credits with it. For the first 30 days of your MSP account's evaluation period, you get to freely setup 250 monitors, which includes upto 50 Advanced monitors, 500K RUM page views, 500 Network Interfaces, 5 GB AppLogs, 1 Mobile APM and 10 Alert Credits. An upgraded MSP plan offers 53 monitors, which includes upto three Advanced monitors, 500K RUM page views, 50 Network Interfaces, 1GB AppLogs for MSP Admin, 200MB Logs for every MSP Customer, and 150 Alert Credits, by default. You can further top-up your plan by purchasing additional add-ons and alert credits. Learn more about MSP pricing. We support payment via Credit Card, Paypal and Purchase Order. All payments via Credit Card or PayPal will be auto renewed based on the payment duration opted by you.

How Can I ?

Upgrade to Paid Subscription:

Follow below steps to upgrade to paid Site24x7 subscription:

  1. Log in to Site24x7 MSP webclient.
  2. Click Admin > Subscriptions.
  3. Based on the logged in IP address, you'll be provided multiple currency options for payment. Use the toggle button to select your preferred currency option. Learn more about the available currency options.


    Based on your chosen currency-type, taxes will be auto-applied to the final payable amount.
  4. Click Upgrade Subscription listed under Zoho Stores.
     
    This will take you to the Site24x7 MSP plan listing page under Zoho Store (Used by Site24x7 for subscription handling.)

  5. Under Plan Details, choose the desired Payment Duration, either Monthly/Yearly.
    You can purchase additional monitor add-ons and alert credits as well. Based on your selected add-ons, it will alter your monthly/yearly subscription pricing.
  6. Click Continue.
  7. In Review Order, verify your order summary, and then click Confirm Order.
  8. In Payment Details, choose your preferred payment method to make the payment.
    Site24x7 supports payment via Credit Card, PayPal and Purchase Order (PO). PO will be listed only if you've selected the yearly option

Payment using Credit Card:

  • Ensure you complete the steps listed above, before selecting Payment Details.
  • Choose Pay with Credit Card option listed under Payment details.
  • In Payment Details, specify your card details and billing address and then click Make Payment.
    Site24x7 supports the following credit card types: MasterCard, Visa, AmEx, Discover, JCB, and Diners club.
  • A confirmation message is displayed to you after a successful upgrade.
    • If the Credit Card transaction fails, contact sales@site24x7.com for an offline transaction.
    • All subscriptions will be automatically renewed from your credit card on a recurring basis. The card will be charged automatically on the date when your next payment is due. However, in case of a failed credit card transaction, we will retry three more times with a two days time interval between each attempt. Post that, the Site24x7 MSP plan subscription will be DOWNGRADED to FREE account.


Payment using PayPal:

  • Ensure you complete the steps listed above, before selecting Payment Details.
  • Choose Pay with PayPal option listed under Payment Details.
  • Once you populate the billing address, click Continue to initiate the PayPal transaction. You will be redirected to the PayPal website, where you can complete your transaction.
  • A confirmation message is displayed to you after the successful upgrade.  
All subscriptions will be automatically renewed from your PayPal account on a recurring basis.

Payment using PO:

  • Ensure you complete the steps listed above, before selecting Payment Details.
  • Choose Purchase Order option listed under Payment Details.
  • Fill out the form and click Submit.
  • A confirmation message is displayed to you after the successful upgrade.
  • We accept NET 30 terms for this payment. The account will be upgraded to the chosen plan for a temporary period of 30 days. On failure to receive payment within the given date, the MSP account will be automatically downgraded to the FREE version.
  • At any point during your subscription cycle, you can move from an offline PO transaction to an online subscription mode like credit card or PayPal. Know more.

Upgrade/Downgrade Add-Ons:

Add-ons are mini packages of monitors that can augment your existing subscription. Additionally, they give you the flexibility to add/reduce monitors. You can purchase any number of additional add-ons based on your chosen plan. Site24x7 MSP plan offers basic monitors, advanced monitors, RUM page views, AppLogs, and Network Interfaces as add-on packages.

  1. Log in to Site24x7 MSP webclient.
  2. Click Admin >Subscriptions.
  3. Click Purchase addons listed under Zoho Stores.

  4. This will navigate you to Manage Site24x7 Subscription window. Here you can Upgrade/Downgrade your addons.
    PO transactions are completed offline. You have to contact Site24x7 sales support team for all offline purchases.

Upgrade Addons:

  • Click Upgrade Add-Ons listed under Manage Subscription.
  • Specify the number of units that you wish to purchase and click Continue.
  • If you've made the purchase in a monthly plan and wish to migrate to a yearly plan, select the checkbox Switch to Yearly. This'd get you a 10% discount on your subscription plan.
    The charges for your subscription will be calculated based on pro-rata basis.
  • A confirmation message about the upgraded add-ons in displayed.
    Upon confirmation, auto payment will be initiated through your preset credit card or PayPal account.

Downgrade Addons:

  • Click Downgrade Add-Ons listed under Manage Subscription.
  • Specify the number of units that you wish to downgrade and click Continue.
  • Verify your add-on count and click Downgrade to downgrade your monitoring add-ons.
  • A confirmation message about the downgraded add-ons in displayed.

Purchase Alert Credits (SMS/Voice):

Voice or SMS alerts allow you to instantly receive critical downtime alerts via a voice synthesized phone call or an SMS. Incase you've exhausted your default alert credits for the month, you will also be able to purchase additional alert credits as per your need.

  1. Log in to Site24x7 MSP webclient.
  2. Click Admin > Subscriptions.
  3. Click Purchase Alert Credits.
  4. You will be routed to Manage Site24x7 Subscription screen. Here, click Buy Now  listed under Manage Non-recurring Add-Ons

  5. Choose the appropriate alert pack from the drop down list. Click Continue.
    Alert Credits can be purchased by choosing an appropriate count from the drop down viz., 50, 100, 250, 500, and 2500 Alert Credits.

    The alert credits under an Alert Pack are valid for both SMS and Voice alerts and will be charged based on the usage of your SMS or Voice alerts.
    1 SMS = 1 credit
    1 Voice alert in US /Canada = 1 credit
    1 Voice alert outside US = 2 credits
  6. Verify your alert credit count and click Continue  to purchase additional alert credits. 
  7. A confirmation message about the purchased alert credit is displayed.

Alert Credits Auto Top-up:

Alert Credits Auto Top-up option can be used to receive uninterrupted sms/voice call  notifications. This option is available for credit card and pay pal users. To enable Auto Top-up option, navigate to Admin > SubscriptionEnable Auto Top-up / Update Auto Top-up.
Provide details in the following fields:

  • Enable Auto Top-up: Use the Alert Credits auto top-up option to auto recharge your alert credits when they go below the desired limit.
  • Configure Threshold: Provide a threshold limit to get your alert credits auto recharged, when your credits drop below this limit.
  • Alert Credits for Top-up: Choose the number of Alert Credits to be added when your credit count goes below the threshold limit.

You can change the set Threshold and the Select Credit Top-up value or disable the Alert Top-up option later using the Update Auto Top-up button. 

The MSP Admin can enable the Auto Top-up option for the customers under the Apply License section. This can be done only if the MSP admin has enabled the Auto Top-up option for his account. The MSP admin can set the threshold for the individual customers.

It is always advisable to have a larger threshold limit and credits set for the MSP account.

Hourly Billing

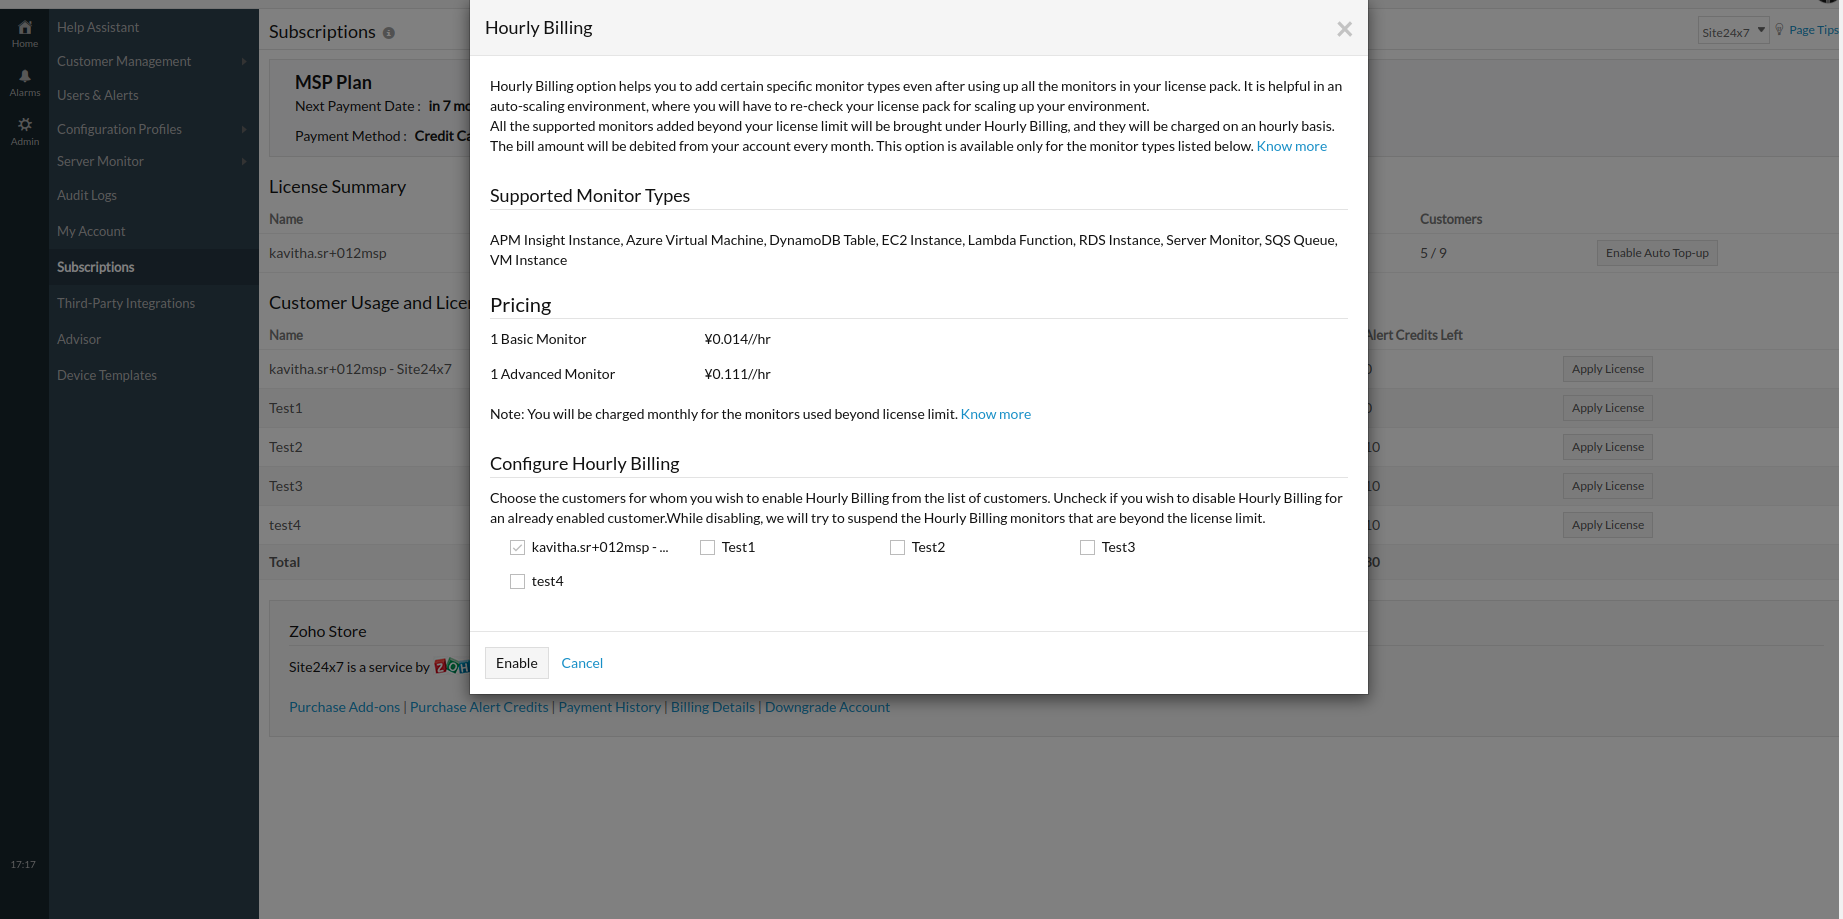
The Hourly Billing option helps you to add specific monitor types even after using all  the monitors in your license pack. Scaling up your environment is  hassle free with the Hourly Billing option. For example, If you need to scale up the number of servers you use, you can add more servers using this option. The monitors under the Hourly Billing option will be charged based on the number of hours for which they are used.

Eligibility for the Hourly Billing option
Only customers who are either credit card users or recurring PayPal account holders are eligible for the Hourly Billng option.

How it works             

Hourly Billing can be enabled by an MSP admin for selected customers. 

 To enable the option:               

1. Login to your Site24x7 MSP account.
2. Go to Admin > Subscriptions.
3. Click on the Configure Hourly Billing option provided next to the Hourly Pricing option and then click on the Enable button in the Hourly Billing pop-up that opens. Hourly Billing for selected MSP customers will be enabled.

To disable the Hourly Billing option for selected customers you can disable the check boxes near each customer. 

To enable or disable Hourly Billing option for selected customers,navigate to Subscriptions and click Apply License for that customer.

Hourly Pricing Summary
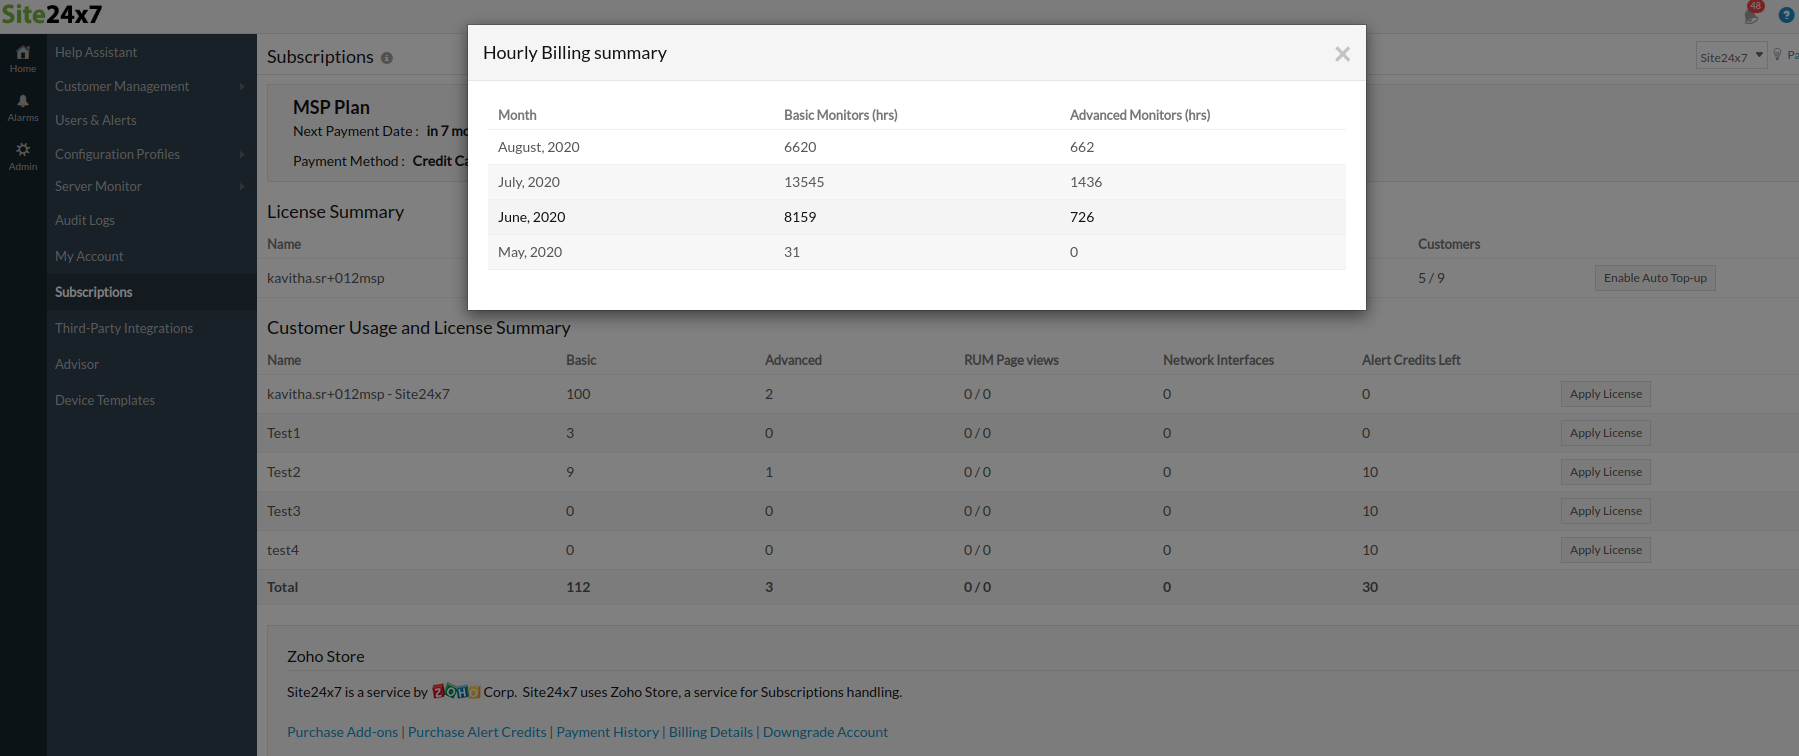
A summary of Hourly Pricing details will be provided under this section. To see the  summary, click on the Hourly Billing Summary option, in the Subscriptions page.
In the pop-up that opens, the following details will be provided:

  • Month
  • Total number of hours Basic monitors were used.
  • Total number of hours Advanced monitors were used.
Read more about Hourly Billing.

Modify Credit Card Details & Billing Address, Add Email recipients:

Follow below instructions to update Credit Card number and Billing details.

  1. Log in to Site24x7 MSP web client.
  2. Click Admin >Subscriptions.
  3. Click Modify Card Details or Billing Details. You'll now be redirected to the Billing Details  window in Zoho Stores.
  4. Under Payment Method tab, click Change icon. Provide the new card details and click Update. You can also view the Current Subscription Plan by clicking the View Subscriptions button.
  5. To alter your Billing address, access the Billing Address & other info tab and click Change. Once you've modified your new billing address, click Update.
  6. You can share purchase notifications and invoice details with your colleagues. If you wish to add more email recipients, select the Email Recipients tab and click the Add Recipient button. Populate the requisite details and Add the recipient.

Download the Payment Invoice:

Follow the below instructions to download the invoices for your payments.

  1. Log in to Site24x7 MSP web client.
  2. Click Admin Subscriptions.
  3. Click Payment History listed under Zoho Stores.
  4. In the Transaction History window, you can view and filter all your previous transaction details.
  5. Click the relevant PDF file listed under the Invoice column to download the invoice.
  6. Click Save File to save the invoice.
  7. Click OK to download the invoice.

View License and Usage Summary

You can view your Site24x7 account's License and Usage summary in a unified dashboard.

  1. Log in to Site24x7 MSP web client.
  2. Click Admin >Subscriptions.
  3. A banner at the top shows the current subscription plan, subscription renewal date, and the billing users. To explore more about how to add a billing user, click here.
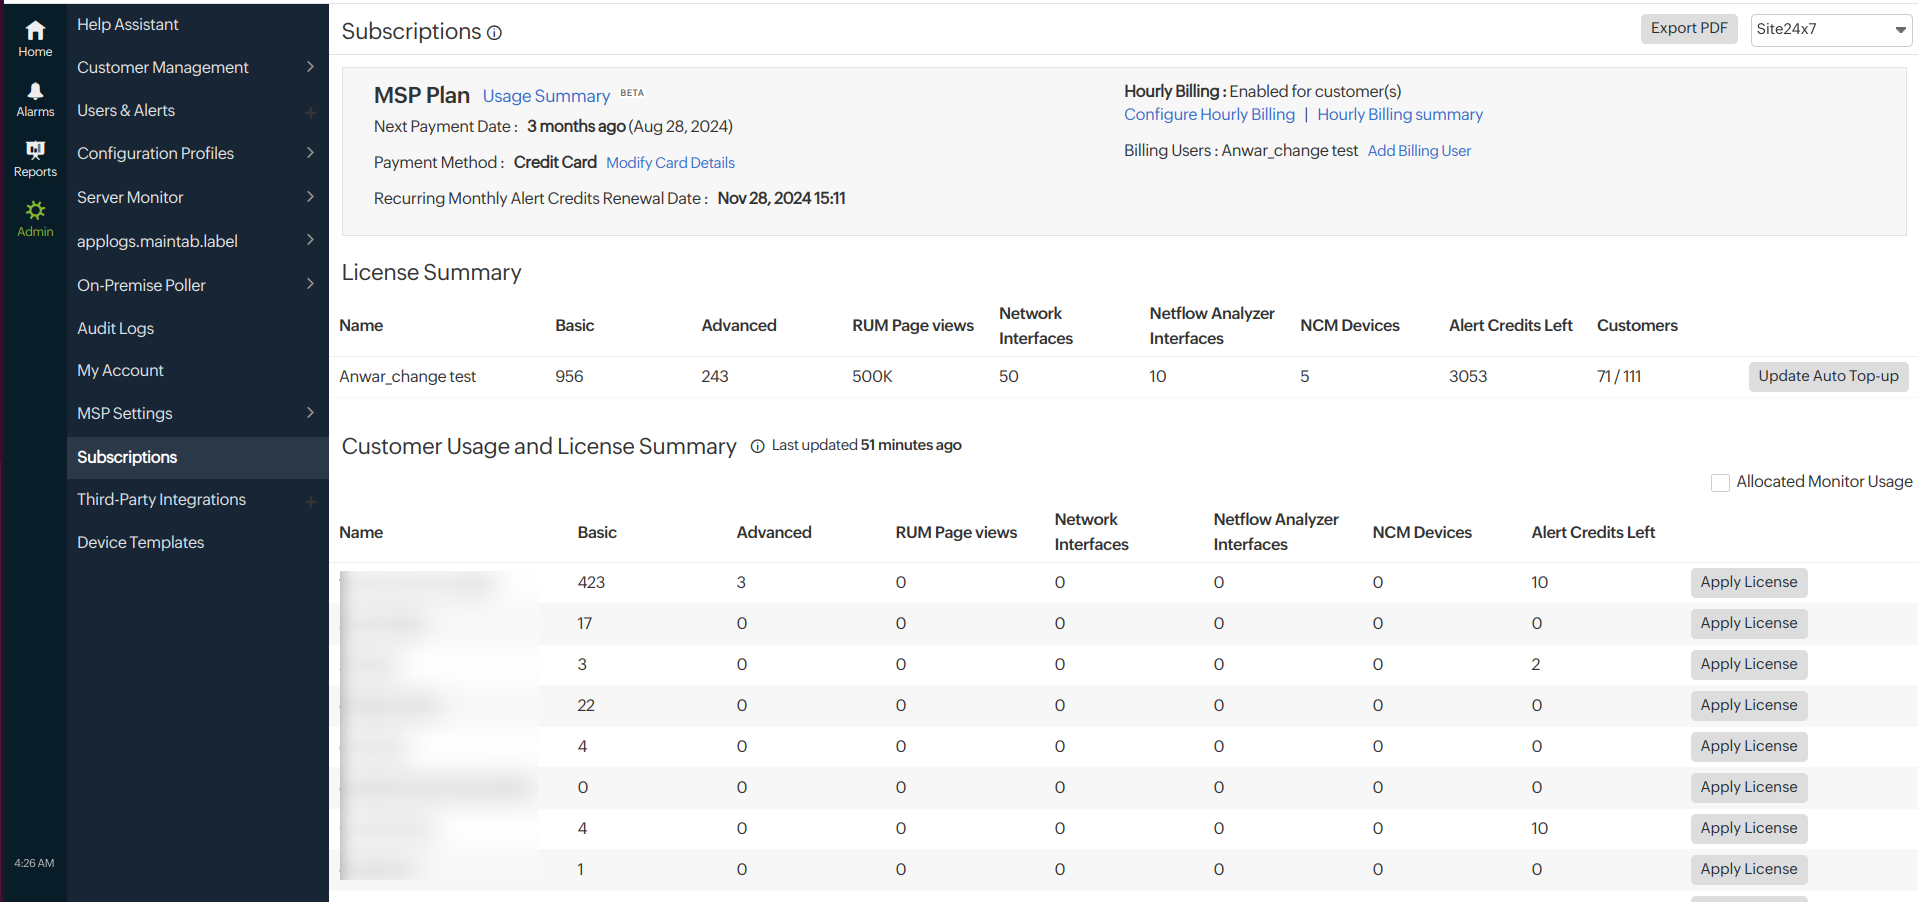
    View licensing and usage related details

    You can enable the check box next to Allocated Monitor Usage to view your monitor consumption.
  4. You will find your account's current License Summary.
    • Basic Monitors: It gives a quick overview of the total number of basic monitors that you are entitled to use under your MSP subscription plan. By default, you get to use 200 basic monitors and share it among your customer accounts.
    • Advanced Monitors: It provides the total number of advanced monitors you are entitled to use under your MSP subscription plan. By default, you get to use 50 basic monitors and share it among your customer accounts.
    • RUM Page Views: Shows the total RUM page views available in your account. You are entitled to use 500K RUM page views, which you can distribute among your customers.
    • Network Interfaces: Shows the total number of Network Interfaces that can be utilized in your account. By default, you get to use 500 Network Interfaces, which you can share among your users based on preference.
    • AppLogs: Shows the maximum upload limit of AppLogs in your account. A paid license comes with 1GB AppLog upload limit, by default. Additionally, each customer account is individually provided a Log upload limit of 200MB. You can expand the AppLogs upload limit by purchasing additional 10GB logs for 10$/month.
    • Mobile APM: Shows the number of the Mobile APM instances allocated for this customer account.
    • Alert Credits Left: Displays the total SMS/Voice alert credits available in your account. By default, each customer account gets to use 10 alert credits, which can be extended based on individual customers' needs.

Applying License for Individual Customer Accounts

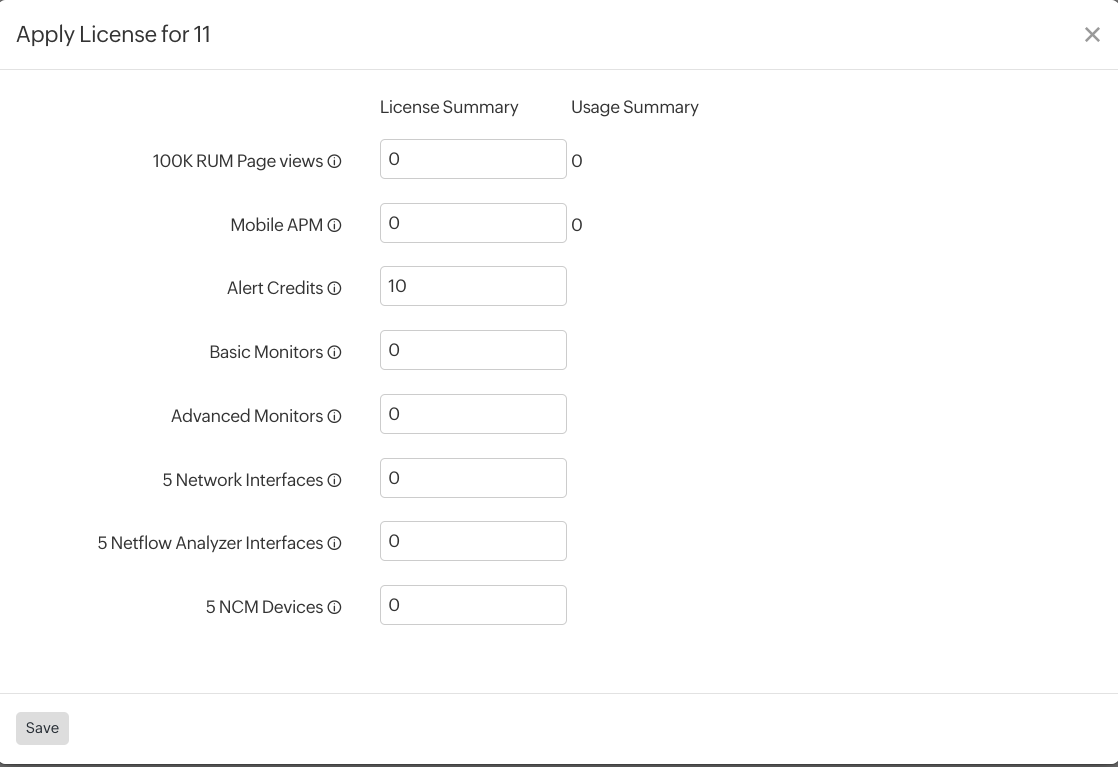
The MSP admins can access the Apply License button to distribute RUM Page views, AppLogs and Alert Credits to individual Customer accounts.

  • You can allocate RUM Page views to an individual customer account, in multiples of 100K page views.
  • A 200MB Log upload limit is provided to every customer account, by default. You can further allocate the upload limit in multiples of 1GB AppLogs/customer account.
  • Individual customer accounts are provided 10 alert credits, by default. Alert Credits can be further allocated to a Customer Account by choosing an appropriate count from the drop down viz., 20, 50, 100, 200, 250, and 500 Alert Credits.

Define Monitor Usage Limit

Being an MSP admin, you can prevent any unforeseen usage of monitors by restricting the monitor usage count in the customer account. This can be achieved by setting an upper usage limit for the basic and advanced monitors, separately. Once you've defined the upper usage limit for the basic monitors, advanced monitors and network interfaces you cannot add more monitors than the set limit, even when you've any unused monitors in the license. Other customer accounts can still use these unused monitors, if needed. You can always modify the usage limit, if you wish to add more monitors later.

All your existing configured monitors will continue to be active, even when your defined usage limit for the monitors is set at a lower value compared to the current usage. Also, if the defined usage limit is set at "0", no monitors can be further added to the account.

Use case:

Let's delve into an example to quantify this further. Say your MSP account has 50 basic monitors and 3 advanced monitors in total. You've also setup two customer accounts, Customer A and Customer B. Now, consider you've defined an upper usage limit of 25 basic and 1 advanced monitors for Customer A, whereas there isn't any upper usage limit defined for Customer B.

In this scenario, the Customer A will be able to add a maximum of 25 basic and 1 advanced monitors only. Assuming Customer A uses 15 basic and 1 advanced monitors from the entitled quota, only 10 basic monitor and no advanced monitors can now be added. Now, if you decide to modify the upper usage limit to 30 basic and 2 advanced monitors for Customer A, the usage limit will be reset accordingly. On the other hand, the Customer B will have access to all the unused monitors, till an upper usage limit is defined.
Learn how to apply license

Change Payment Duration:

Site24x7 lets you change your payment duration from the monthly to a yearly mode. Once moved to yearly payment duration, you are not allowed to change back to a monthly payment duration. We do not offer any quarterly or half yearly payment duration.

  1. Log in to Site24x7 MSP web client.
  2. Click Admin >Subscriptions.
  3. Click Purchase AddOns or Purchase Alert Credits. You'll redirected to the Manage Site24x7 Subscription window. 
  4. Select the Switch to Yearly link listed under Manage Subscription.
  5. You'll be prompted with a Confirm Order window. Click the Make Payment button to change the subscription plan from monthly to yearly.
    The charges for your subscription will be calculated based on pro-rata basis.

Change Payment Mode from PO to Credit Card/PayPal:

Follow below instructions to modify your current payment mode from PO to online modes like credit card/PayPal.

  1. Log in to Site24x7 MSP web client.
  2. Click Admin >Subscriptions.
  3. Click Renew Subscription.
    You will be navigated to the Manage Site24x7 Subscription page, where you are provided a notification message to convert to an online subscription mode.
  4. Click the highlighted link Payment Method to automatically convert from a PO subscription to an online subscription mode.
  5. You'll be prompted with a Payment Details page. Specify the Credit Card or PayPal details.
  6. Click Update to modify the payment mode to Credit Card or PayPal.
  7. A confirmation message about the change in payment mode is displayed.

Renew Subscription:

Site24x7 auto renews your MSP subscription plan on your next renewal date of your payment cycle. This will be available for Credit Cards and PayPay mode of Payment.


  • For offline PO purchases, we accept NET 30 terms for this payment. The account will be upgraded to the MSP plan for a temporary period of 30 days. Upon receiving the invoice, you may pay us within 30 days either through credit card, bank cheque or wire transfer. On failure to receive payment within the given date, the account will be automatically downgraded to the FREE version
  • If you have made an online purchase using credit card or PayPal, subscriptions will be automatically renewed from your account on a recurring basis. The account will be charged automatically on the date when your next payment is due

Downgrade Subscription to FREE Plan:

Follow the below instructions to downgrade your paid subscription plan to a FREE plan:

  1. Log in to Site24x7 MSP web client.
  2. Click Admin >Subscriptions.
  3. Click Downgrade Account  link under Zoho Stores.


  4. Click Cancel Subscription listed under Manage Subscription. 
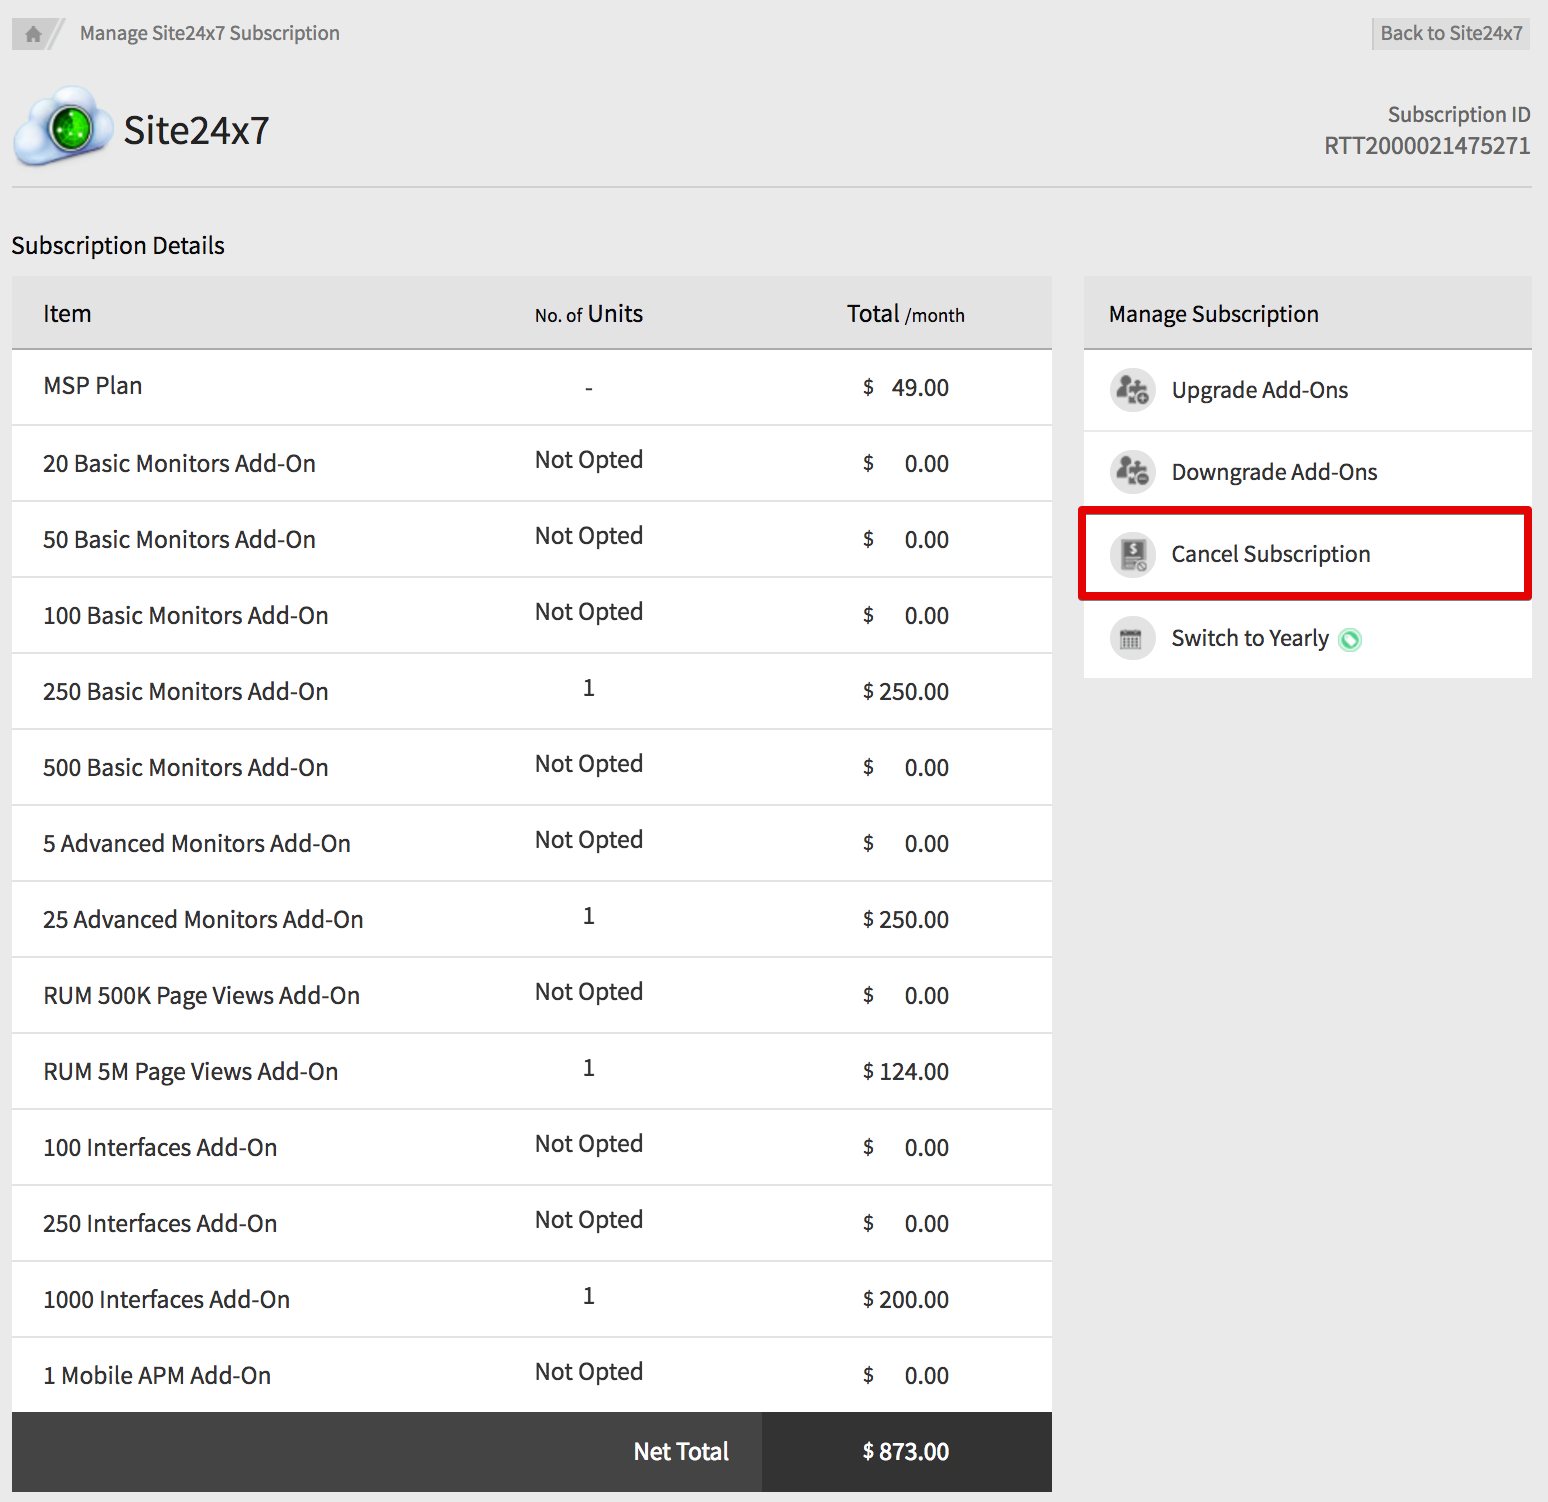
  5. In Feedback form, indicate your reason for cancellation and then click Confirm Downgrade. Mark the checkbox "Downgrade automatically at the end of the current billing cycle," if you wish to postpone the downgrade by the end of the billing cycle.
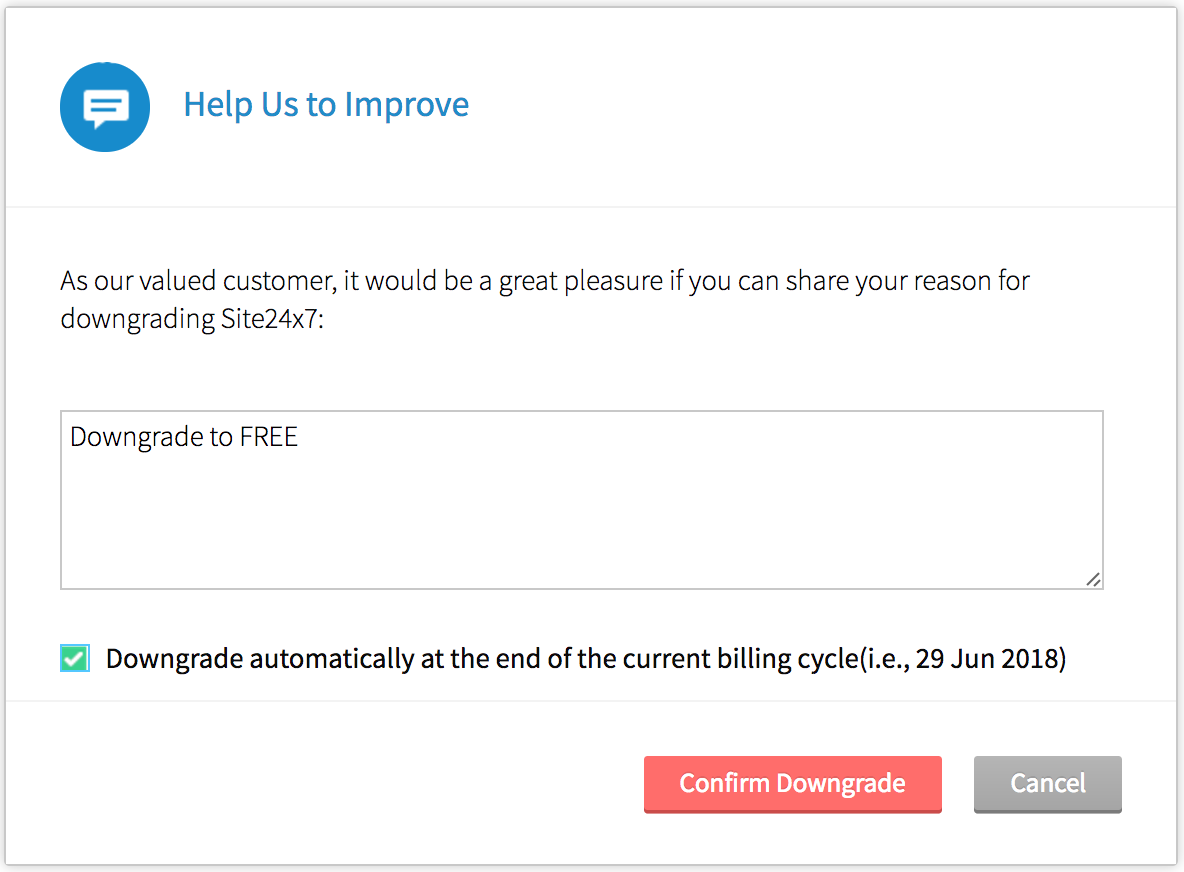
  6. If you've marked the check box "Downgrade automatically at the end of the current billing cycle", then you will be asked to either Downgrade immediately or resume the Subscription.
Was this document helpful?
Thanks for taking the time to share your feedback. We’ll use your feedback to improve our online help resources.

Help MSP Subscription