Getting started with WordPress

This article addresses the basics of getting started with the website building tool WordPress, and will address installing and using WordPress, working with page and website templates, and adding widgets and plugins to the website.

Introduction

To set up an internet website, you need to consider three aspects: administration, hosting, and design.

  • Administration: Register a domain name for the website. This is done through ICANN-accredited registrars. Popular examples include GoDaddy, Google, Name-Cheap, and BlueHost. Registering a domain name ensures that people who type in your website address will be directed to your hosting address.
  • Website location and hosting: When a website address is entered in a web browser, the user is redirected to the hosting address and location. At the hosting location, the website consists of files that are stored and accessed as webpages. These files could include text, images, videos, and code. A website is designed and hosted (stored) on a hosting provider’s infrastructure. Most domain registrars provide hosting services.
  • Website content and design: Once the domain is registered and a hosting provider is obtained, it is time to design and create the website.

    Websites used to be created using coding languages by advanced programmers. As the internet has proliferated, website creation tools, sometimes called website editors, have evolved. Some popular website building platform providers include WordPress, Wix, SquareSpace, and Network Solutions.

Getting Started

WordPress is available free for use as a self-hosted version from WordPress.org, and a hosted version for a fee from WordPress.com. Those who already have a website hosting and location provider subscription, could start with the free WordPress.org website. Limitations with the free version include fewer options in website themes and built-in plugins.

Let's explore setting up and using WordPress:

Step 1: Setting up WordPress

  • Download from https://wordpress.org/download/
  • Alternatively, register and start under “My Sites” on WordPress.com

Other options include linking WordPress from your hosting providers management interface or Control Panel. For example, the "cPanel" on Linux-based hosting providers could use the WordPress-Lite toolkit for free, if WordPress is not available as a site building option.

The scenario below describes the process for creating a free login on WordPress.com.

Step 2: Working with WordPress: Themes for websites and web pages

A website communicates various messages through its webpages. The information provided could be about a person, a company, a product, service, or an idea. The message communicated is referred to as "content". In WordPress a website is created using a combination of "pages" and "posts" to share content.

Pages are used for content that remains the same for a long time. For example, a home page, landing page, and an "About Us" page will feature contact information, and information about products or services that is not likely to change often. Posts are content that have a shorter shelf life or priority. For example, news, blog post, or an industry article.

A "Theme" is what controls the overall look and feel of a website. It is like a template for the website or webpage. A theme determines how your website will be structured, where content can be placed, where and if images and videos can be placed, the position of menus, how your website can be navigated, and what fonts and colors are used. The theme you select will also determine if features like activity tracking, search engine optimization, ecommerce, online payments and forms are possible. Themes are usually professionally designed templates that are coded with some of the above considerations in mind.

Best practice: Having the final content available for your website as you build it will help you decide what theme and template will best suit your website. For example, content with many short shelf-life messages is best implemented with a theme that has a higher focus on posts and blogs.

Themes are available for selection on WordPress under the Administration Panel My Site > My Home > Design > Themes:

On accessing the Themes page, a range of themes are available for selection.

The theme page displays:

  • Information about the theme that was selected or defaulted to:
    • Theme name
    • Customize: Permitted changes to colors, menu, fonts, etc. can be performed here.
    • Info: Provides additional details regarding the theme selected, features, capabilities, and how to add content.
  • Install Theme: This option is available if you have a subscription. It allows advanced users to upload their own themes.

WordPress has a suggested structure for building out the website, as shown below:

WordPress home site

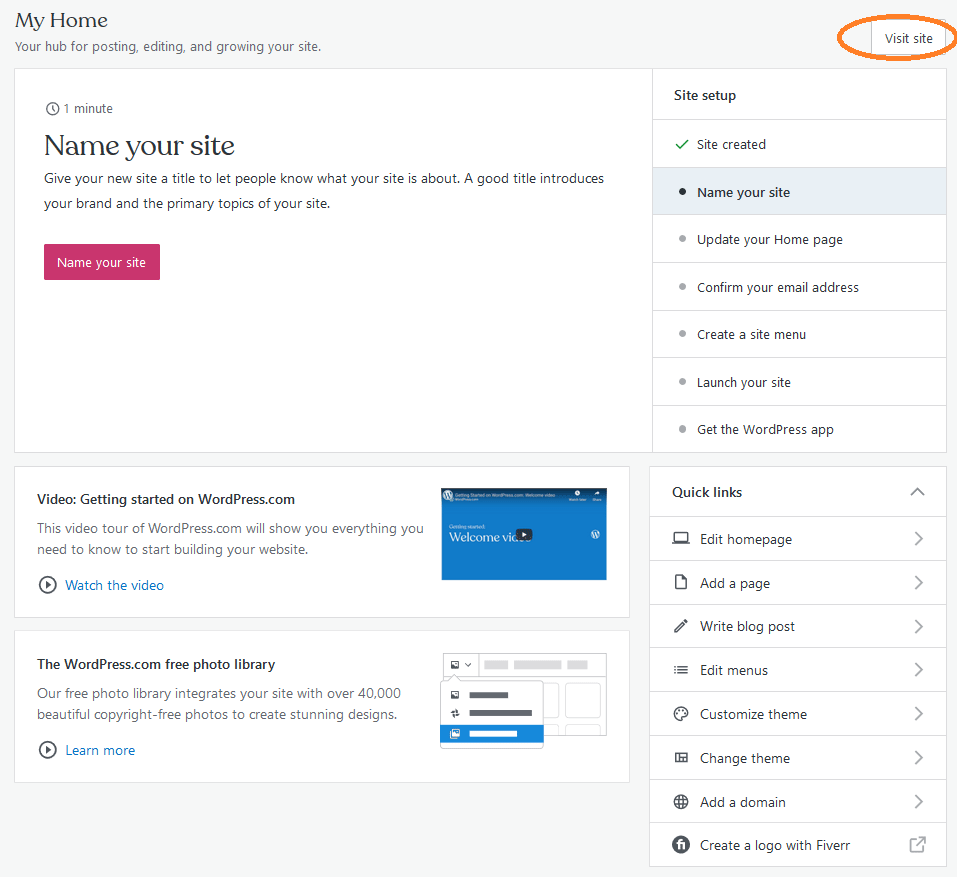
Clicking on “Visit Site” takes the administrator to the draft view of the website. This view will become the final view when you publish the site.

Step 3: Working with WordPress: Site Identity

Now that we have a theme selected, we can start giving our website an identity. While the identity parameters are optional, having them allows for a standard website structure that helps website visitors understand and navigate the website. The site identity consists of the following components:

  • Logo: If a logo is available, this can be added and it will automatically display in every page that supports Logo in the selected theme.
  • Site Title: The Site Title is displayed on the top of the page, usually in the page header based on the website theme and style chosen.
  • Tagline: The Tagline usually shows near or under the Site Title based on the website theme and style chosen. A tagline is a marketing slogan for the organization
  • Site Icon: Site Icons show on browser tabs.
  • Footer: The website footer at the bottom of a web page usually covers content to help improve usability. Content covered could include copyright, privacy policy, sitemap, logo, contact information and others.
WordPress site identity components

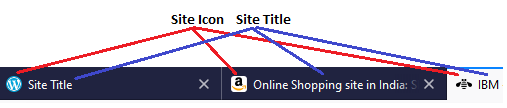
The site identity components can be accessed by following the Administrative Page My Site > My Home > Design > Customize > Site Identity

Step 4: Working with WordPress: Setting up Website Navigation

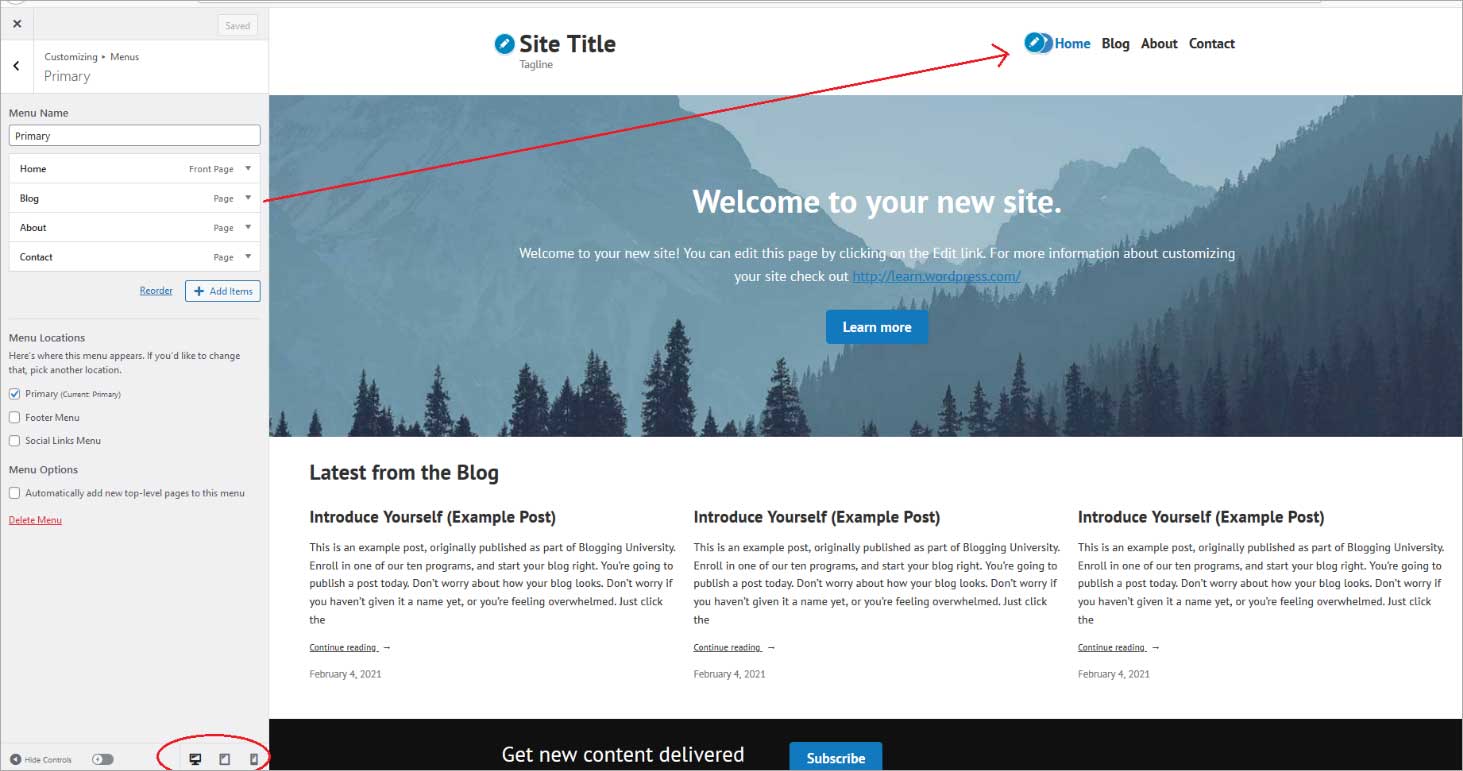
Now that we have the website identity set up, we can work on website navigation. Good website navigation helps visitors easily find the information they want, and directs them to take a required action, such as completing a form, making a call, or buying a product or service. A website that is easy to navigate allows for a smooth and satisfactory user experience and helps encourage users to visit again.

Having content created and ready helps you plan a menu structure on WordPress. WordPress offers a flexible approach and new pages can be added, moved, or removed as needed.

Create Navigation Menus

  • Menus are accessed from the Design > Customize > Menu option on the admin page “My Site > My Home”
  • Navigation menus allow visitors to browse different pages or sections on your website.
  • The menu that shows by default is as available in the selected theme. It is possible to use the "Create New Menu" to select a different menu structure if you prefer. The selection choices will be based on the design of the theme you selected. For example, in the Theme that we used as a sample on WordPress, there were two default menus: Primary and Social.
  • The theme’s primary menu has four pages: Home, Blog, About, and Contact. These are positioned on the top-right section. In our sample theme, these repeat on all pages and help guide the visitor through the website.
  • At the bottom left, three icons (circled in red in the image) can be selected to provide a sample rendering of the website as it would appear on a desktop, tablet, and mobile phone screen.
  • WordPress site
  • To Reorder the Menu, click on the ‘Reorder’ button The up, down, left, and right arrows can be selected to move the visual component to its desired location.
  • After completing the changes, click Done and Save Changes. As these changes are finished, they can be seen immediately on the draft webpage.
  • Add Items: Custom Links, Pages and Posts can be added to Menu and Navigation structure based on content and required flow, by clicking on the “Add Item” button.
  • Once added, these can be Reordered or removed as needed.
  • WordPress navigation menu

Menu Location options include:

  • Primary Menu: Based on the selected theme, usually positions the menu on the top of the webpages.
  • Footer Menu: Will insert the menu into the webpage footer.
  • Social Links: Adds Social Media links that can be configured to point to Social Media channels. For example, Facebook, Twitter, Instagram, and Pinterest. Social Links can be set up further by accessing them from the Customizing > Menus option.
  • Automatically add new top-level pages to this menu: Helps automatically add new pages that are created or inserted to the menu.
  • WordPress menu location options

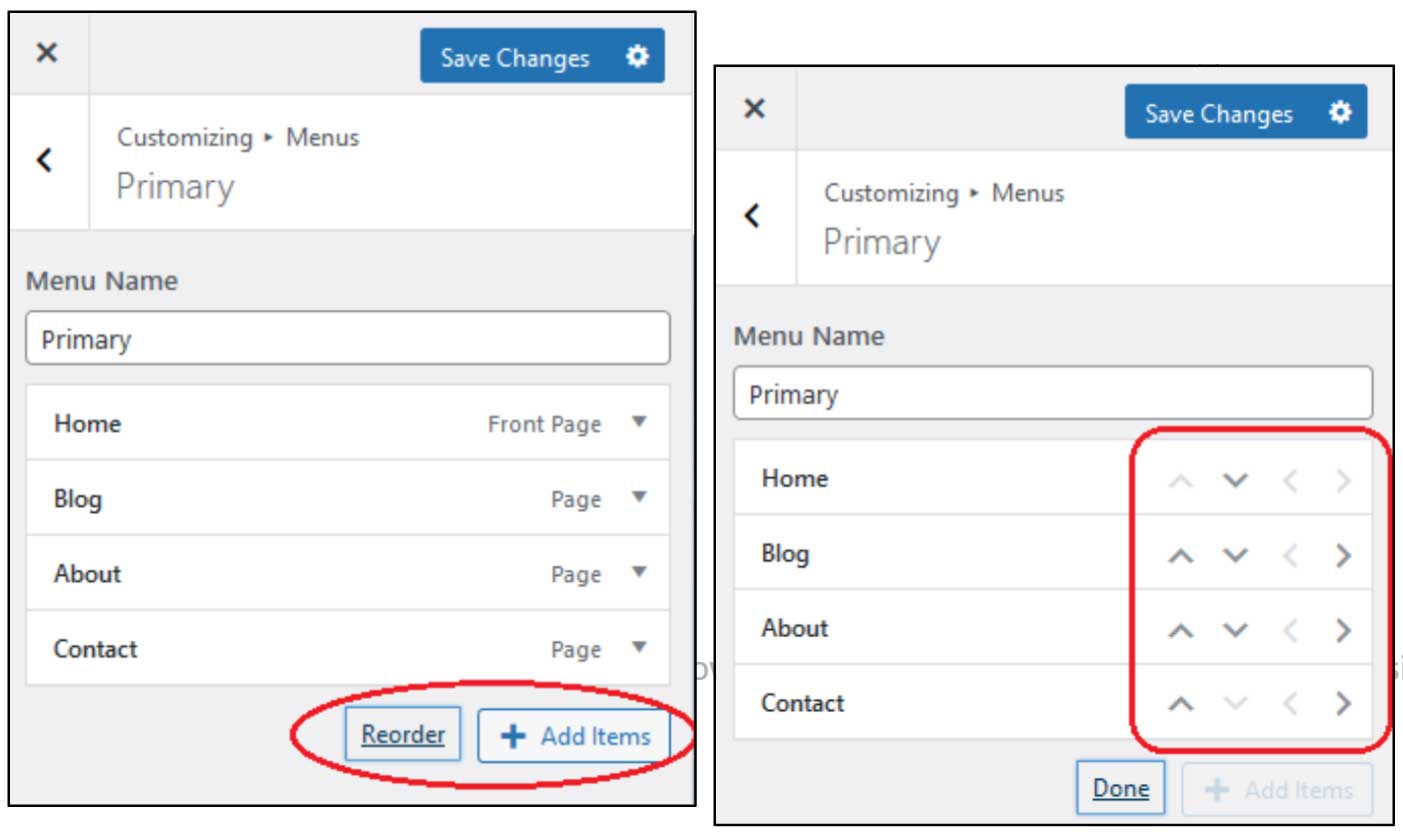
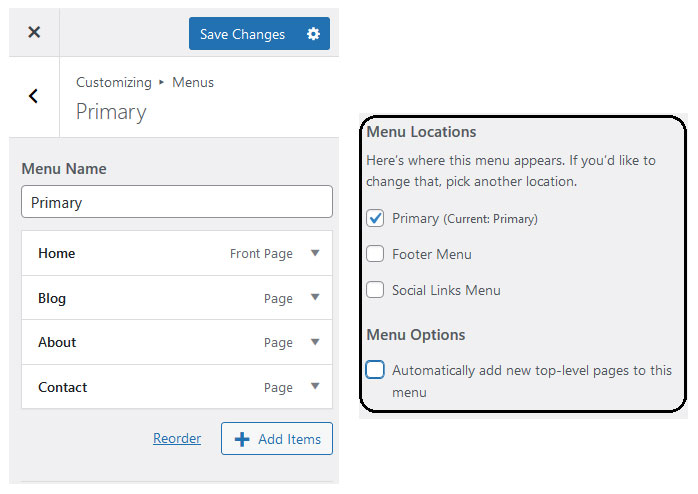
Additional information on Menus can be found on multiple internet sources including: Site Menus – Support — WordPress.com.

Step 5: Working with WordPress: Customizing and Widgets.

Once content and menus are organized, it’s time to work on:

  • Colors & Backgrounds for the website based on available flexibility built into the theme.
  • Content Options for settings, like allowing main images to repeat across pages.
  • Widgets are tools or content that can be inserted into a sidebar or footer for the website, or a specific webpage.
  • Homepage Settings control what visitors see on the homepage. For example, an administrator apply settings so that site visitors see the latest posts or land on a static page.
Customizing and widgets in WordPress

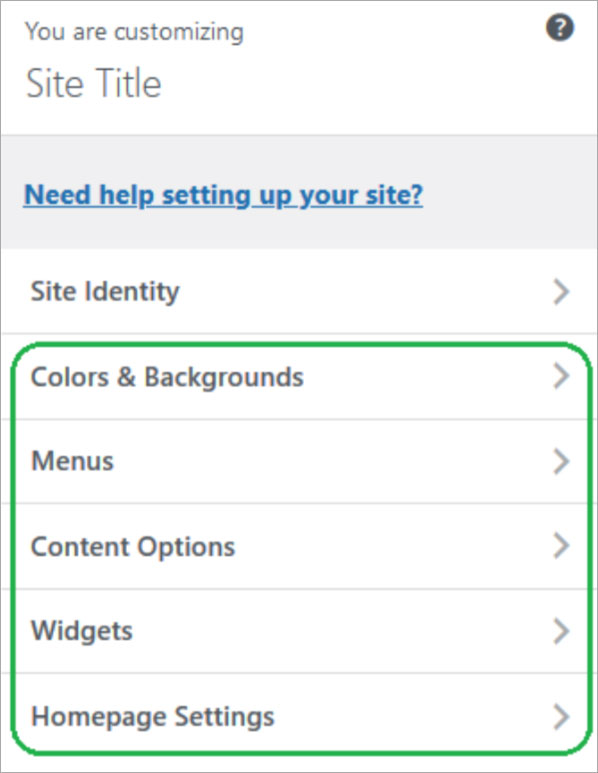
Getting a bit more hands on, let's have a look at each of the customized options:

Colors & Backgrounds

  • Allows changes to Primary, Secondary, Tertiary, Foreground, and Background colors, from a palette selection as well as possible customized colors, based on theme flexibility.
  • ABy selecting each colored circle—in the sample image the White circle is selected and is the Background Color as indicated—the background color can be changed from white to any color in the palette or a customized color could be created too, using the option “pick your own color”.
  • Similarly color selection and variations are possible for the foreground and other colors on the website.

Using “Choose a Palette” allows preconfigured color options for the website.

  • Content Options: In the sample theme used, the content option allows a featured image to be shown on pages that have an image option on the palette
  • Widgets: Tools or content that can be inserted into a sidebar or footer for the website, or a specific webpage.
  • Add a Widget: Button provides a drop-down of Widgets that are available for insertion into the website.
  • The sample theme in use allows for widgets to be inserted into the footer of the website.

Homepage Settings: Control what visitors see on the homepage. For example, an administrator could apply settings so that site visitors see latest posts or land on a static page.

  • Home Page Displays: Offers the option for the home page to be focused on “Your Latest Posts”, which means that a visitor will be first taken to the blog page in this theme. Selecting “A Static Page” directs visitors to the homepage that has been set up.
  • Homepage: This drop-down menu selection allows any other page to be selected as the home page. A new homepage can also be created using “Add new page” and assigning the new created page as the homepage.

A brief look at plugins

Plugins are applications that can be "plugged in" to your website. Plugins provide pre-coded capabilities that enable user and administrative features to be quickly set up. WordPress has a huge repository of free plugins and plugins you can buy. Choose a plugin if it adds value to your user’s experience and enhances the message you want to communicate. Typical plugins make it easy to fill in forms, upload images, track website activity by visitors, have chat boxes, ensure security, and more. Plugins are accessed by navigating on the Administrative page to My Site > My Home > Tools > Plugins

  • By clicking Plugins, a menu of available plugins is shown. The plugins can be searched by category: Engagement, Security, Appearance, and Writing. Additionally, sorting by Featured, Popular, and New is available from a search function.

Additional information on working with WordPress can be accessed from multiple sources including: Support – Official WordPress.com Customer Support

Summary

We started with the basics needed to have a website on the internet: Administration, Hosting, and Design. After understanding how to setup WordPress.com, the article focused on WordPress as a tool to help with the Design aspect of the website. We covered an overview of WordPress Design aspects like webpage and website themes, site identity, and customization of the website. In customization we explored navigation through menus, working with colors and palettes, inserting pages, widgets, and plugins.

Was this article helpful?

Related Articles

Write For Us

Write for Site24x7 is a special writing program that supports writers who create content for Site24x7 "Learn" portal. Get paid for your writing.

Write For Us

Write for Site24x7 is a special writing program that supports writers who create content for Site24x7 “Learn” portal. Get paid for your writing.

Apply Now
Write For Us