Monitor over 100 Azure resources with Site24x7's Azure monitoring tool for optimal Azure performance.
Virtual machines (VMs) must provide secure network access to servers and applications, similar to on-premises firewall appliances. In an Azure Virtual Network (VNet), secure network access is enabled by Azure network security groups (NSGs). NSGs are network layer firewalls that allow you to control inbound and outbound network traffic to and from VNet resources.
In this article, you will learn why you need NSGs and how to use them. Starting with a hypothetical scenario, you will learn how to use the Azure Command-Line-Interface (CLI), define specific security rules, and view and monitor the deployed NSGs in your Azure environment.
The purpose of a network firewall is to control incoming and outgoing traffic by protecting specific application ports — for example, port 80/443 for web applications and 1433 for Microsoft SQL Server communication.
With Azure resources, NSGs provide similar functionalities. You define a set of NSG rules that specify how two-way traffic can flow. You use a range of IP addresses from an Azure Subnet or a specific Network Interface Card (NIC) linked to a virtual machine, specify the port, and define the target resource. In most cases, the target resources will be Azure Virtual Machines running workloads, but they may also be other Azure products, such as Azure Backup or Azure App Service.
Besides restricting access to resources, NSGs can also segment network traffic. For example, you can use NSGs to limit network traffic communication between a subset of resources or resource groups, limiting network security risks and vulnerabilities.
It is also possible to enforce regulatory compliance with NSGs. For example, you can block remote access to an Azure VM through the public internet, only allowing it through a VPN-enabled source network.
To follow along with this tutorial, you will need the following:
You are deploying a web server VM running Windows Internet Information Server (IIS), hosting a web application on port 80. This VM connects to a database back-end server, running Microsoft SQL Server, on port 1433.
The web and database servers both run on their subnet, which is part of a larger Azure Training VNet. The web server subnet is called WebVMSubnet, and the database server is called DBVMSubnet
You want to allow incoming public internet traffic from anywhere to port 80/443 on the web VM.
Note: While allowing only port 443/HTTPS is recommended, imagine a scenario where you want to allow port 80/HTTP to perform a redirection to port 443/HTTPS from within the web application itself.
You also want to allow SQL Server database communication only from the WebVM Subnet to the Database Server Subnet.
Outgoing traffic from the VMs to the public internet is only allowed on ports 80 (HTTP) and 53 (DNS).
Finally, Remote Desktop Protocol (RDP) traffic to the VMs is only permitted from a specific Remote Management Subnet.
The diagram below illustrates the scenario.
 Fig. 1: Visualization of the tutorial’s scenario
Now, look at how to create NSG rules to meet the requirements in the scenario above.
First, you need to have the necessary network building blocks in place. Run the following Azure CLI command, adding your resource group name and location:
az group create \
--resource-group AzTrainingRG \
--location eastus
This command creates a new Azure resource group in your location of choice.
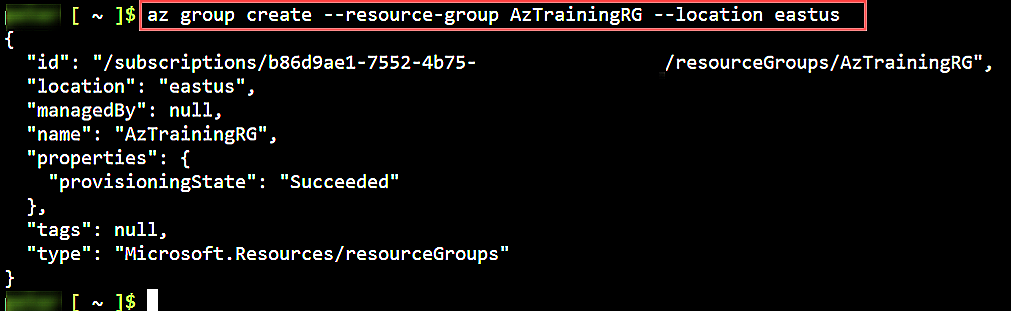 Fig. 2: Azure resource group creation
Create the Virtual Network address range with the three subnets:
az network vnet create \
--name AzTrainingVNet \
--resource-group AzTrainingRG \
--location eastus \
--address-prefix 10.0.0.0/16 \
--subnet-name FrontEndNetwork \
--subnet-prefix 10.0.0.0/24

az network vnet subnet create \
--resource-group AzTrainingRG \
--vnet-name AzTrainingVNet \
--name BackEndNetwork \
--address-prefix 10.0.1.0/24

az network vnet subnet create \
--resource-group AzTrainingRG \
--vnet-name AzTrainingVNet \
--name RemoteMgmt \
--address-prefix 10.0.100.0/24
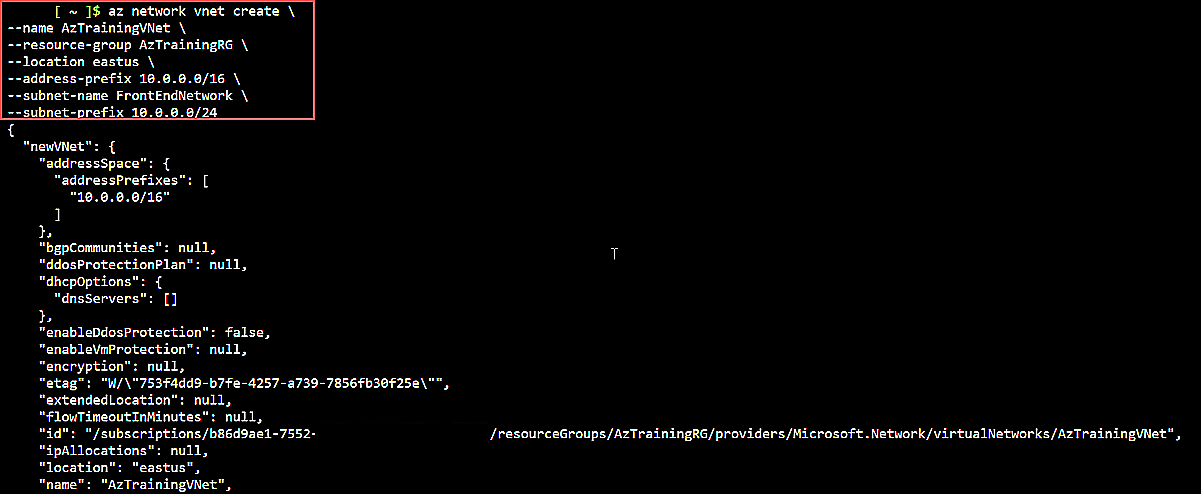 Fig. 3: Azure Virtual Network creation
All details regarding the completed deployment are shown in the JSON-output. The same is available from the Azure Portal. Navigate to the Resource Group, which holds the Virtual Network resources, or search for Virtual Network in the search resources field. Select the Virtual Network, and select the Subnets section.
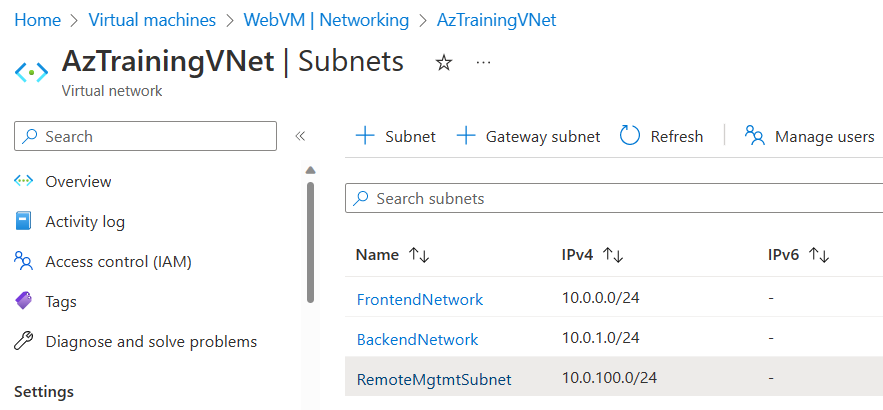 Fig. 4: Virtual Networks subnets listings from the Azure Portal
With the network components in place, you can now create the network security group rules.
First, create the NSG rule. Next, run a second series of commands to create the NSG rule specifications and define the allow/deny traffic ports and the source and destination parameters. Note that you must create the NSG in the same Azure region that the network resources are in.
Create a new network security group:
az network nsg create \
      --resource-group AzTrainingRG \
      --name sampleNSGRule
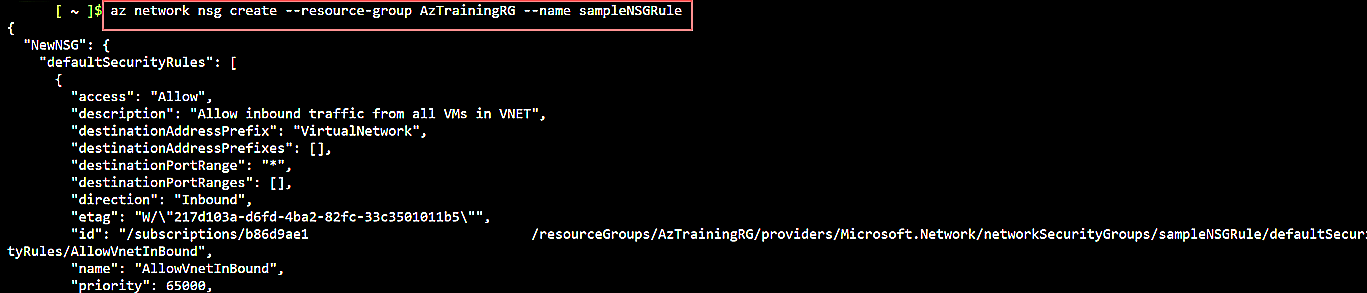 Fig. 5: Create a new network security group
This command creates the initial NSG, together with several default network rule policies. Each of these rules must be given the lowest priority of 65000/65001/65500 to ensure they won’t conflict with your custom rules.
This default rule policy is also visible when you open the network security group resource from the Azure Portal, as shown below:
Fig. 6: Default network security group rule policy view from the Azure Portal
With the default NSG rule in place, you can now continue integrating your sample scenario-specific requirements.
Update the NSG rule to allow incoming port 80/HTTP and 443/HTTPS to the FrontendNetwork.
The Azure CLI command looks similar to this:
az network nsg rule create \
--resource-group AzTrainingRG \
--nsg-name sampleNSGRule \
--name allow-http-https \
--priority 100 \
--direction Inbound \
--source-address-prefixes '*' \
--source-port-ranges '*' \
--destination-address-prefixes '10.0.0.0/24' \
--destination-port-ranges 80 443 \
--protocol Tcp
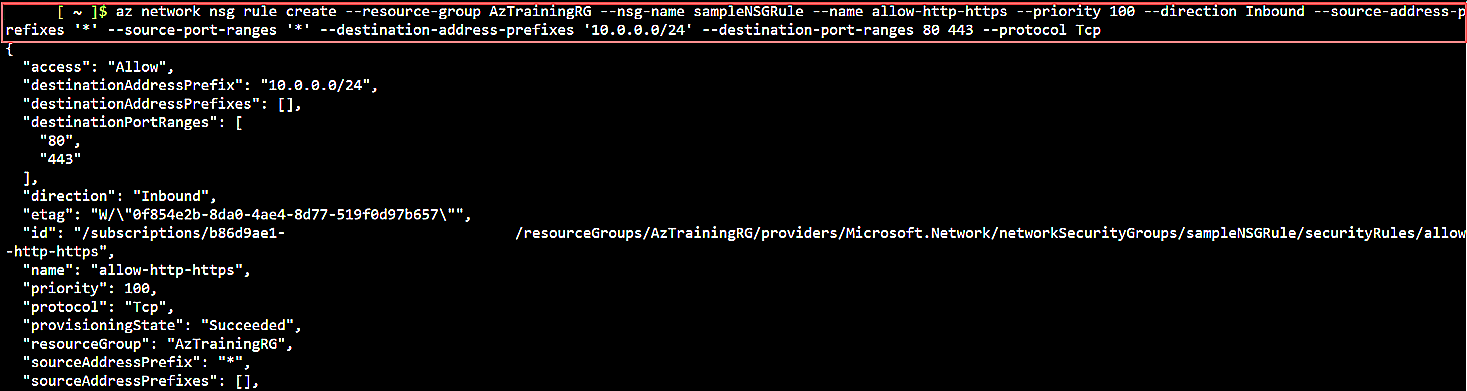 Fig. 7: Azure CLI command to create the network security group rule
Continue with an additional NSG rule policy that limits incoming RDP and SSH port traffic to the remote management subnet. Here’s the Azure CLI command:
az network nsg rule create \
--resource-group AzTrainingRG \
--nsg-name sampleNSGRule \
--name allow-rdp-ssh \
--priority 200 \
--direction Inbound \
--source-address-prefixes '10.0.100.0/24' \
--source-port-ranges '*' \
--destination-address-prefixes '10.0.0.0/24' \
--destination-port-ranges 3389 22 \
--protocol Tcp
This code gives the following output:
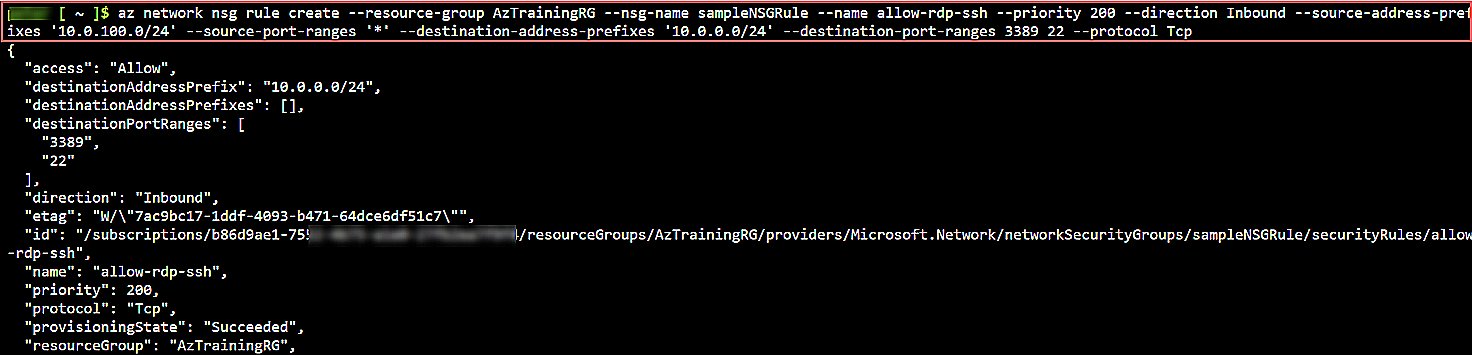 Fig. 8: Output of the Azure CLI command setting your NSG rule policy
Accordingly, the following command establishes the configuration of the SQL-Server port traffic from FrontendNetwork to BackendNetwork:
az network nsg rule create \
--resource-group AzTrainingRG \
--nsg-name sampleNSGRule \
--name allow-sql \
--priority 300 \
--direction Inbound \
--source-address-prefixes '10.0.0.0/24' \
--source-port-ranges '*' \
--destination-address-prefixes '10.0.1.0/24' \
--destination-port-ranges 1433 \
--protocol Tcp
Here’s the output of this command:
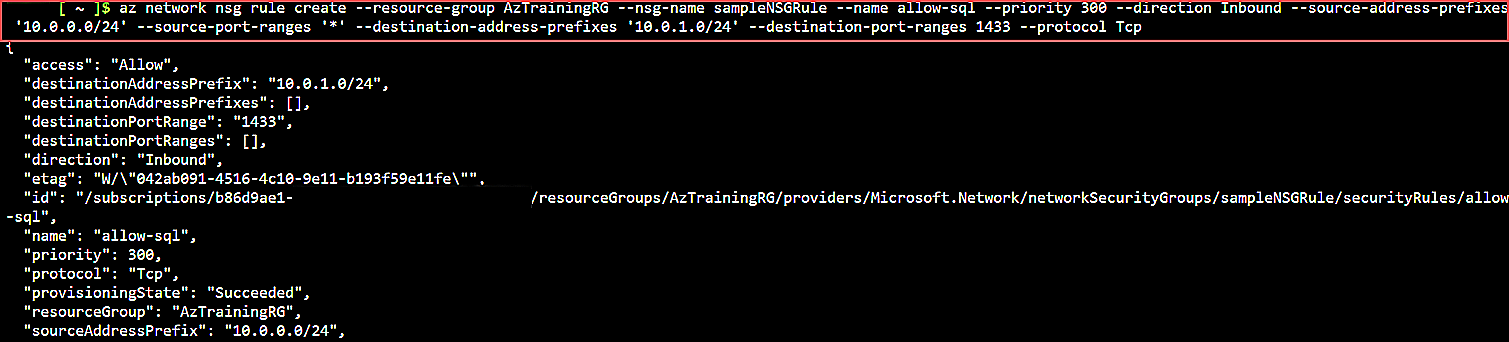 Fig. 9: Azure CLI Command specifying the SQL-Server port traffic configuration
With that, you have now created the necessary inbound NSG rules.
Finally, close the necessary outbound NSG rule, which only allows outbound traffic from VMon ports 80 and 53:
az network nsg rule create \
--resource-group AzTrainingRG \
--nsg-name sampleNSGRule \
--name allow-outbound-internet \
--priority 100 \
--direction Outbound \
--source-address-prefixes '*' \
--source-port-ranges '*' \
--destination-address-prefixes 'Internet' \
--destination-port-ranges 80 53 \
--protocol Tcp
This code gives the following output:
 Fig. 10: Output of the command specifying the outbound NSG rule
In this last rule, note that you can reuse priority-level 100 since you’re defining an outbound rule. Next, you could also use the predefined service tag Internet as a parameter of the destination-address-prefixes.
In the previous section, you learned how to create new NSG rule policies and control custom incoming and outgoing network traffic. It’s also possible to make changes to existing NSG rules, as well as delete them.
Updating an existing NSG Rule policy relies on the az network nsg rule update command. Update the rule to allow all outgoing traffic to reach the public internet instead of only ports 80 and 53, as currently configured:
az network nsg rule update \
--resource-group AzTrainingRG \
--nsg-name sampleNSGRule \
--name allow-outbound-internet \
--priority 100 \
--direction Outbound \
--source-address-prefixes '*' \
--source-port-ranges '*' \
--destination-address-prefixes 'Internet' \
--destination-port-ranges '*' \
--protocol Tcp
Validating this updated change from the Azure Portal network security group blade details looks like this:
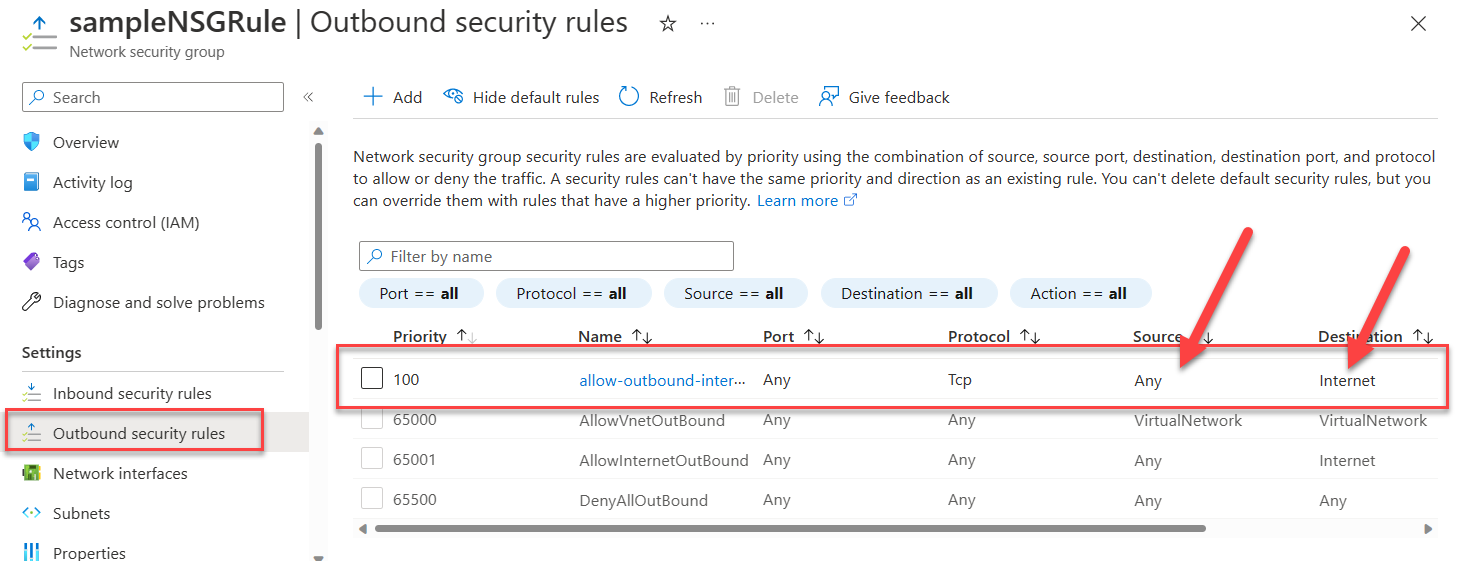 Fig. 11: Network security group details in the Azure portal
In the previous steps, you learned how to create a new Network Security Group and specify the correct source and target IP-address ranges and allow/deny settings for each NSG rule.
However, it’s also possible to integrate an existing or new NSG, and attach it to an Azure Virtual Network (VNet) subnet, or directly attaching it to an existing VM Network Interface Card (NIC).
The Azure CLI syntax to do this looks as follows for attaching the NSG SampleNSGRule to the FrontEndSubnet:
az network vnet subnet update \
--resource-group AzTrainingRG \
--name FrontEndSubnet \
--vnet-name AzTrainingVNet \
--network-security-group sampleNSGRule
Or using this CLI syntax to attach the existing NSG SampleNSGRule to the NIC of a VM:
az network nic update \
--resource-group AzTrainingRG \
--name WebVMNic \
--network-security-group

az network nic update \
--resource-group AzTrainingRG \
--name WebVMNic \
--network-security-group sampleNSGRule
Note: Although both commands show the update action, it’s also possible to attach an existing NSG during the creation of the subnet or NIC using the az network nic create or az network subnet create syntax, respectively.
NSGs in Azure allow cloud customers to manage network traffic to and from virtual network-linked Azure resources and other Azure resources. An Azure NSG can be associated with an Azure Subnet, but a more granular configuration is possible by associating the NSG with an individual VM NIC.
Starting with a default set of traffic rules, NSGs provide fine-grained configuration options. Common scenarios include:
NSGs enable a detailed but manageable approach to setting up a firewall-network layer similar to a traditional data center. The configuration, management, and monitoring are comparable to Azure resources like the Azure CLI, Azure Portal, or other Infrastructure as Code (IaC) tools.
Site24x7 monitors Azure Virtual Networks, VMs, and subnets, tracking key metrics like network throughput, latency, and availability. This helps you assess the health of resources protected by NSGs and identify connectivity issues that may stem from misconfigured security rules.
Yes, Site24x7 monitors the performance and reachability of your Azure resources. If an NSG rule blocks legitimate traffic and causes connectivity failures or degraded performance, Site24x7 detects the impact and sends instant alerts via email, SMS, or third-party integrations.
Site24x7 offers comprehensive monitoring for Azure VMs and Virtual Networks, allowing you to correlate network security policies with overall resource performance and availability.